• Home
  • Blog
  • About Me
    • Contact Me
      • Advertise
      • Privacy Policy
  • Shop

The Wood Grain Cottage

  • Seasonal
    • Spring
    • Summer
    • Fall
    • Winter
  • Project Gallery
    • Remodeling
    • DIY Projects
    • Decorating Ideas
    • Furniture Makeovers
    • Sewing
    • Gardening
    • Recipes
    • Organizing
  • Home Tour
    • Our Current House
    • The Original Wood Grain Cottage
  • Shop Our Home
    • My Amazon Storefront
DIY· Projects· Remodeling

How We Installed Our Floating Vanity

July 30, 2019

When we were looking at vanity options for the hall bathroom, I kept going back to the idea of having a floating vanity. I liked the subtle, modern vibe it would add to the bathroom with some of the more traditional items we’d be incorporating as well. I also wanted a vanity that had a thicker top, so when I found this one, I was basically sold. It was the right size, the right color, the right style, and the right price. 

Today, I wanted to share how we installed our floating vanity. While it should have probably been easier than it was, we finally got it installed and anchored to the wall. It’s not going anywhere, that’s for sure. 

Right out of the box, the vanity had brackets that were meant to be attached to a screw in the wall or studs. But because our studs didn’t line up with the vanity brackets, we needed to attach anchors into the wall.  This vanity is heavy… we needed to make sure it wasn’t going anywhere. 

How We Installed Our Floating Vanity by The Wood Grain Cottage

The brackets were also set back from the very back of the vanity, so we cut down a leftover piece of plywood to match the difference, which was  3/4″. We were able to then secure the plywood to each and every stud where the vanity would eventually hang…

How We Installed Our Floating Vanity by The Wood Grain Cottage

Then, because we’d tried two different high weight ranked anchors to hold the vanity up (that failed to do the job), we used a left over rail from our Ikea cabinets. These rails are incredibly handy. We just screwed the rail wherever there was a stud.

How We Installed Our Floating Vanity by The Wood Grain Cottage

This worked like a charm and it definitely wasn’t going to pull out of the wall like the other anchors we’d tried. The rail also had a groove that the bracket on the vanity would sit perfectly on…

How We Installed Our Floating Vanity by The Wood Grain Cottage

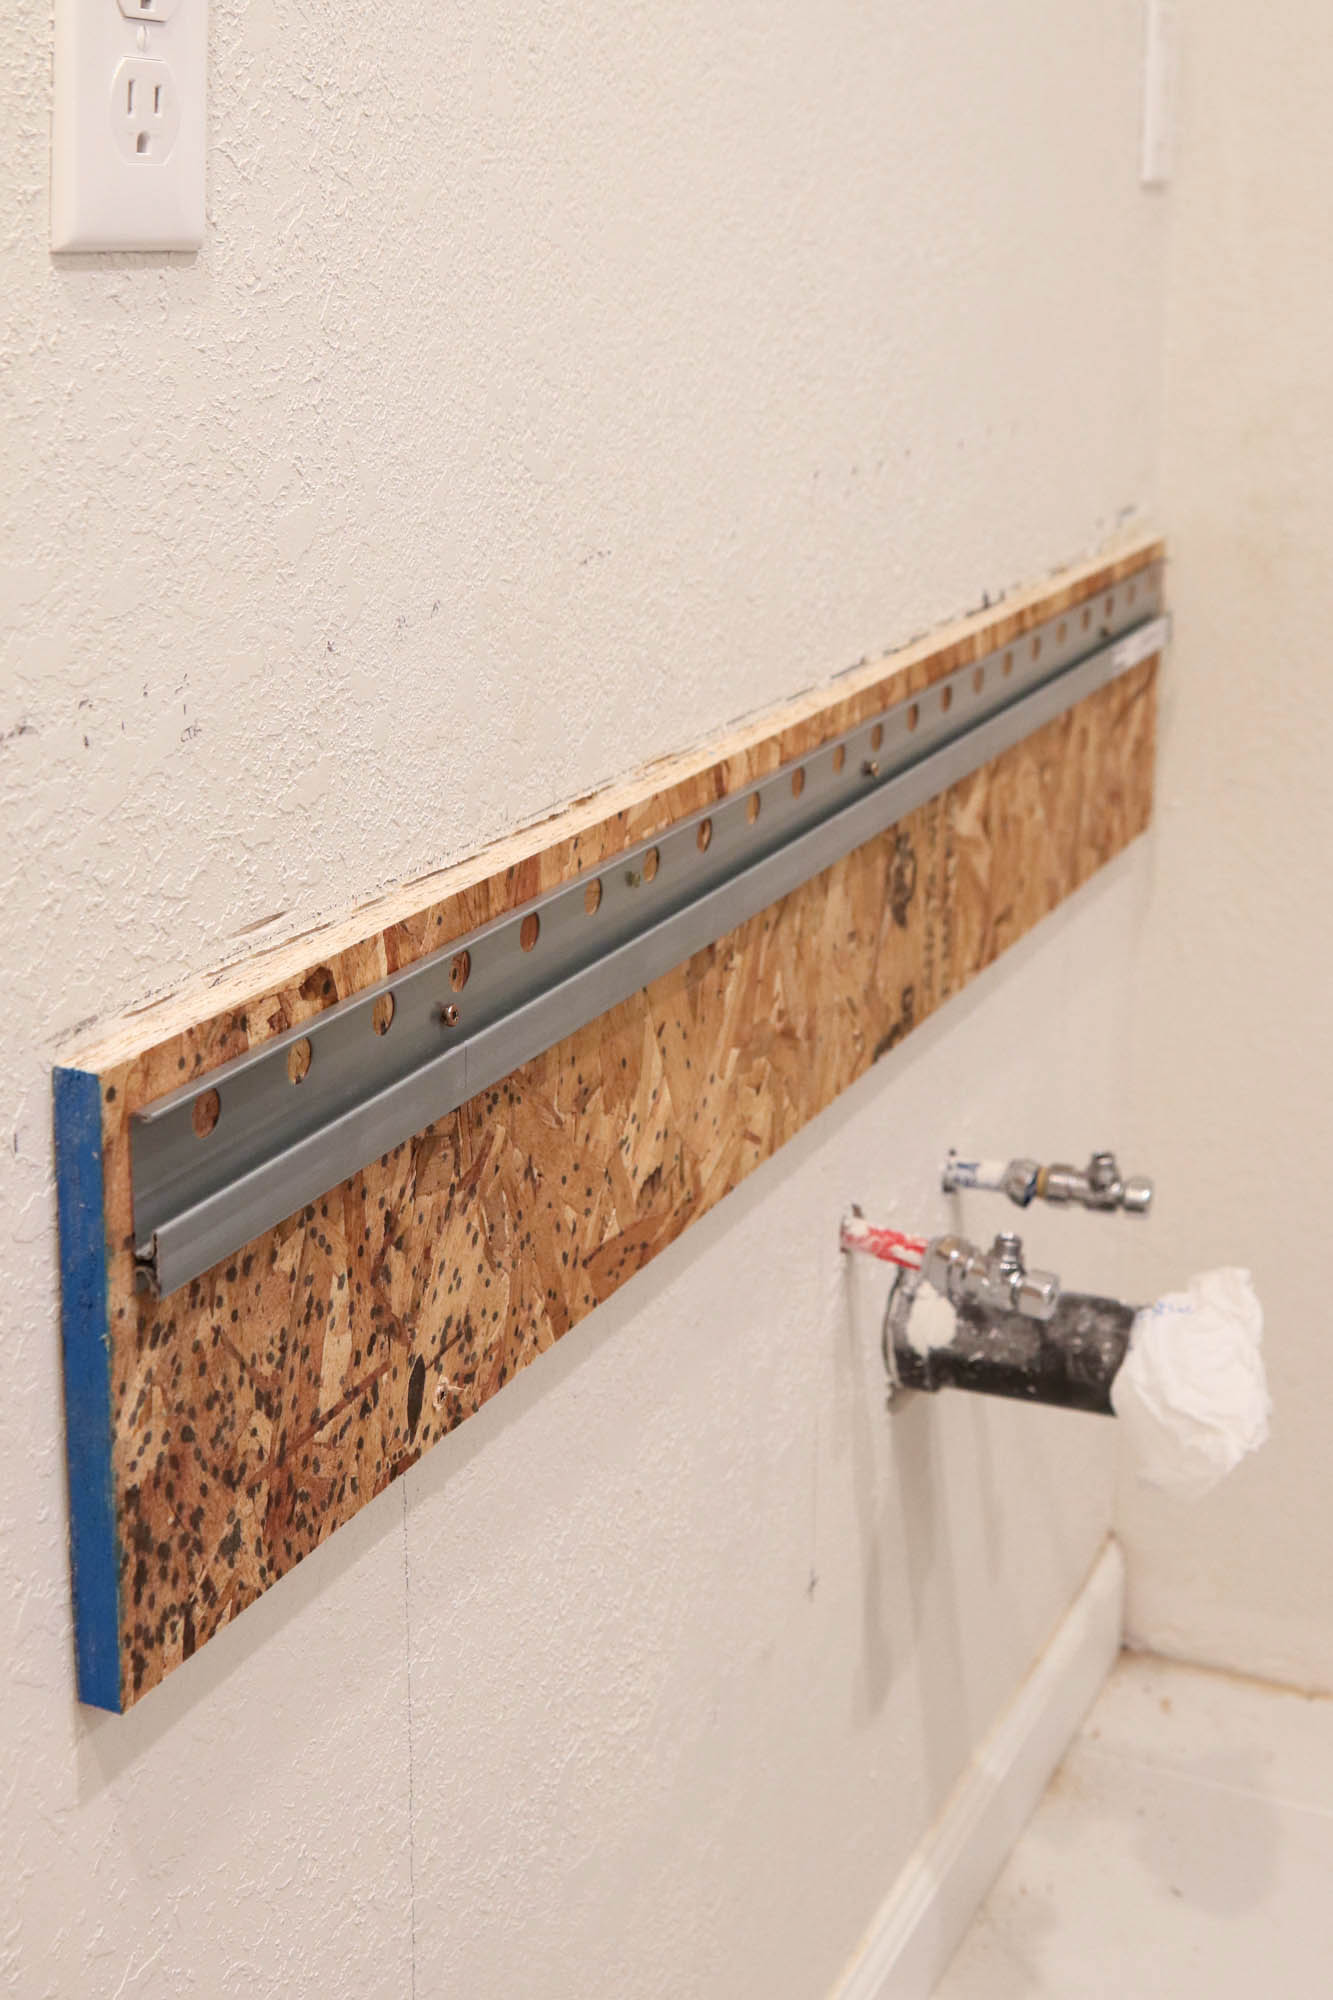
Then, we lifted the vanity up onto the rail and tightened the bracket that was included with the vanity…

How We Installed Our Floating Vanity by The Wood Grain Cottage

We used our level to make sure the vanity was sitting correctly, then we did another round of tightening on the brackets…

How We Installed Our Floating Vanity by The Wood Grain Cottage

To be extra safe, we also used screws to attach the very back piece of the vanity into the plywood and wall… This thing isn’t going anywhere, and that’s good because like I’ve mentioned, it’s really quite heavy…

How We Installed Our Floating Vanity by The Wood Grain Cottage

We also held the vanity off the side wall about 1.5″ to make sure the drawers would open up with the door trim we’d be installing. 

How We Installed Our Floating Vanity by The Wood Grain Cottage

Next up, we needed to install the actual countertop. Before we did that, I took a vacuum to the vanity and removed any wood particles…

How We Installed Our Floating Vanity by The Wood Grain Cottage

Then, we followed the directions they sent with the vanity. We used clear silicone and ran a bead down any area the countertop would sit against…

How We Installed Our Floating Vanity by The Wood Grain Cottage

I tried not to apply too much, that way it didn’t squeeze out onto the cabinet, but just enough that we’d get a solid hold…

How We Installed Our Floating Vanity by The Wood Grain Cottage

How We Installed Our Floating Vanity by The Wood Grain Cottage

Then, we carefully placed the countertop on top of the silicone…

How We Installed Our Floating Vanity by The Wood Grain Cottage

And just like that, our vanity was installed and ready for plumbing!

How We Installed Our Floating Vanity by The Wood Grain Cottage

My plan is to replace the hardware it originally came with for something that has a brass finish. I think it will make for a lovely contrast and add a little warmth. I love how it looks with our tile, and I can’t wait to start adding some of the other fun touches we’ll be incorporating in here!

The countertop is a true, bright white and has a smooth finish. We honestly love it.

How We Installed Our Floating Vanity by The Wood Grain Cottage

The sink is also molded into the countertop, so it’s all one big unit. It’s such a statement piece too, with the thickness of the top.

How We Installed Our Floating Vanity by The Wood Grain Cottage

I was also excited about the storage space and soft close doors and drawers. Those are all big wins.

How We Installed Our Floating Vanity by The Wood Grain Cottage

After the vanity was mounted, we added the sconce lighting, the mirror and all of the plumbing fixtures. It’s all come together so beautifully, I can’t wait to show you where we’re at today… even if we’re still not completely done!

I’m Shayna… The small town Colorado girl who’s obsessed with home and everything that entails! I’m a creative, a decorator, a day dreamer, a huge fan of scones and I’m passionate about loving where I live and making a home.

Tagged with: bathrooms, willow house11 Comments

Comments

  1. Debi says

    July 30, 2019 at 10:21 AM

    I love this! Y’all are so clever, coming up with solutions to hard problems. I definitely think the brass hardware will look richer!

    Reply
  2. Laura says

    July 30, 2019 at 6:23 PM

    Looks great! I can’t wait to see the finished room! Please be sure to give us all the info on the fixtures. The new vanity and top are really pretty!

    Reply
  3. Cindy N. says

    July 31, 2019 at 6:01 AM

    Well done! Excited to see more!

    Reply
    • sanlu says

      September 9, 2020 at 5:11 AM

      the plug outlets are driving me crazy. Instead of hitting a stud you should have done hollow wall outlets and set them an equal width apart. It looks terrible.

      Reply
      • Shayna says

        September 15, 2020 at 4:27 PM

        Thanks for the feedback. For some reason these pictures make the outlets look offset from what they are in real life.

        Reply
  4. Gwen says

    July 31, 2019 at 8:41 PM

    Stunning!!! I like these ideas you have and are using that you say “easy” but are very complicated to me!!! That everything is level and installed is a wonderful nod to your skills.

    Reply
  5. S M Moniz says

    August 2, 2019 at 7:14 AM

    How happy I am when I open my emails everyday and see your posts!
    Missed them when you were not there!
    I just love love love…!!!
    I always struggled with style! Didn’t know exactly what mine was!
    Since reading and seen your posts from wood grain cottage from long ago and now, I found out my style “translated “!
    Well done! You inspires-me!
    Love,

    Reply
    • Shayna says

      August 2, 2019 at 11:52 AM

      Thank you for sharing that with me! I’m so happy I helped you find your style! 🙂

      Reply
  6. amanda says

    November 12, 2020 at 10:04 AM

    Hello, how thick is this counter top? I love the look.

    thanks

    Reply
    • Shayna says

      November 12, 2020 at 5:12 PM

      Thank you! The countertop is 4″ thick! It’s such a great look!

      Reply

Trackbacks

  1. An Update On Our Master Bathroom - The Wood Grain Cottage says:
    March 24, 2020 at 10:53 AM

    […] installing our floating vanity with our tried and true method. You can see our tutorial for that here. Even though this one wasn’t nearly as heavy as the vanity in our hall bathroom, floating […]

    Reply

Leave a Reply Cancel reply

Your email address will not be published. Required fields are marked *

This site uses Akismet to reduce spam. Learn how your comment data is processed.

I’m Shayna… The small town Colorado girl who’s obsessed with home and everything that entails! I’m a creative, a decorator, a day dreamer, a huge fan of scones and I’m passionate about loving where I live and making a home.

Join our newsletter

Search:

Join our newsletter

This past weekend we hit our 2021 house project go This past weekend we hit our 2021 house project goals HARD! With all the bedroom trim done (hallelujah!), we’ll be painting and installing closet doors next! 👏🏻  I always look forward to crossing projects off the list... and finishing our trim has been on there waaaay too long! 😵  #thewoodgraincottage #thewgc #houseremodel #kitchenshelves
Oh those beautiful, twinkling lights... they’re Oh those beautiful, twinkling lights... they’re my favorite! On the blog I’m joining several bloggers and we’re all sharing our night home tours!  If you love the warm twinkle of Christmas lights, you’ll love these beautiful tours! 🎄🌟  #thewoodgraincottage #thewgc #christmastree #christmasdecor #christmasstockings #christmasnightstour #christmasatnight
Our red, white and gold Christmas home tour is on Our red, white and gold Christmas home tour is on the blog! 🎄🌟  This year has been such a fun and special time with the addition of our sweet Ania. She makes us even more excited for Christmas than normal and adding her stocking with ours made my momma heart burst. ❤️  See more of our home on the blog, and be sure to visit all the other beautiful homes on the tour as well!  #thewoodgraincottage #thewgc #christmasdecor #christmashometour #christmastree #christmasdecorations #christmas #christmashome
Next week I’m sharing our Christmas home tour, b Next week I’m sharing our Christmas home tour, but in the meantime, I’ve been spreading Christmas cheer throughout the house! On the blog, I’m sharing my favorite, simple decorating ideas you can incorporate into your home... with the items you already own!  They’re guaranteed to help you add a festive touch to your home! 🎄🌟  #thewoodgraincottage #thewgc #christmasdecor #christmasdecorating #christmasdecorations #easychristmasdecor #christmas
Current mood: Sitting by the Christmas tree lookin Current mood: Sitting by the Christmas tree looking at those pretty twinkling lights! It’s my favorite thing about having the tree up!  #thewoodgraincottage #thewgc #christmasdecor #christmastree #christmastreelights #redchristmasdecor
Happy Thanksgiving! Wishing you a wonderful day ce Happy Thanksgiving! Wishing you a wonderful day celebrating everything we have to be grateful for! My list is long and may I never forget how blessed I am!  #thewoodgraincottage #thewgc #thanksgivingdecor #thanksgivingtable #thanksgivingtablescape
  • Facebook
  • Instagram
  • Pinterest
  • Twitter
  • Shop
  • Email
Copyright © 2021 The Wood Grain Cottage · Custom site by Moonsteam Design · Privacy Policy