
Our Brick Fireplace Makeover
I’m sharing our brick fireplace makeover. What was once a really dated fireplace, is now updated and fresh thanks to paint and new trim work.
Even though you’ve seen several finished pictures of our brick fireplace makeover, I wanted to share the process of how we got here.
If I’m honest, of all the rooms in our house that we’ve remodeled, this room was the easiest and most cost effective. And the results are some of the most dramatic.
If you’ve been following my blog for any length of time, you know how much I love paint. The power of paint never ceases to amaze me and I’d be lying if I wasn’t captivated by how easy it is to completely transform whatever it is you’re working on.
A brick fireplace included.
Our Brick Fireplace Makeover
Before I show you our steps for the full makeover, let’s look back at where we started…
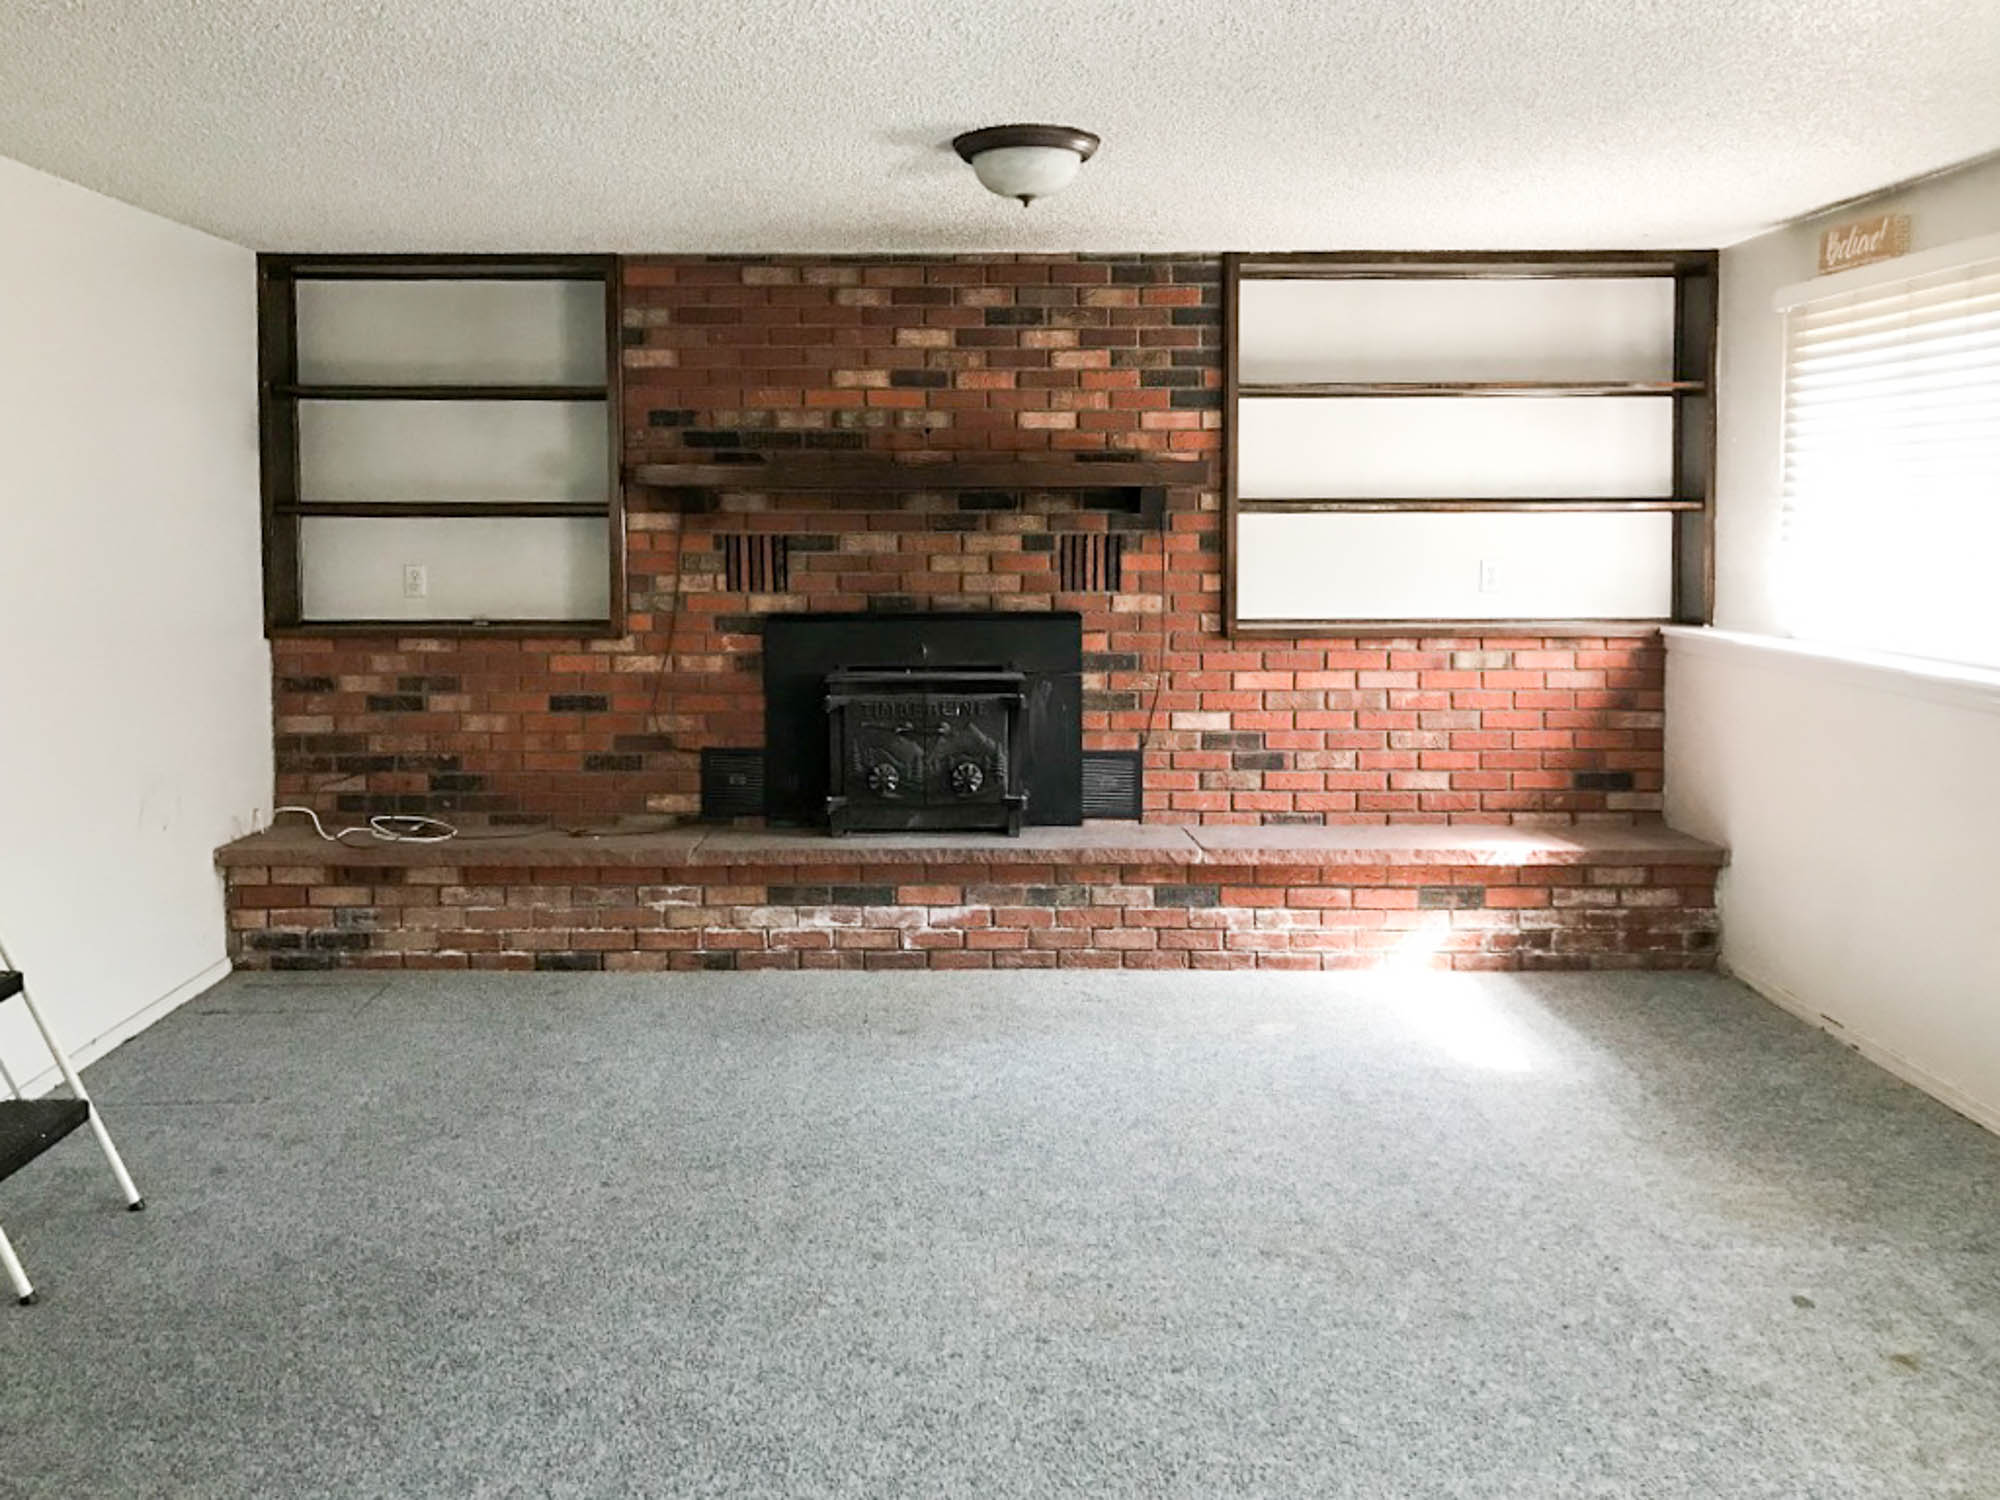
When we bought the house, we had a fireplace/chimney specialist come look at the current set up, clean the chimney and make sure we’d be good to remove the existing fireplace insert, convert the fireplace back into a wood fireplace and cover the old vents that would no longer be needed once we removed the fan.
He inspected everything and gave us the go ahead. We were thrilled to know we weren’t stuck with the original setup.
Painting Our Brick Fireplace
The first step to our makeover, was painting the brick fireplace. After doing a bit of research, I decided to paint the brick with a lime wash paint. It’s specifically designed to be used on brick and it lets the brick continue to breathe, which is something I just learned about with brick.
For the color, I chose Avorio White. It’s not a stark white, but rather a creamy white. It’s a very nice color.

I followed the directions on the bucket and mixed up the lime paint in one of the only “buckets” I could find laying around, this plastic trash can…
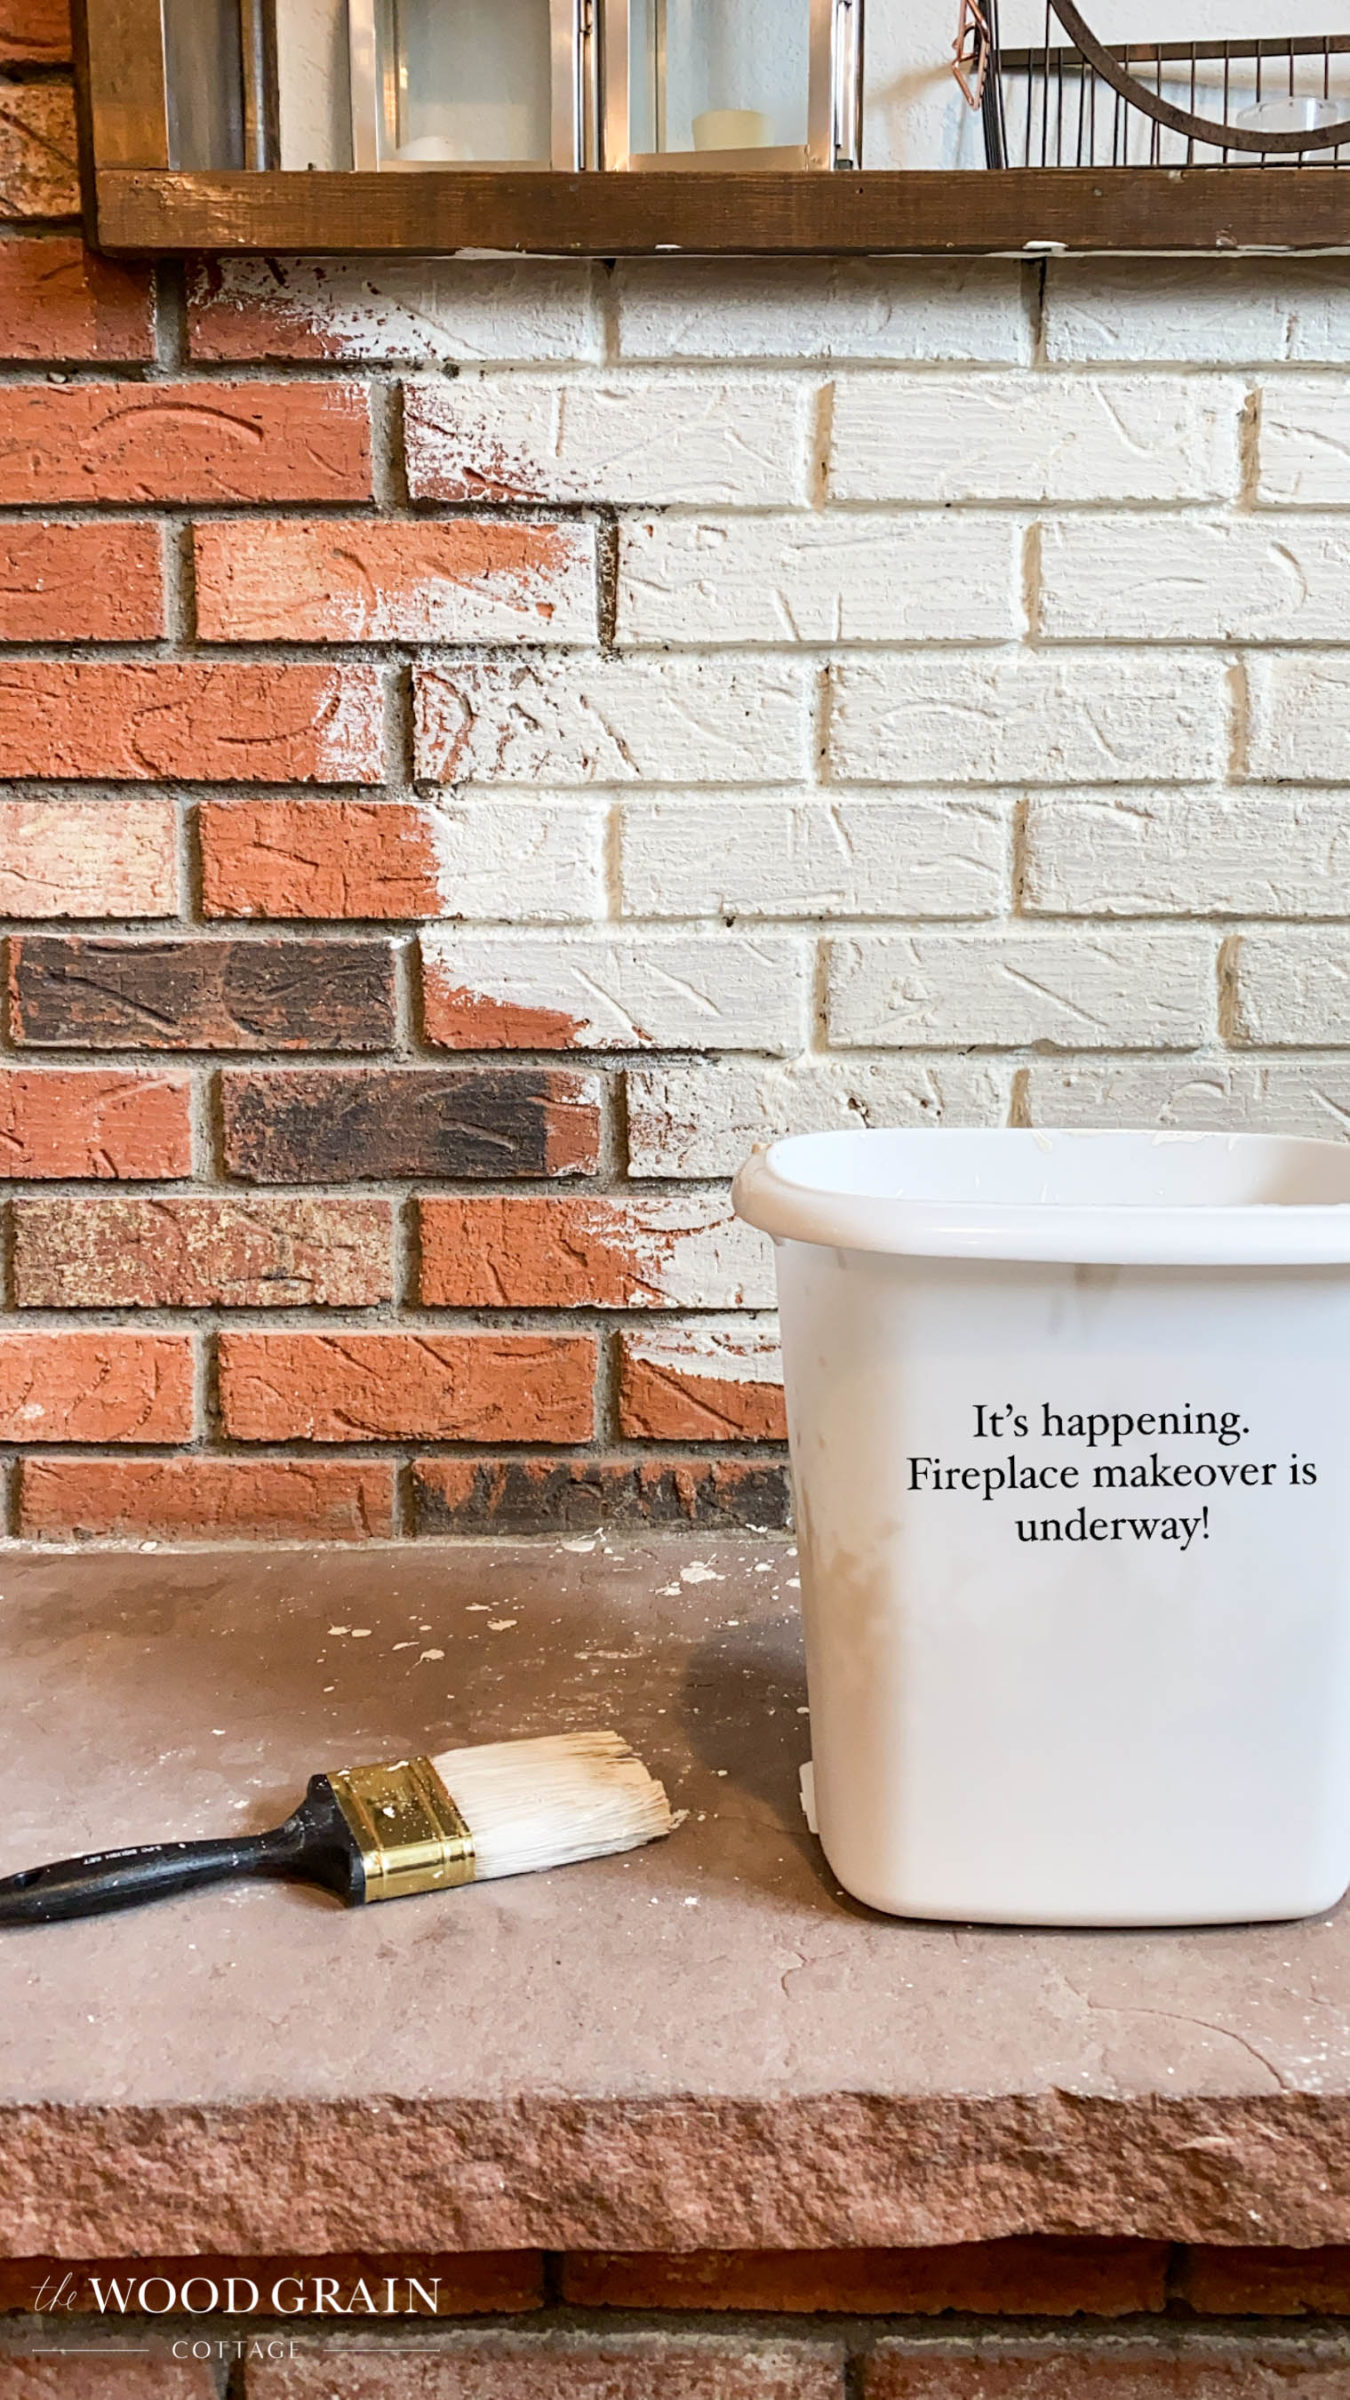
I used a measuring cup to scoop out the paint concentrate, then poured in water. I used our drill with a paddle attachment to mix them. I highly recommend using this method. It perfectly blends the two together giving you a really nice consistency.
I didn’t really have a set ratio, but instead I went by the mixed consistency once it was blended. You don’t want it too thick, but you also don’t want it too runny. I compared mine to a pancake batter. If you want to stretch the concentrate a little further, you can aim for a waffle batter, which is a little bit runnier.
Regardless, it was very easy to mix and there isn’t any intimidation factor with it! The paint is also completely removable for the first two days, making this an ideal solution if you want to create more of a “washed” appearance. I wanted full coverage, so I did two solid coats and let it completely cure.
To apply the paint, I used a cheap paint brush. I actually bought a set of them. A masonry brush is recommend, but I couldn’t find one so I used the next best thing.

This paint can also be applied with a paint sprayer (this is the one we have and love), but I honestly didn’t mind painting it by hand with the brush. It went much faster than I thought it would…

One tub of the paint wasn’t quite enough. I didn’t have enough to do a full second coat, or to finish the fireplace ledge. I ended up ordering one more to finish everything and there is definitely paint left over for another project.

It’s amazing how much of a difference the paint made. It completely brightened up the room and transformed the dated 1970’s brick!
Trimming Out The Fireplace
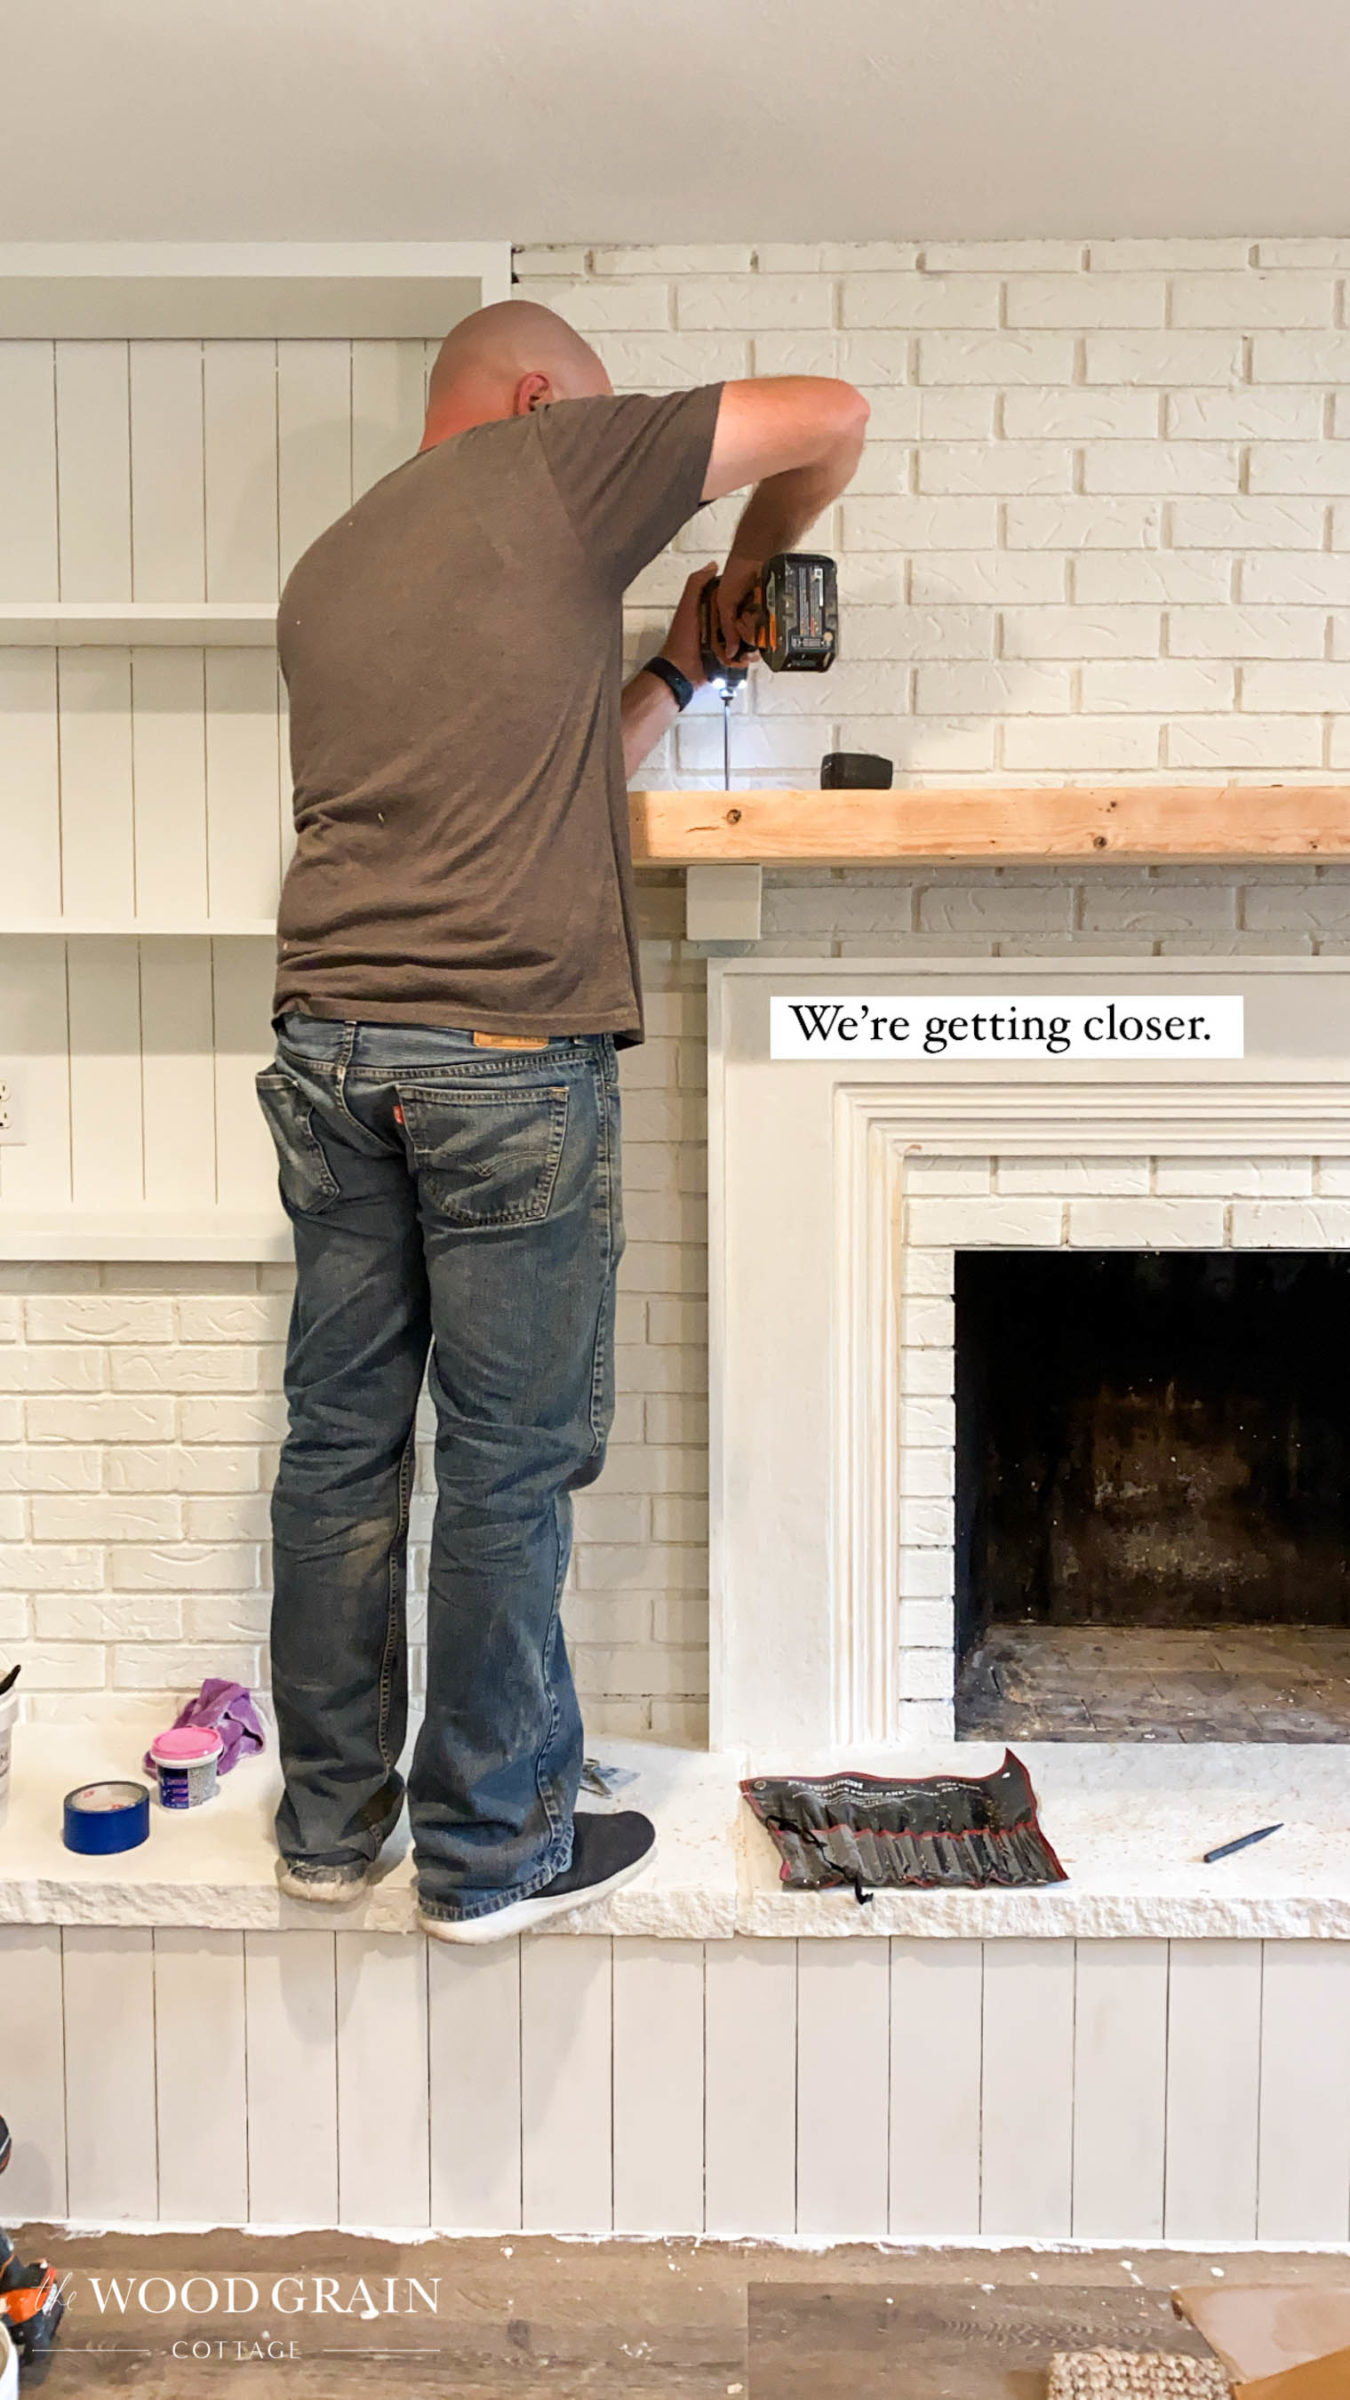
When it came time to update the actual fireplace surround, I knew I wanted to really bulk things up with large trim work. We knew from the fireplace inspection that the vents were not necessary, so covering them made the most sense.
We used a combination of several different types of lumber, but the first board we installed, was a 1″x8″ board. It was just wide enough to cover the fan box opening at the bottom…
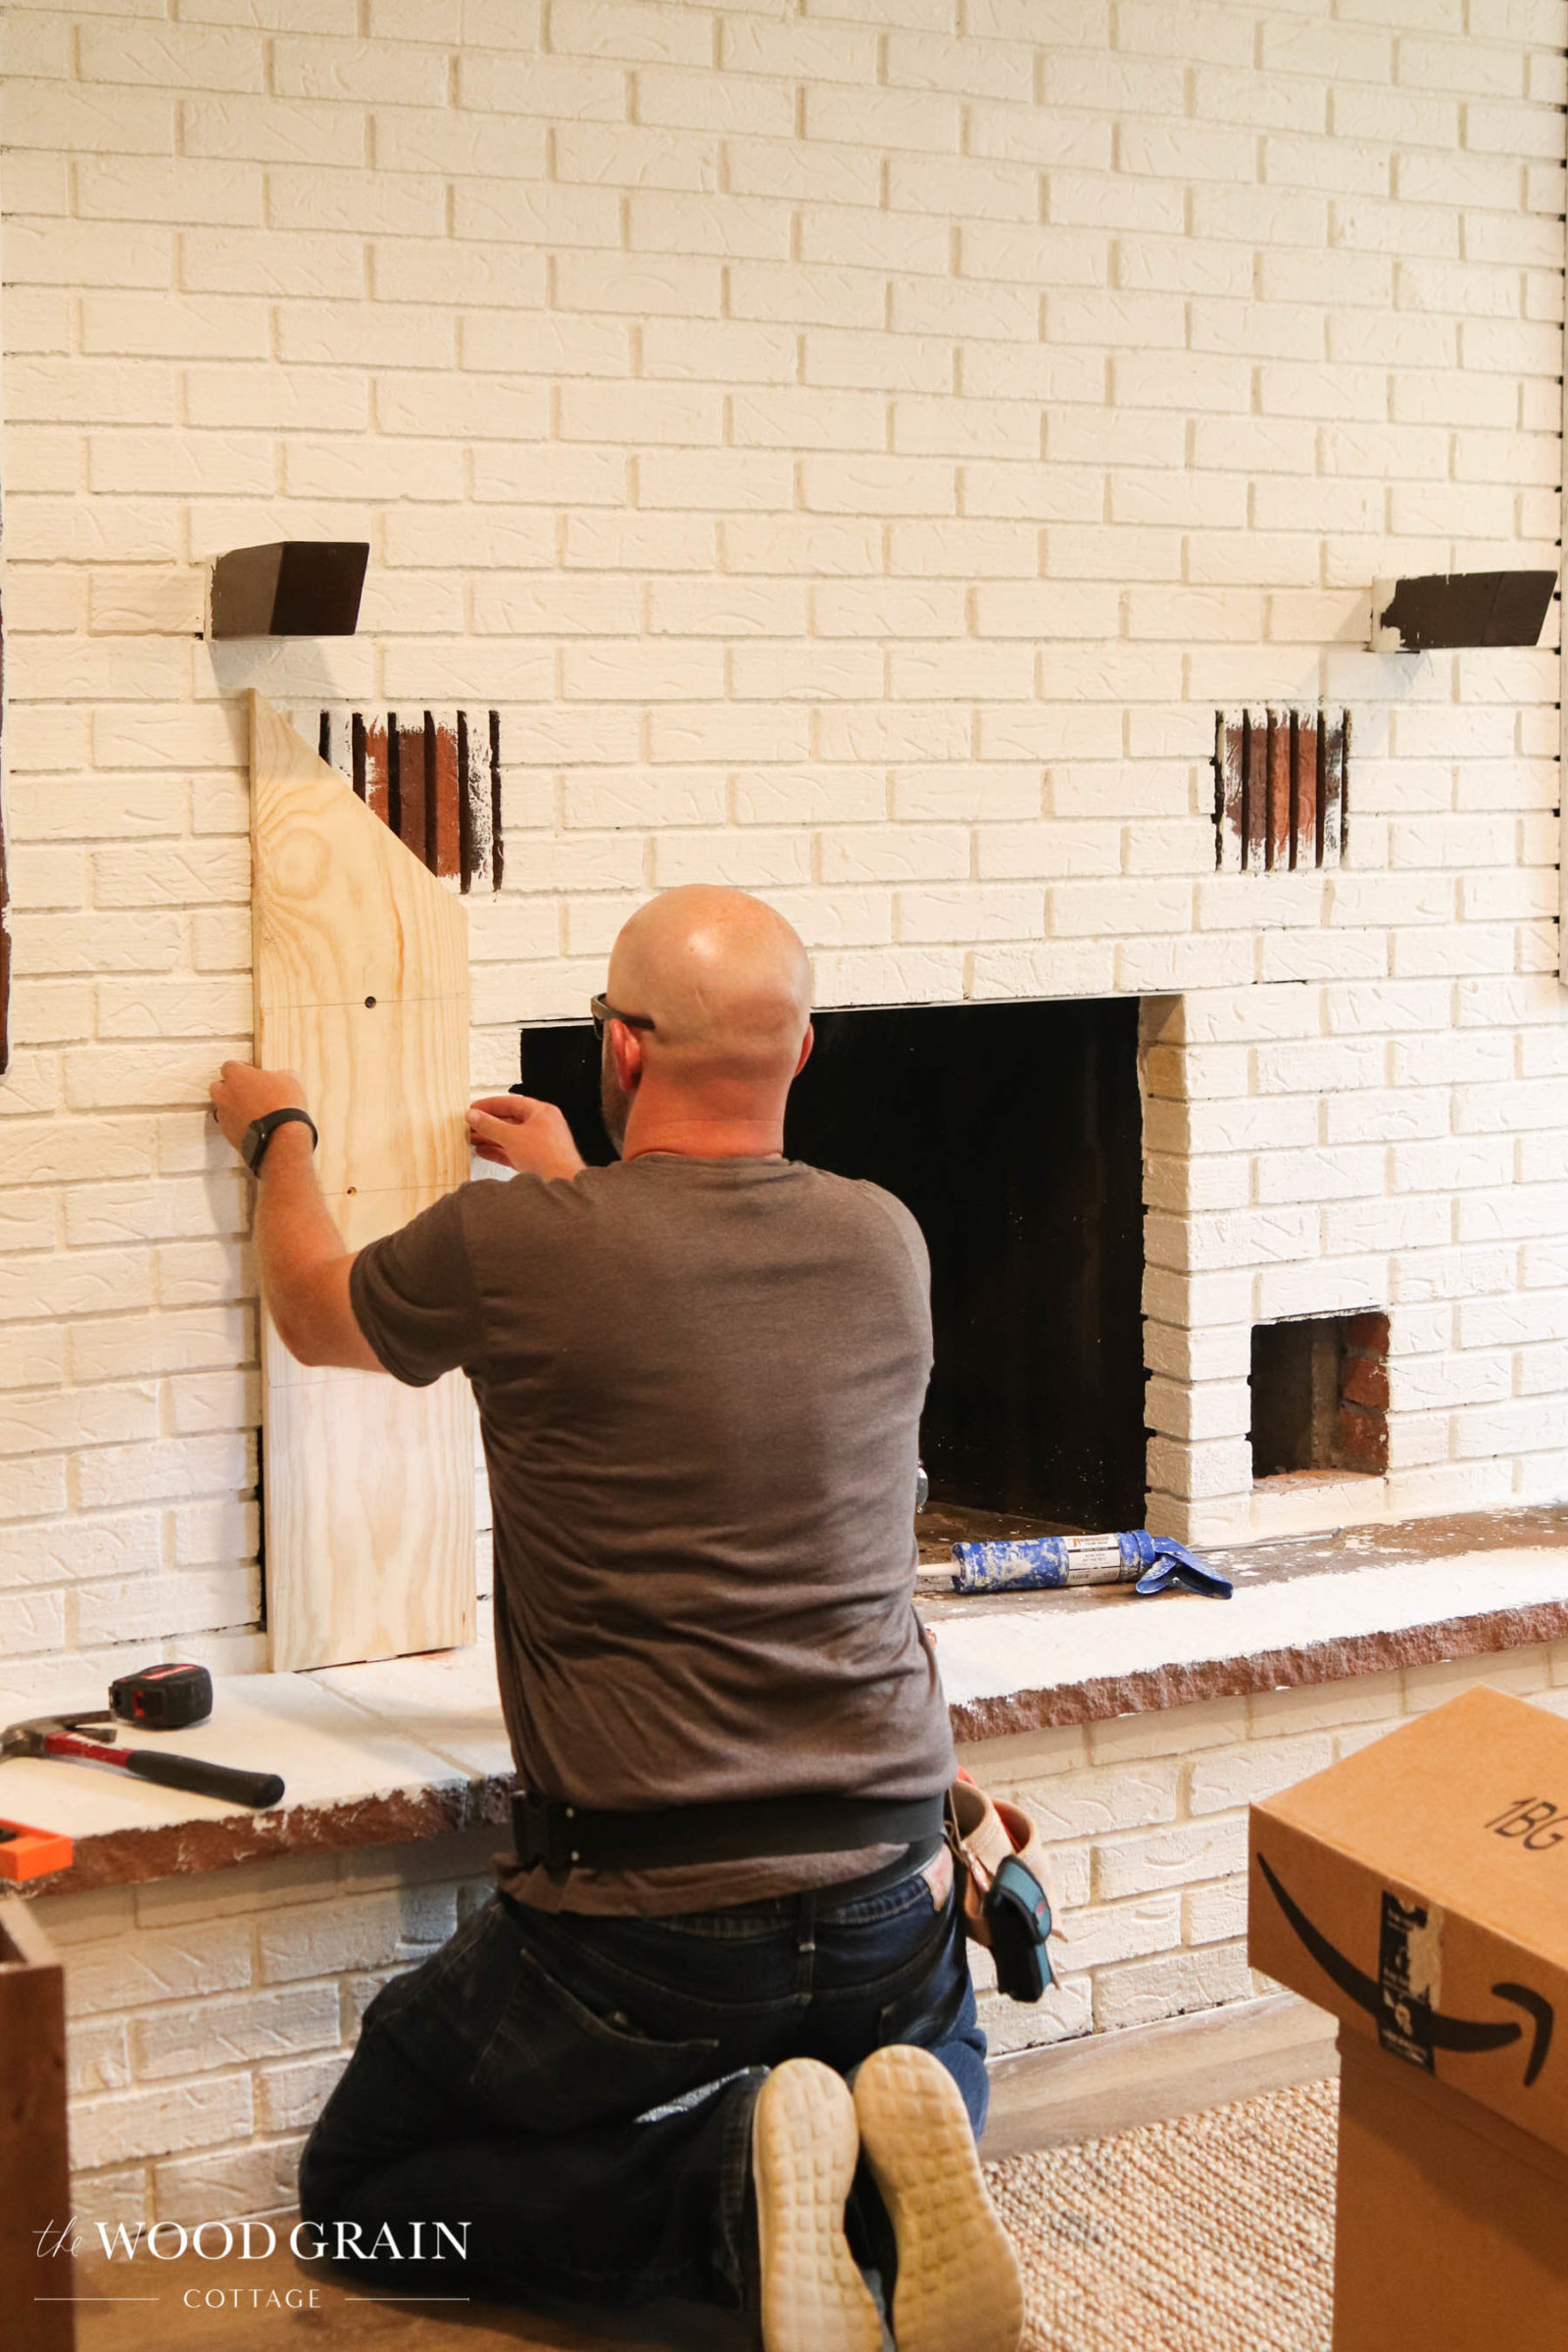
To install the first piece into the brick, Todd predrilled a few holes into the 1″x8″, then used concrete anchors to attach it…

He did the same thing to the other side, and the top piece as well. The anchors worked really well. The boards aren’t going anywhere, that’s for sure!

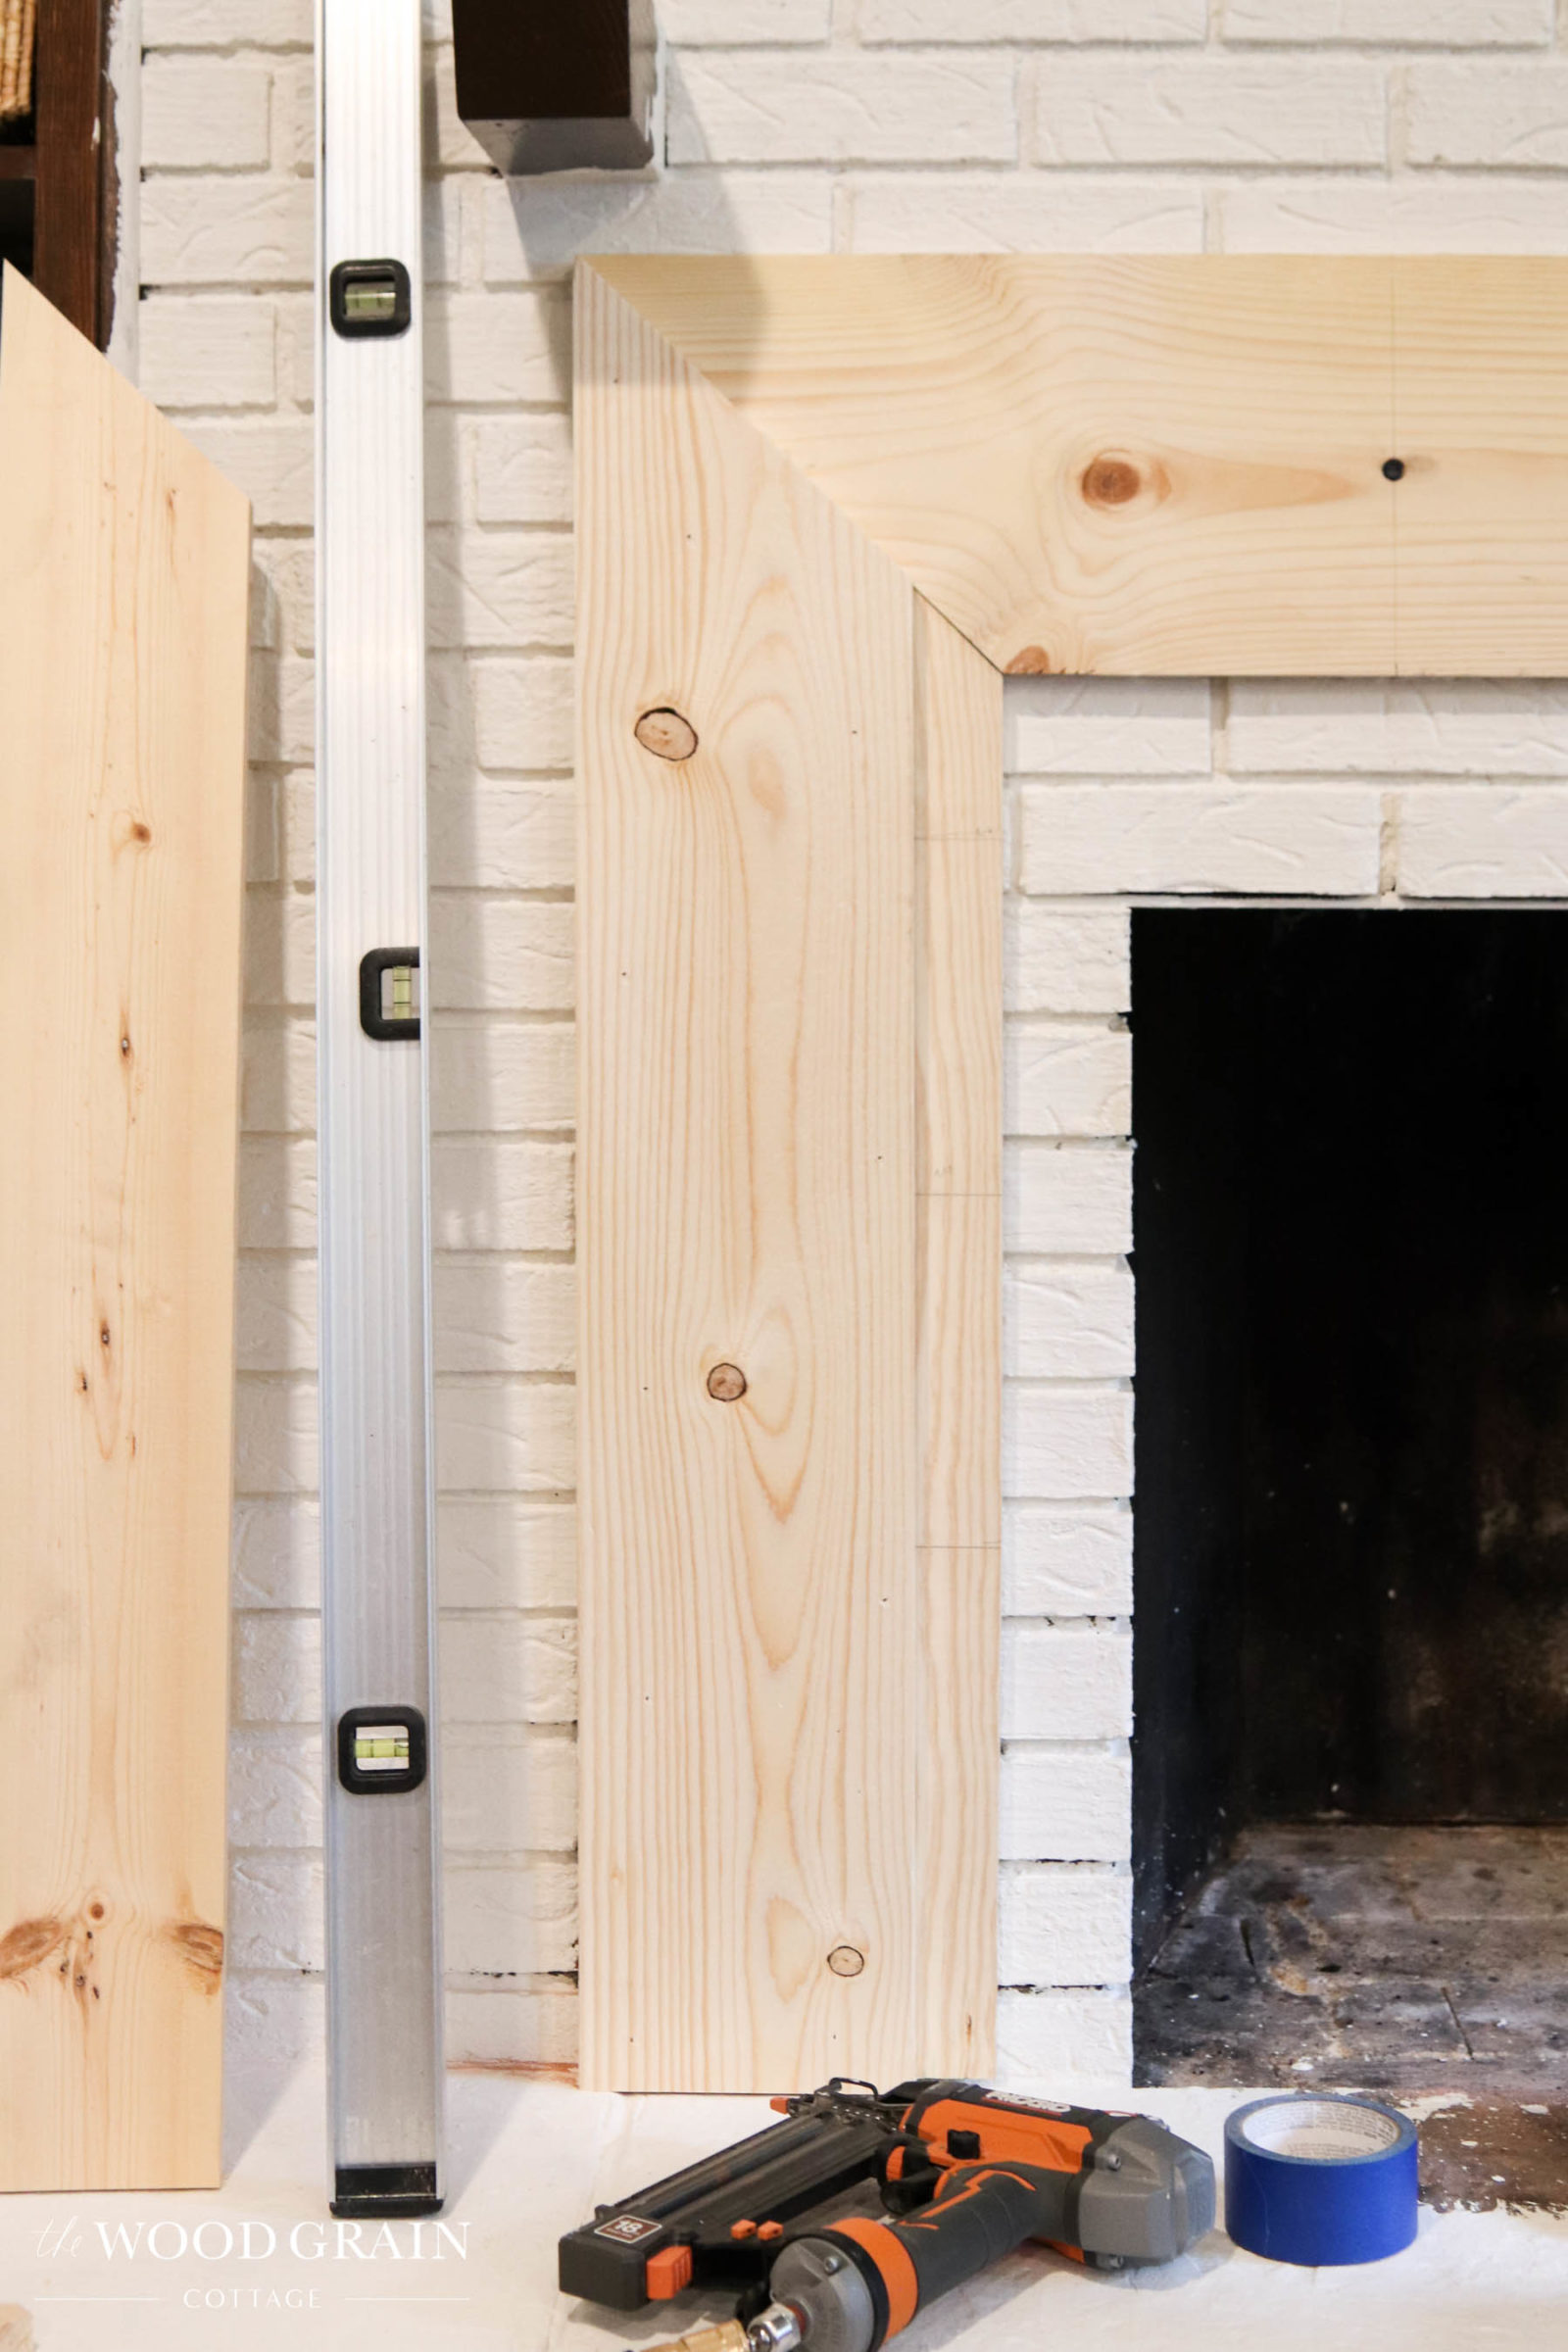
I should also note: even though our brick lines look straight, they aren’t level. If we made the trim boards level, everything would have looked really crooked, so we used the brick lines as our level.
With the first layer of boards mounted to the brick, we started on our second layer. For this, we used a 1″x6″ board.
Since we already had the first set of boards secured into the brick, we were able to use brad nails to secure everything else…
We followed the same steps on the second layer…
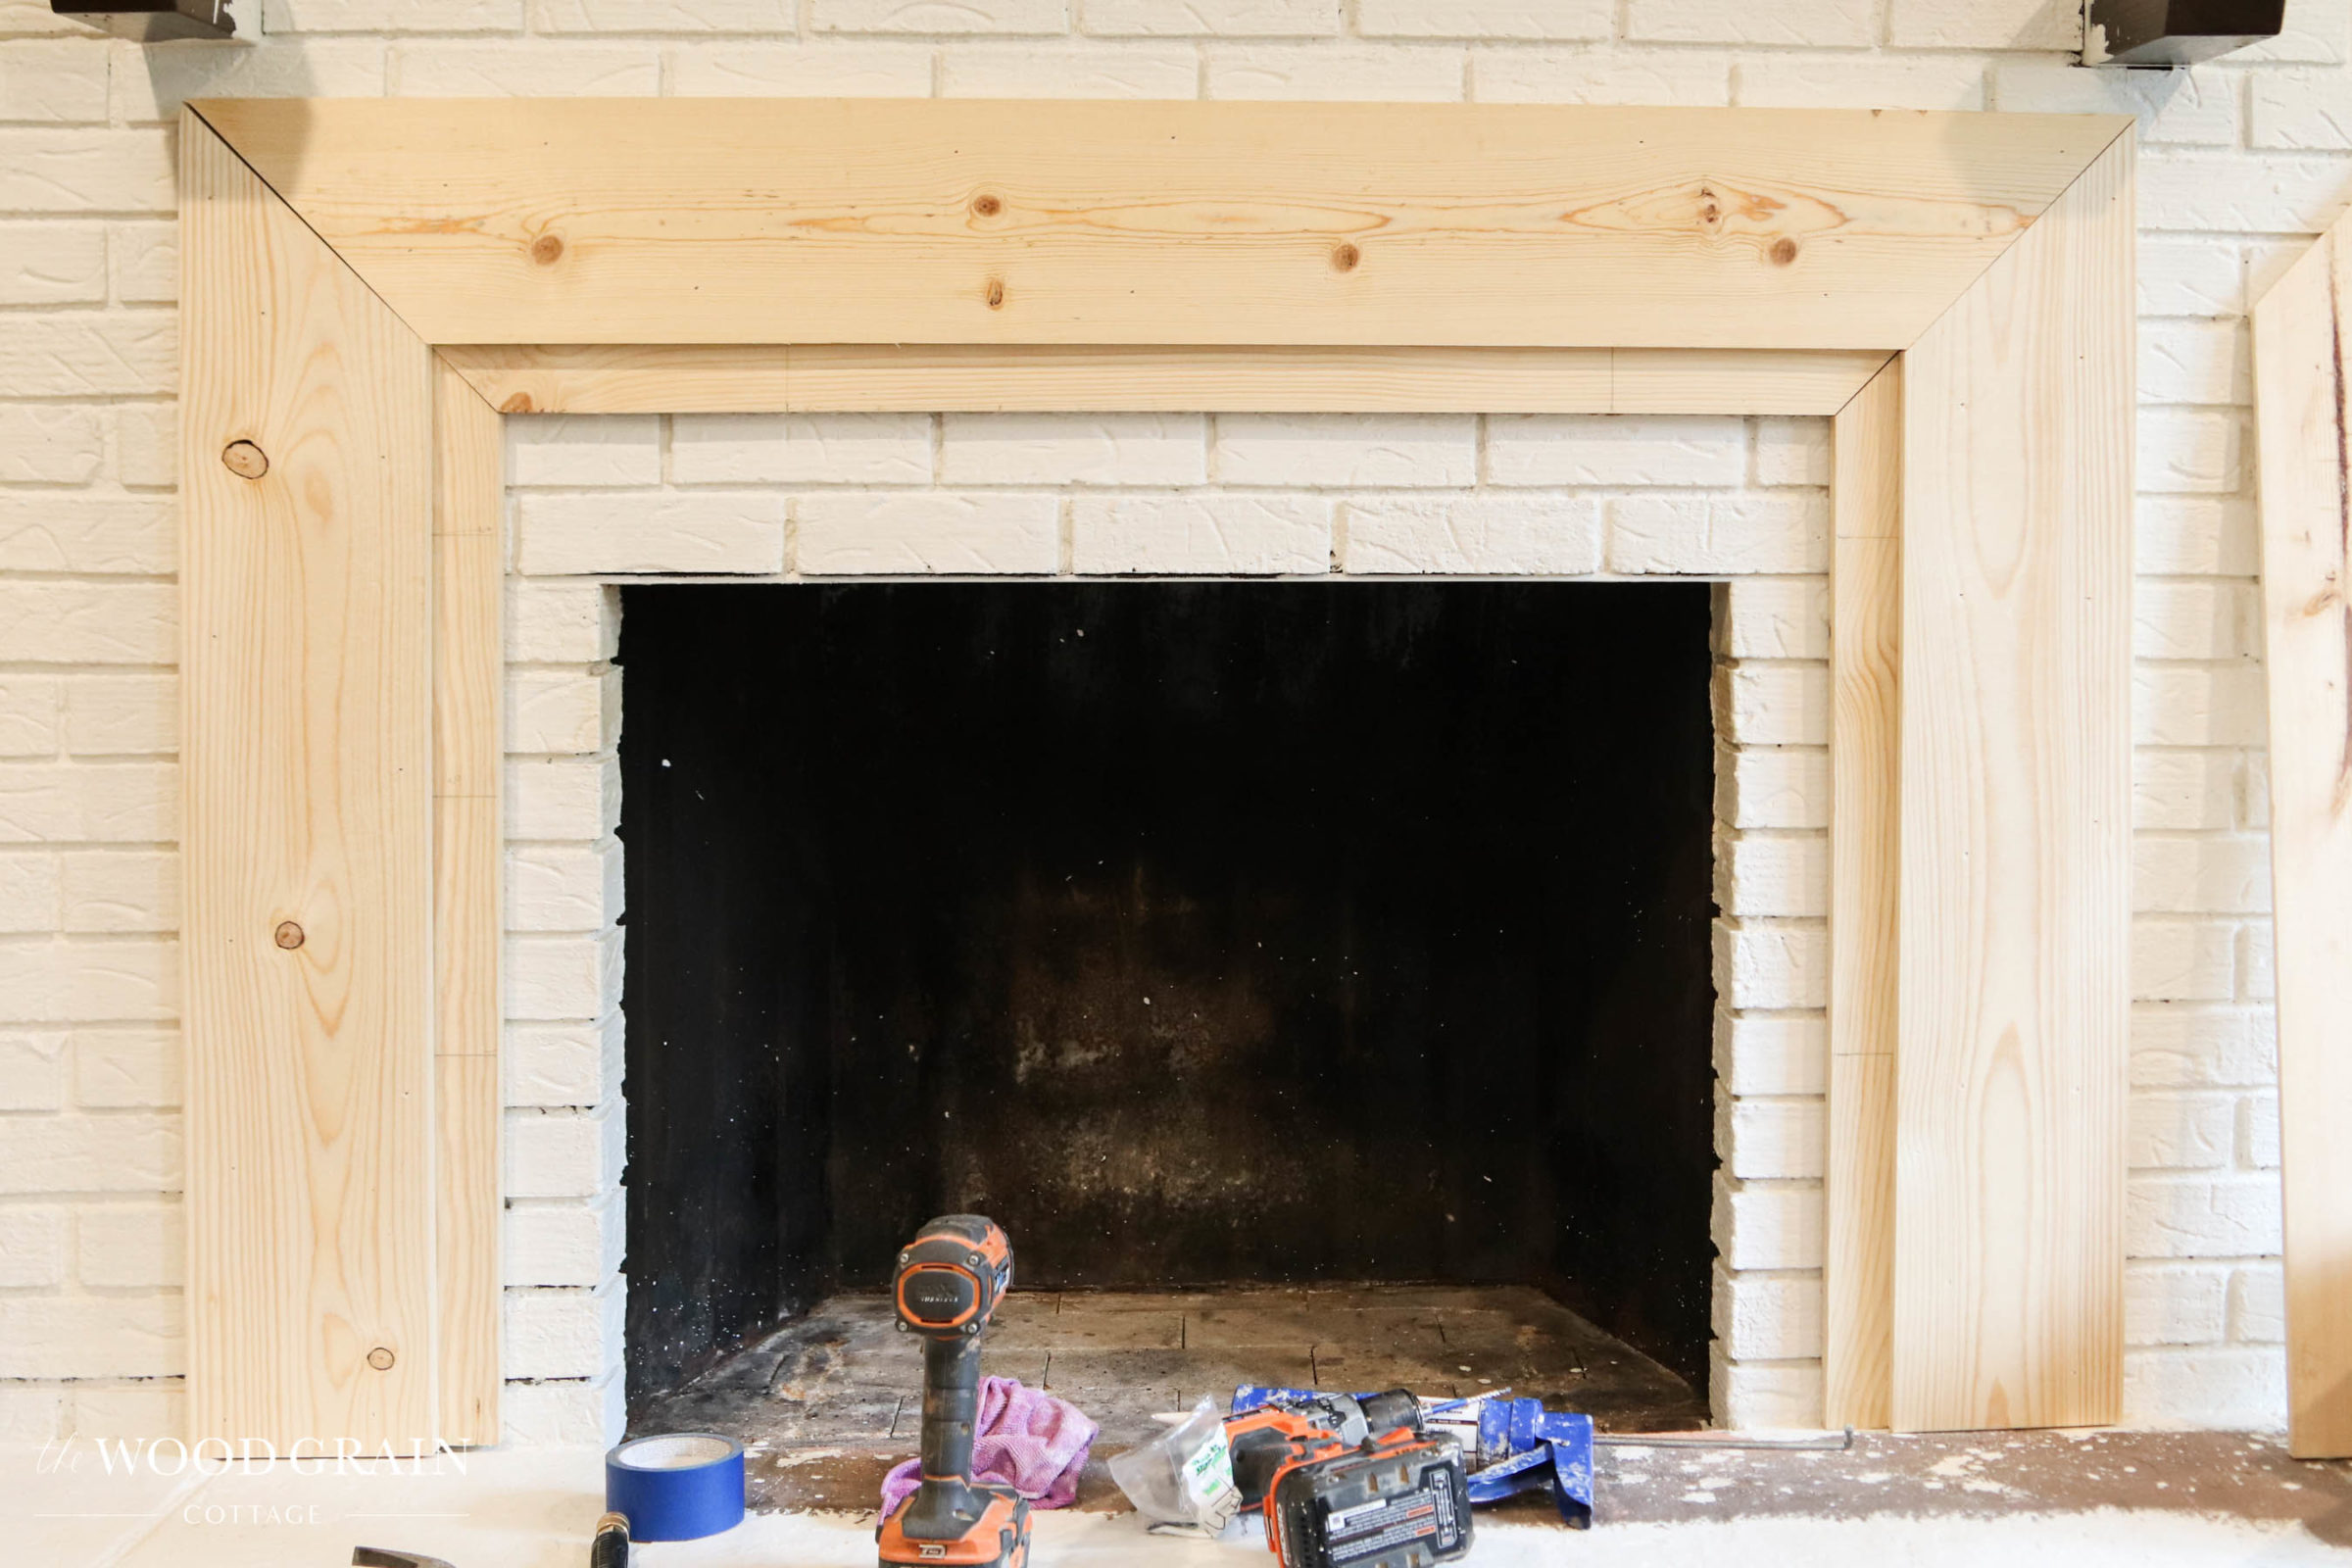
And then to add one more layer, we installed a 1″x4″ piece all the way around…


Once we had each of the three boards installed, it was time to add the finishing trim. We’ve used this before on the moulding in our master bathroom and in Ania’s nursery…

We added it to where the first layer met the second layer, and again where the second layer met the third…

It really gave the trim work a more polished look and added an extra layer of detail and elegance…

Then, to add the final finishing piece, we installed a cap around the entire perimater of the trim work…

For this, we used some leftover mdf from our cabinets. Todd ripped it down to three inches wide, which gave the interior a 1/2″ overhang past the third layer…

And with that, the trim around the fireplace was ready to be painted!

Finishing The Fireplace Surround
I had a really hard time deciding if I wanted to paint the entire thing white, or if I wanted to give it the appearance of a cast stone mould. I ended up deciding to cover the top layer with grout, which does mimic a cast stone mould.
Unfortunately, I don’t have pictures of this step because I had an upset baby pulling on my leg while I was doing it, but here’s what I did:
- I used leftover grout from our downstairs bathroom project. I mixed the sanded Snow White grout with water until it was a nice, thick consistency.
- With a 4″ putty knife, I applied the grout over the top board, pressing the mixture hard onto the surface of the board. The grout must be thick enough to stick, but not too thick that it’s overly heavy and wants to slide off.
- I used the putty knife to create a nice smooth surface and I added a few layers as I went over the entire top board surface.
- I also tried to get the grout to go over the detailed moulding, but that was much harder to accomplish, so I just used my fingers to apply the grout in place of caulking. It worked like a charm.
- You will need to work somewhat quickly because the grout does want to dry as you are working with it, so just keep that in mind.
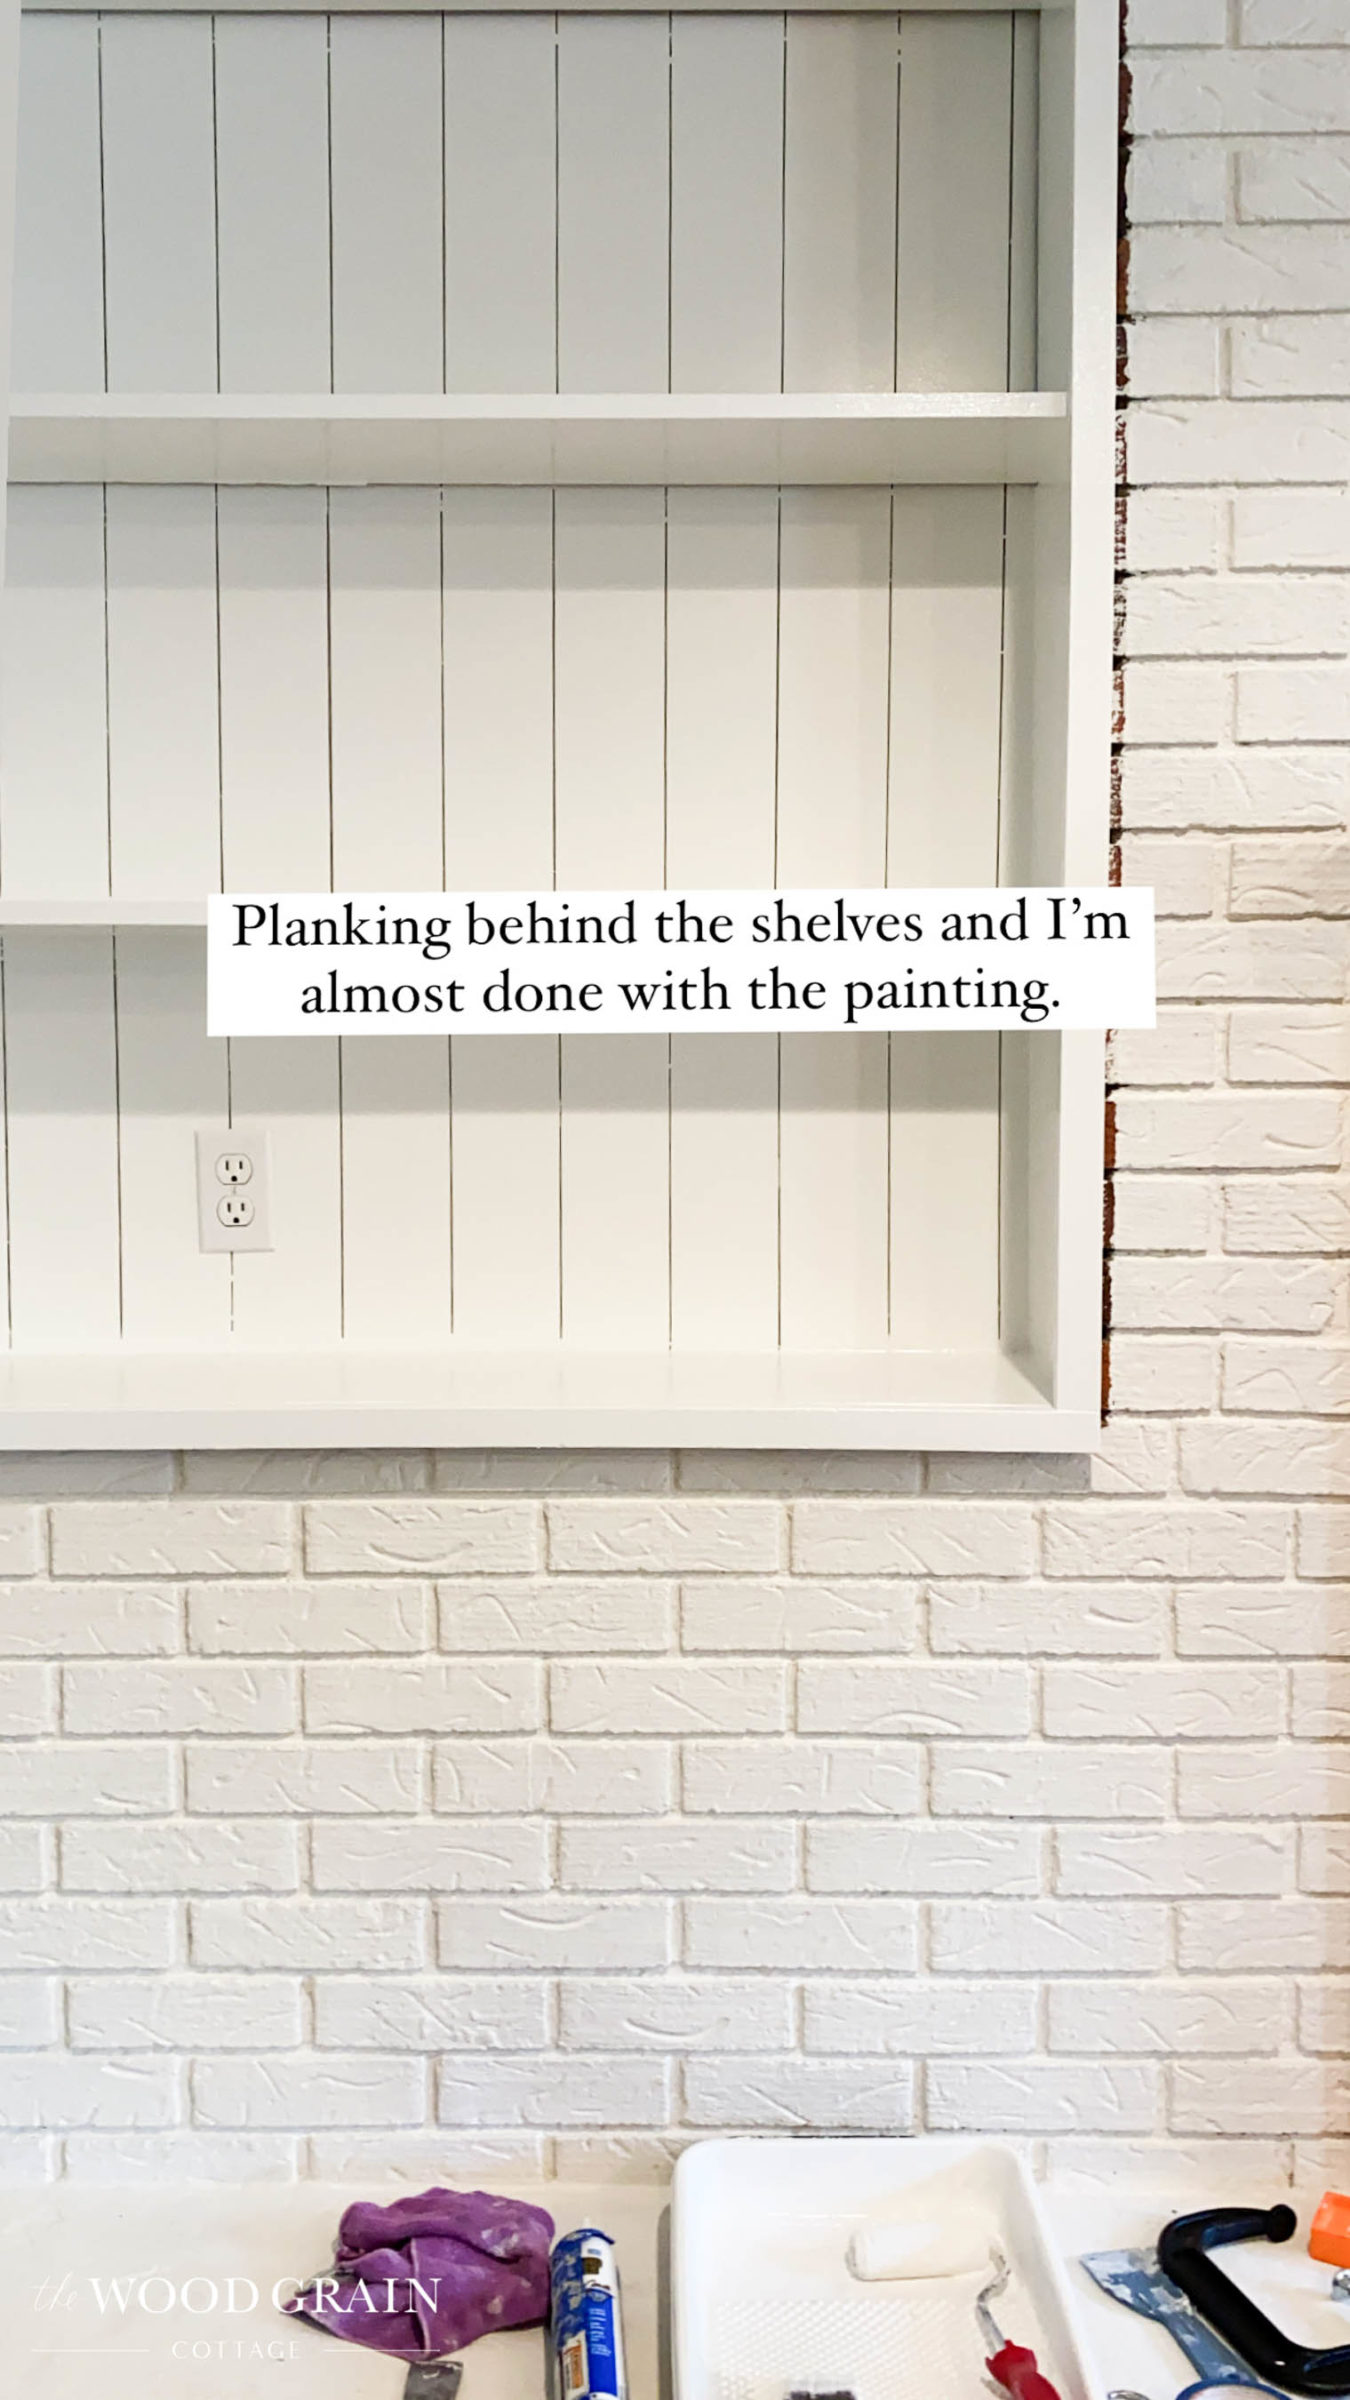
Planking The Shelves
Next on the list, was planking the wall behind the shelves. This added so much character to the existing shelves!
The shelves previously had quarter round installed all around them, but I knew we wouldn’t need to keep it once the planking was installed…

You can see our tutorial on installing vertical planking here.
Once the planking was finished, I gave it all a few good coats of Super White by Benjamin Moore in semi-gloss…
Sanding Down The Fireplace Mantel
We also decided to sand down the existing mantel. It was a really nice piece of wood, but to make it look a little more rustic, Todd used an angle grinder to remove the dark brown stain. Unfortunately, I didn’t get any pictures of this either.
Once the mantel was on the fireplace (we used the existing mounting system since it’s built into the brick!), I added even more rustic charm, by taking a hand saw and making deep cuts into the wood. I also used a punch and a hammer to add in more elements of detail.
I used the same method on this table, if you’d like more information.
Building Out The Bottom Wall
When it was all said and done, I loved how the fireplace looked, but there was one area that felt awkward to me… the space below the ledge and the floor. I didn’t like how the ledge felt off center with the brick wall sitting further back behind it, so I asked Todd to build out a small wall.
Unfortunately, I didn’t get any pictures of this step either, but he basically used leftover wood that he ripped down into strips. He used a few concrete anchors to mount the board to the bottom of the ledge, and then he created a frame with the lumber, using the side walls and floor to nail it all in place.
Then, we planked over it and I used the same lime wash paint on it as the rest of the fireplace.
I’m so happy I had him build this little wall. It makes the fireplace feel more proportional with a more substantial base. It also perfectly ties in with the vertical planking behind the shelves.
If you want to see behind the scenes of this entire project, you can see all of it on Instagram. I’ve saved the stories for you under “Fireplace Makeover”.
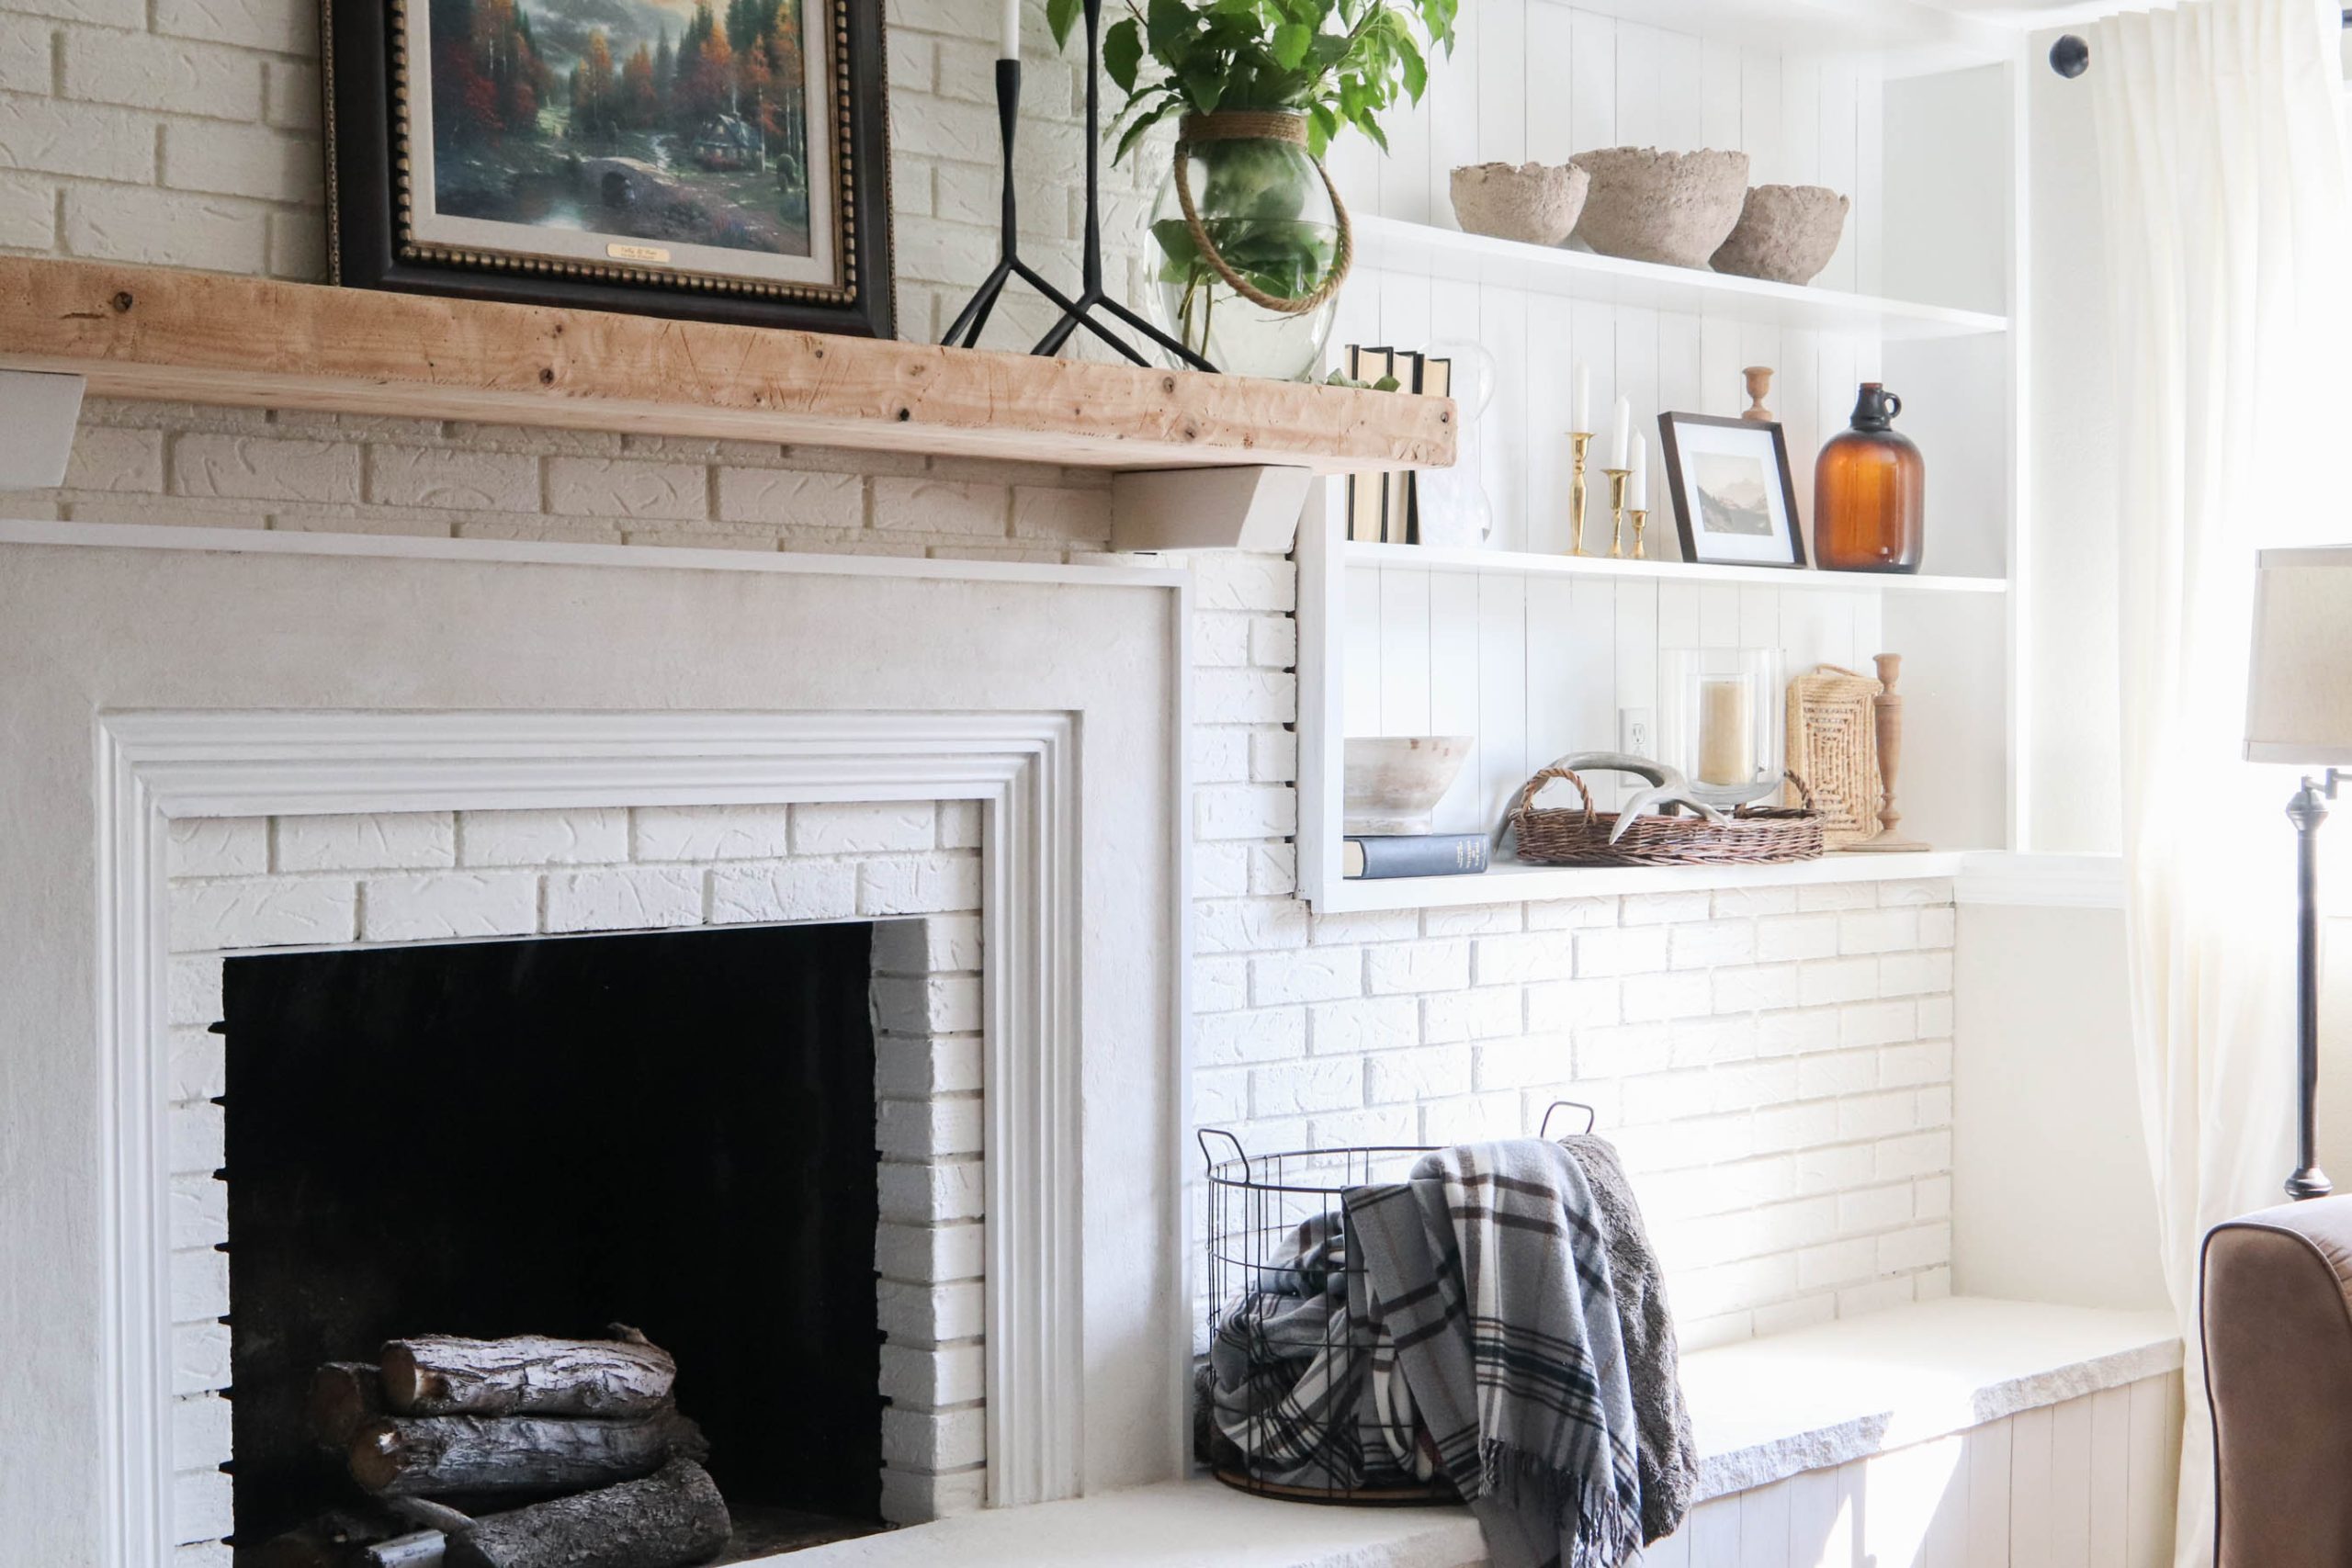
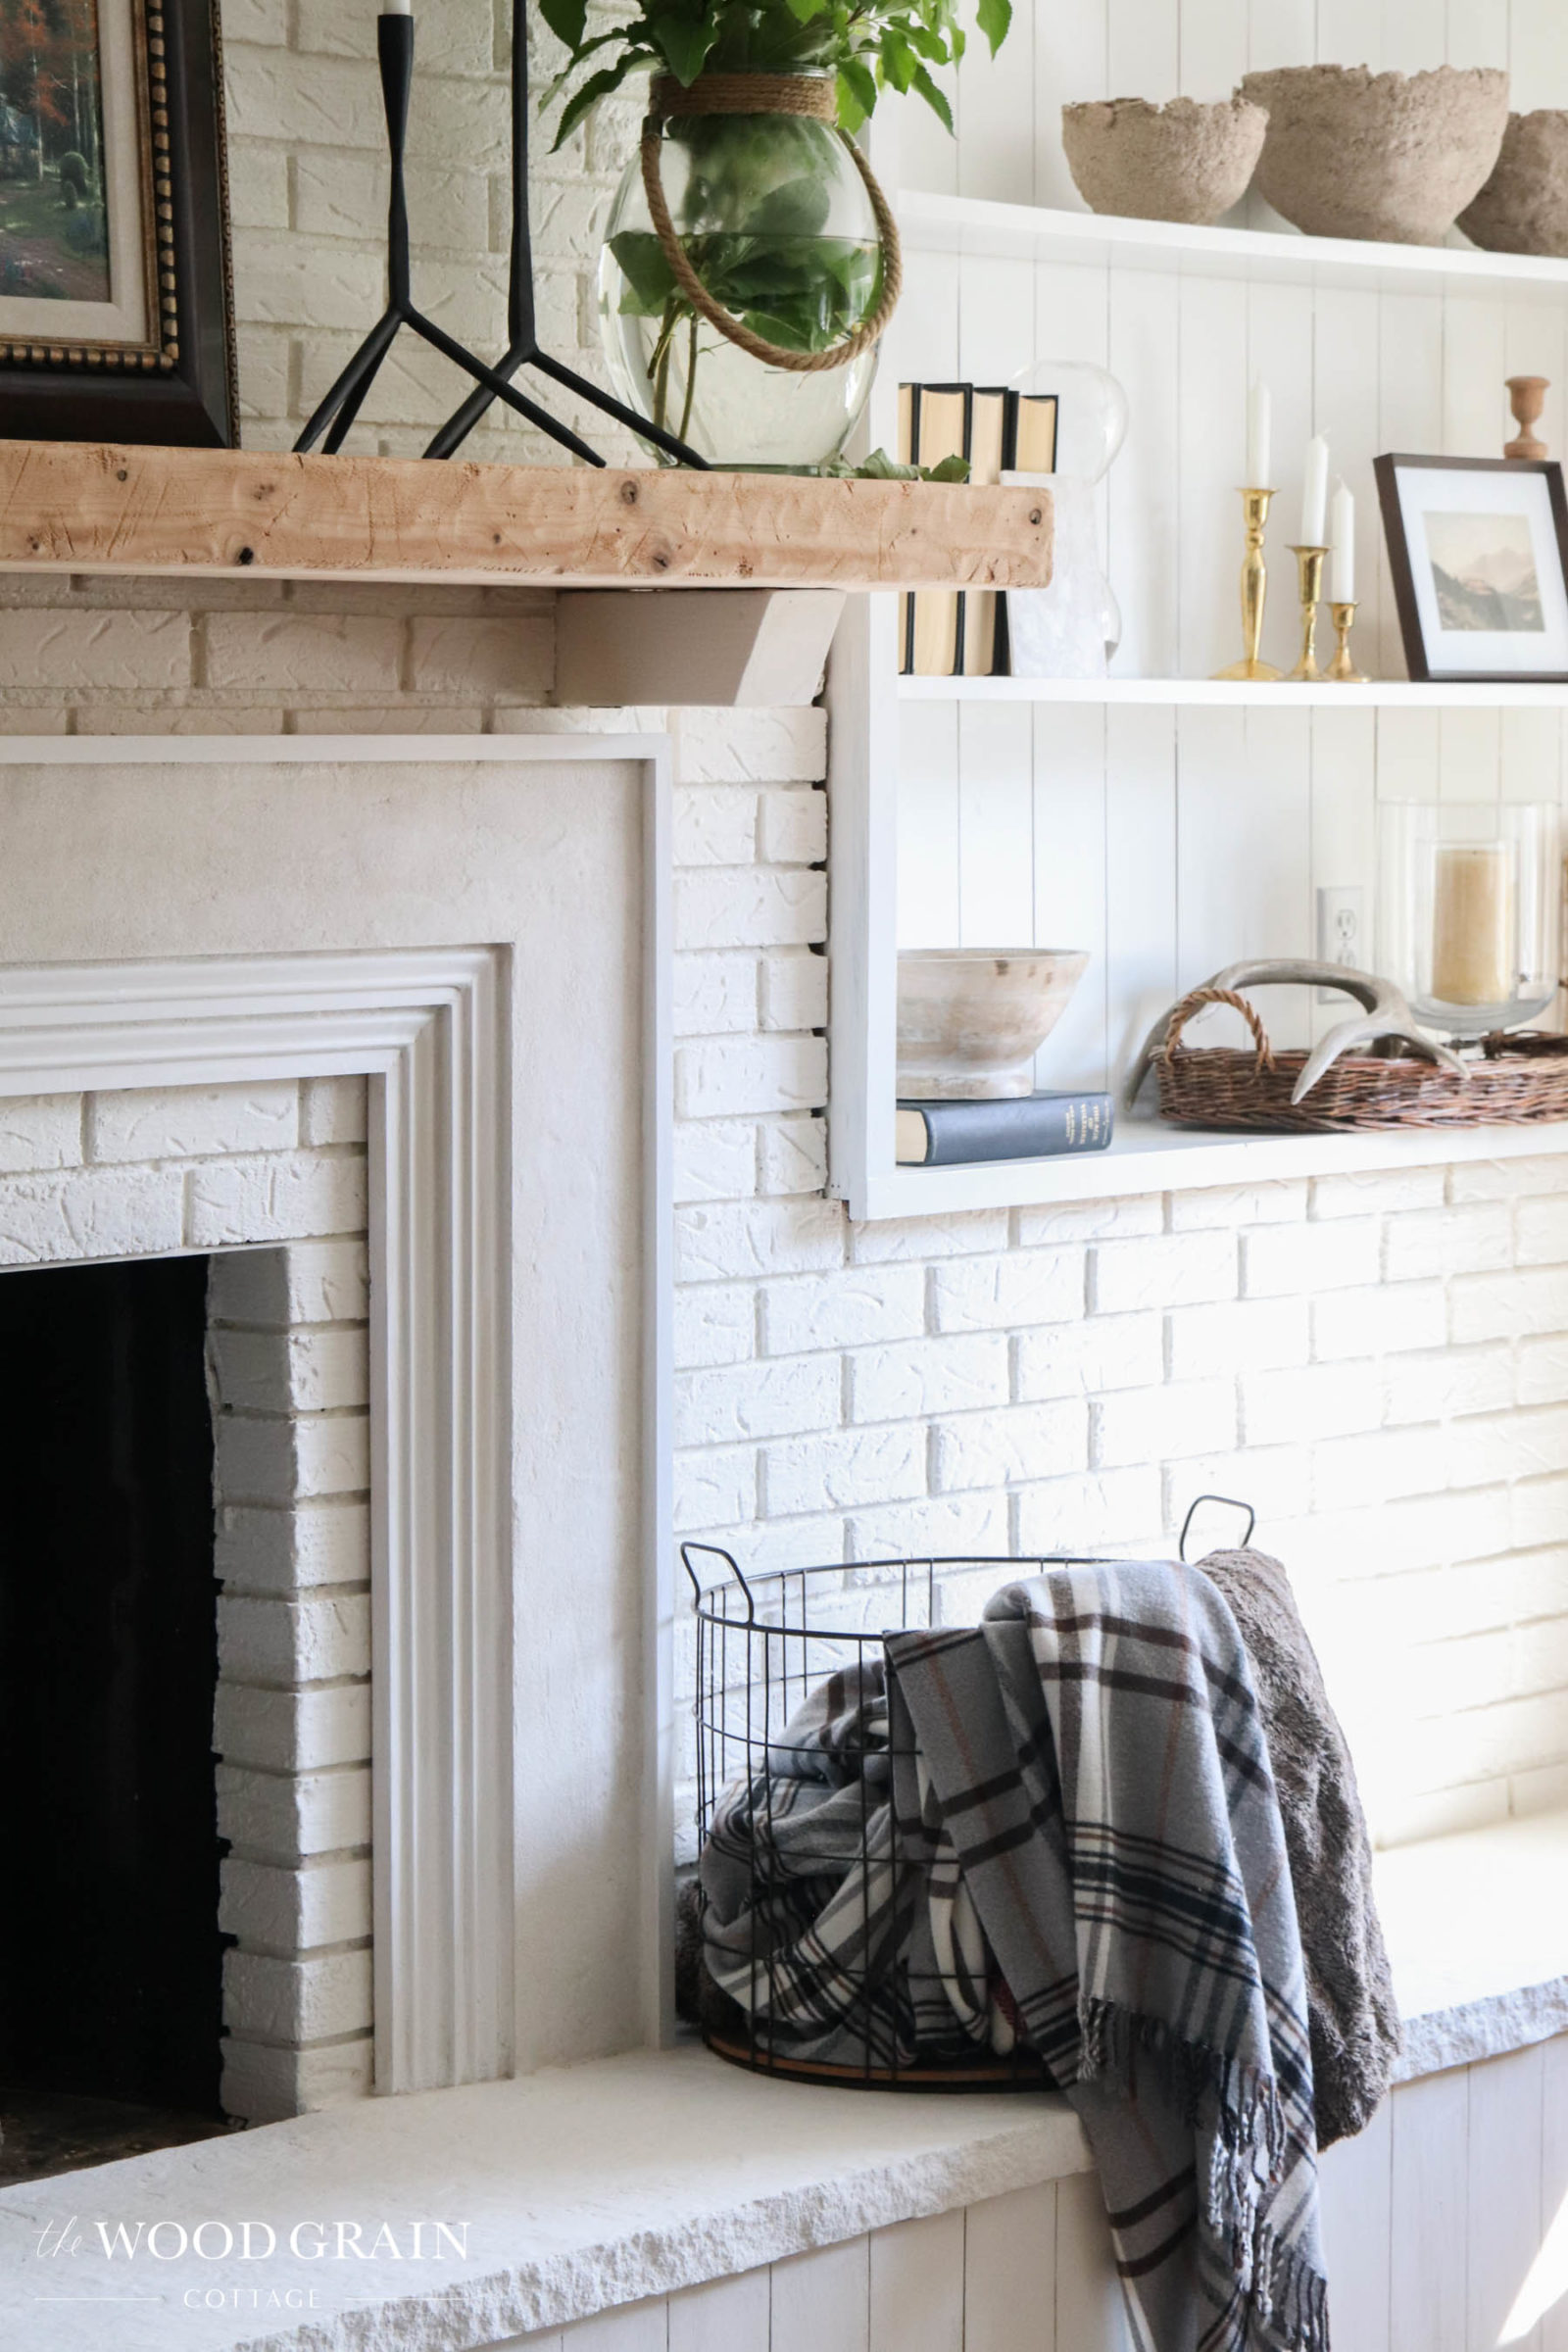
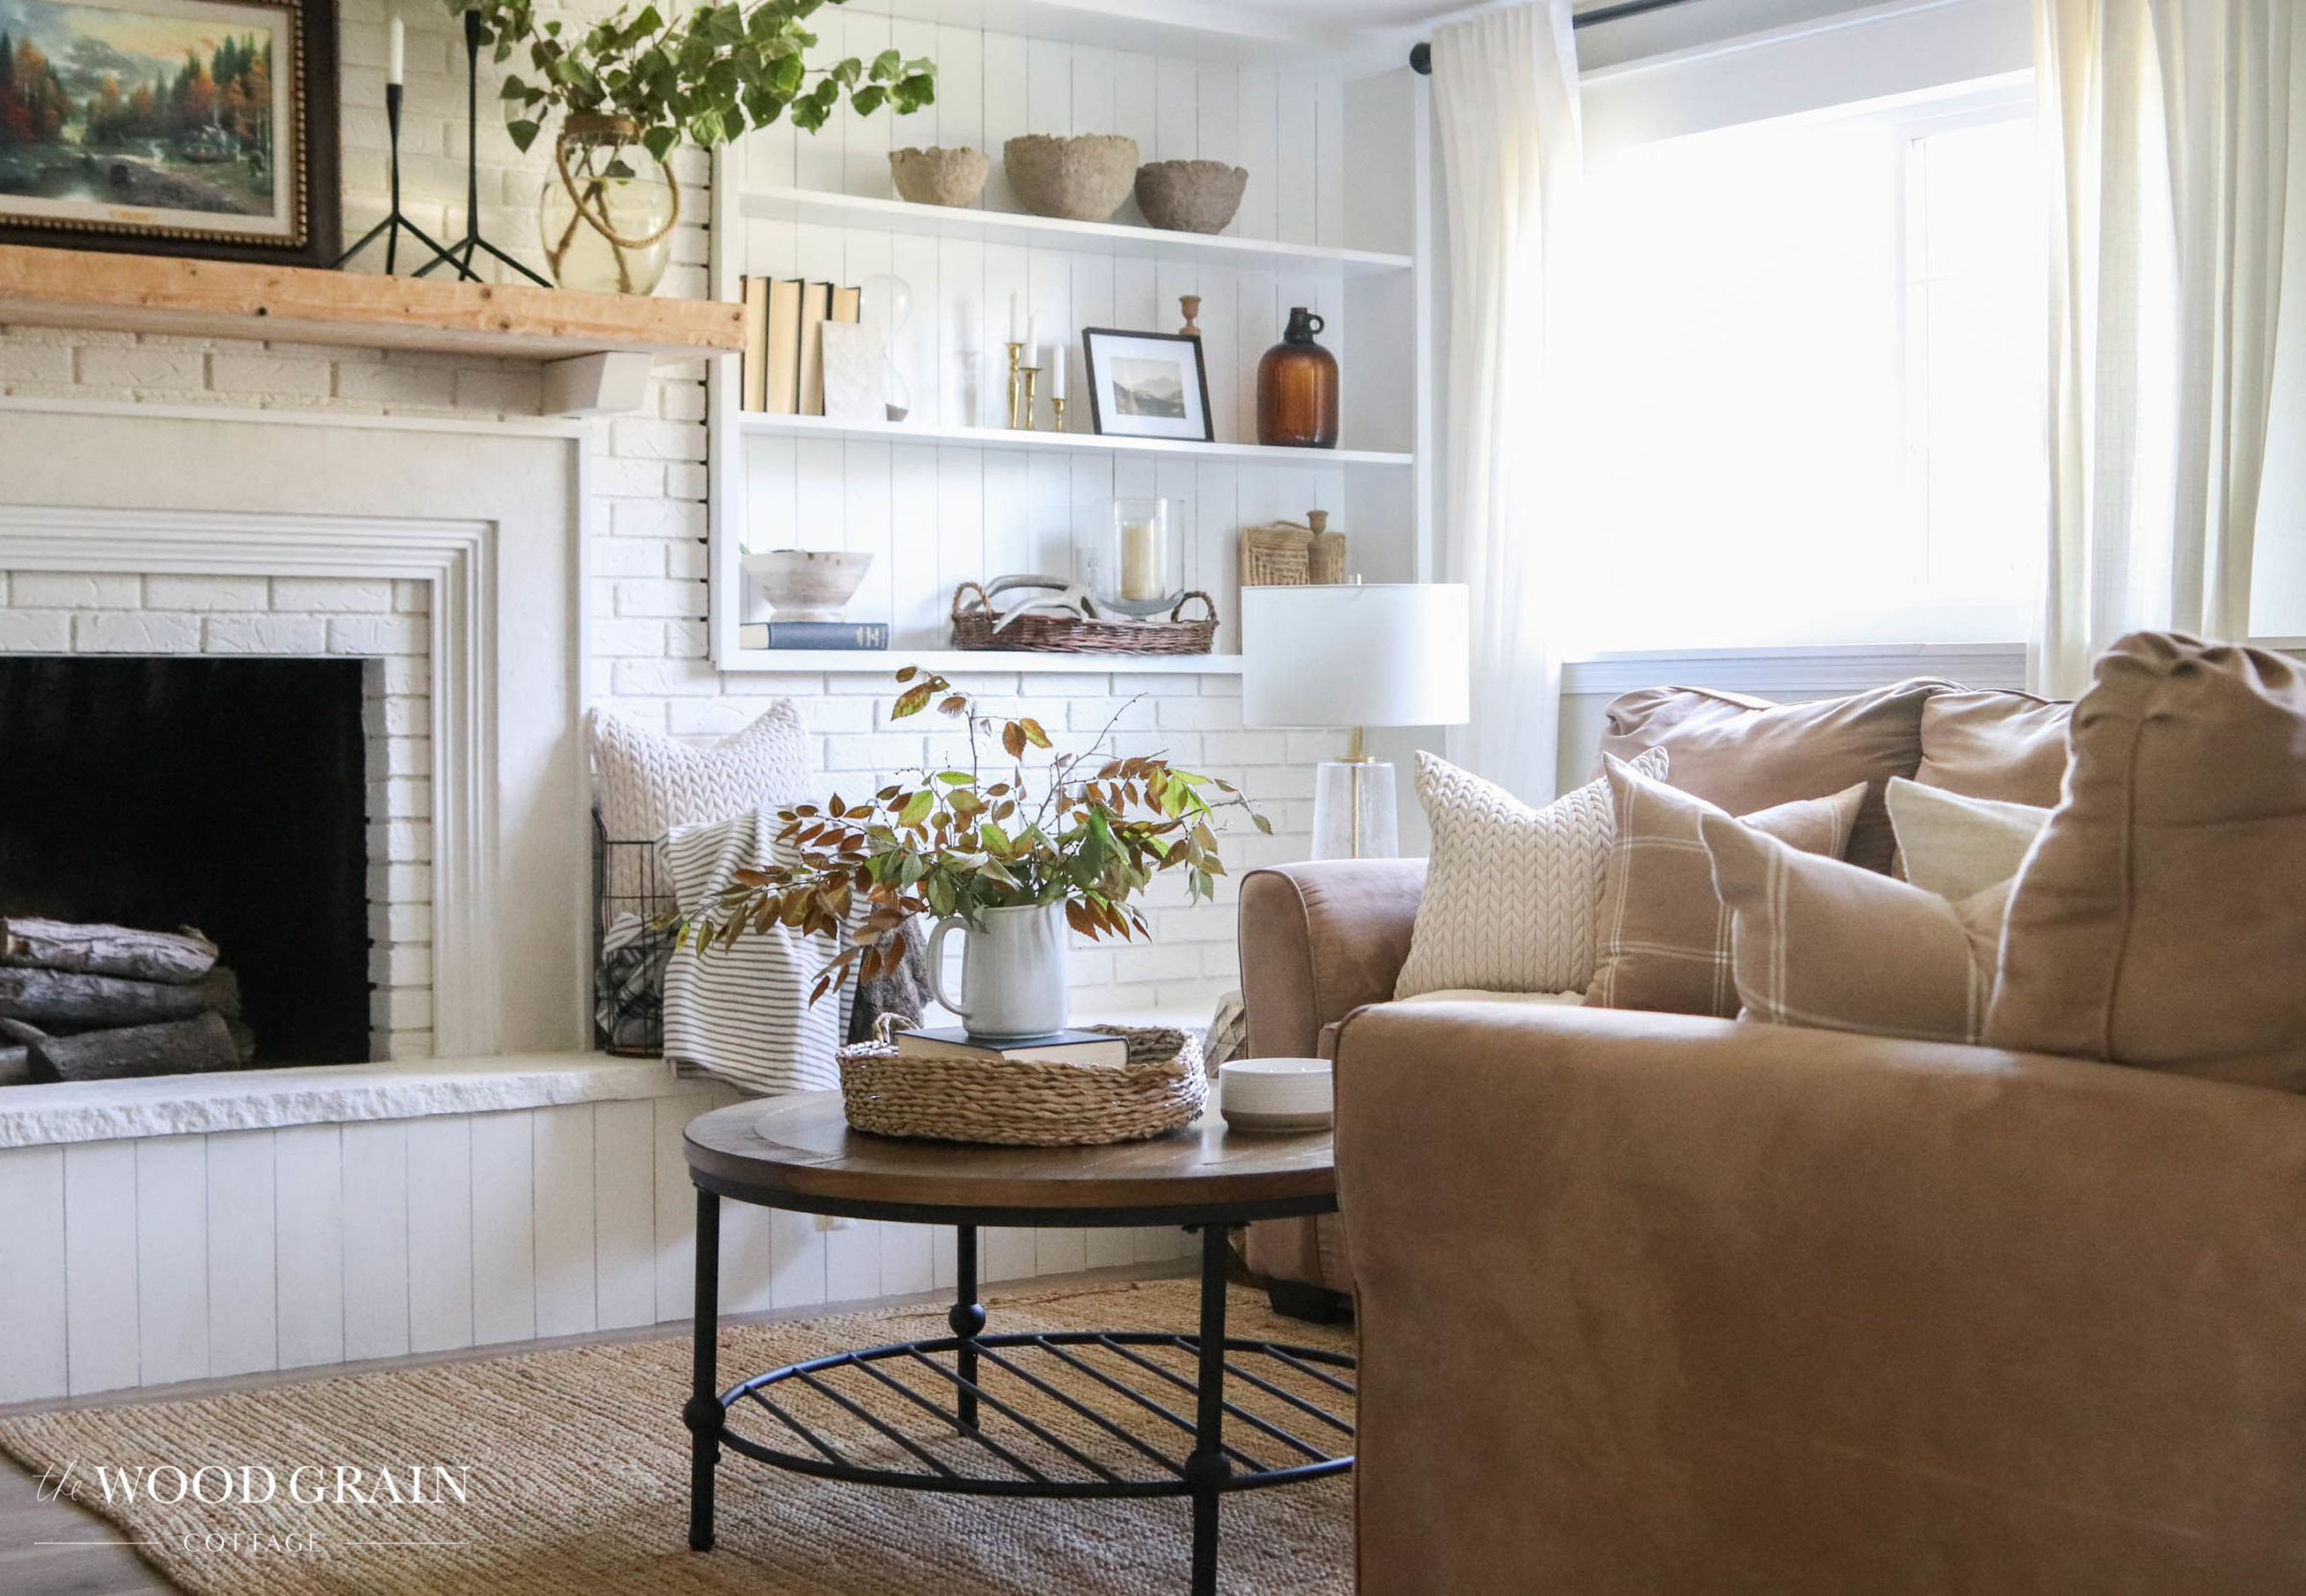
Our Finished Brick Fireplace
With all of our projects done, we had a finished fireplace! And we honestly couldn’t love it more.


This room has quickly become a favorite for us and it’s been a welcome addition to our home. We find ourselves gathering here more and more and Ania loves to go downstairs to run in circles around our new coffee table.
It’s the small things in life.
I’ve found myself adding layer after layer, making this room feel even cozier…
Paint has completely transformed this space… and a few other projects too I guess… but the power of paint truly shines in here…

And I honestly don’t think I could love our fireplace surround more. All that trim work creates such a beautiful focal point for the room…

And we really love our rustic, natural mantel. It’s honestly hard to believe it’s the same mantel from when we started…

We just gave the raw wood a place to shine and I love how it ties in with the creamy brick and the white shelves…

I also really, really love the built in shelves on either side of the fireplace. They add the perfect touch, and the vertical panelling really adds an extra detail to them…


This room has come such a long, long way. It started out dark and dated, but it’s been refreshed and I’ve loved watching every step unfold…

One thing is for sure, we love our new living room!
Living Room Paint Colors
Our living room walls are Gray Mist by Benjamin Moore in eggshell. All of the trim (including the built in shelves) and doors are Super White by Benjamin Moore in semi-gloss.
The fireplace is Avorio White by Romabio. The fireplace surround trim work is Snow White Grout and Super White by Benjamin Moore in semi-gloss.
Living Room Sources

Affiliate links are provided below. Full disclosure here.
[show_boutique_widget id=”1092916″]
I hope you enjoyed this project, and that maybe it’s inspired you to transform a space in your own home.
Totally awesome in every way. Wonderfully thought out and executed. Congratulations! And may it bring extra warmth and comfort and joy to you all as you enjoy your home.
It came out seriously beautiful!! Great job guys!!
Pinned it 😉
Shan
Gorgeous before and after Shayna, wow!!
Great look! Would love to pin it but can’t seem to find the link.
What a vision! It is all absolutely Lovely!!
This room is SO cozy and what a transformation!!!
Love it!!
The transformation is stunning. You made your space so nice now!!! A funny side note irony: just the other day my hubs and I were dreaming about taking our gas and wood burning fireplace and putting in an insert, have the wood burning chimney closed, and somehow figure out how to get vents……that makes it so much warmer and all the heat doesn’t go right up the chimney. We hardly ever have fires b/c the entire house gets cold when we do. Our house is an open concept and just gets super cold. And here you closed yours and wanted a wood burning fireplace. Haha – isn’t that funny? Anyway – I ♥ your fireplace!!!!
What an amazing before and after! Thanks for sharing all the details. I have a wall in my living room that needs the same kind of help. Very inspiring!
Wow, wow, WOW!!!
Looks good!
wow, wow, wow!!! The power of paint IS amazing!!! Your before and after prove that paint, imagination, and DIY ingenuity can really transform a space.
I just love the result!!!
Thanks so much for sharing:)
Absolutely gorgeous. I love everything you did here. What I wouldn’t do to have such space. You guys nailed this project. Look like you spent a million dollars on this makeover.
Wow!!! Your fireplace wall is gorgeous! I LOVE everything that you’ve done.
I would never leave this room! Is the fire place functional? Just gorgeous!
Thank you! Yes, the fireplace does work!
We are remodeling our fireplace wall and wanted to post and let you know I have come to your site many times for inspiration! It is so beautiful!