
DIY Staircase Makeover
Are you ready for a big transformation? Our DIY staircase makeover has made a huge difference for our home!
If there’s been one project that’s been glaringly obvious that we need to finish, it’s our stairs. When we were knee deep in demo’ing the house, we went through and removed all the old, super gross carpet, but other projects became more important and we ended up moving in with the stairs still in pretty rough shape. We’ve hated them, but we’ve dealt, just as anyone does when living in a fixer upper.
With this project being one we wanted to complete this year, and the fact that it’s been holding us up from finishing any base trim that connects to the stairs, we decided the wait was over and it was time to finish this project! And because so many of us have carpet covering our stairs, today I’m sharing our DIY staircase makeover in hopes of inspiring you to tackle your own project as well!
Before we get started, let’s take a good look at what our stairs looked like…


Pretty, right? Actually they were a complete eyesore and easily seen from every room in the house. Luckily for us though, the construction treads, for the most part, were in good shape and gave us a good foundation to start our makeover. Needless to say, we were both excited to cover up the ugly!
DIY Stair Makeover
Supplies/ Tools:

Affiliate links are provided below. Full disclosure here.
- Oak Stair Treads (These are similar to the ones we used!)
- 1/2″ MDF Material (We used a full 4″x 8″ sheet for 12 stairs.)
- Measuring Tape
- Todd’s Favorite Measuring Laser (Optional, but very handy and accurate!)
- Level
- Brad Nailer
- 18 Gauge 2″ Brad Nails
- Liquid Nails
- Wood Glue
- Chop Saw
- Table Saw
- Stain (We used Minwax Jacobean)
- Polyurethane (We used Minwax Polyurethane, Fast Drying in Clear Satin)
- Foam Brush, for staining
- Paint Brush, for polyurethane
- Rag, for wiping excess stain
- Wood Shims
- Pencil
- Paint (I used Super White by Benjamin Moore in semi-gloss)
- Foam Paint Roller
- Paint Brush
- Caulking Gun
- Caulking
- Spackling
- Fine Grit Sandpaper
Step 1: Measure & Cut The Stair Treads To Length
First things first, to make it easier as we moved forward with the project, we numbered each of our 12 steps. Each stair tread and riser is custom fit, and you’ll want to number everything moving forward for the easiest installation.
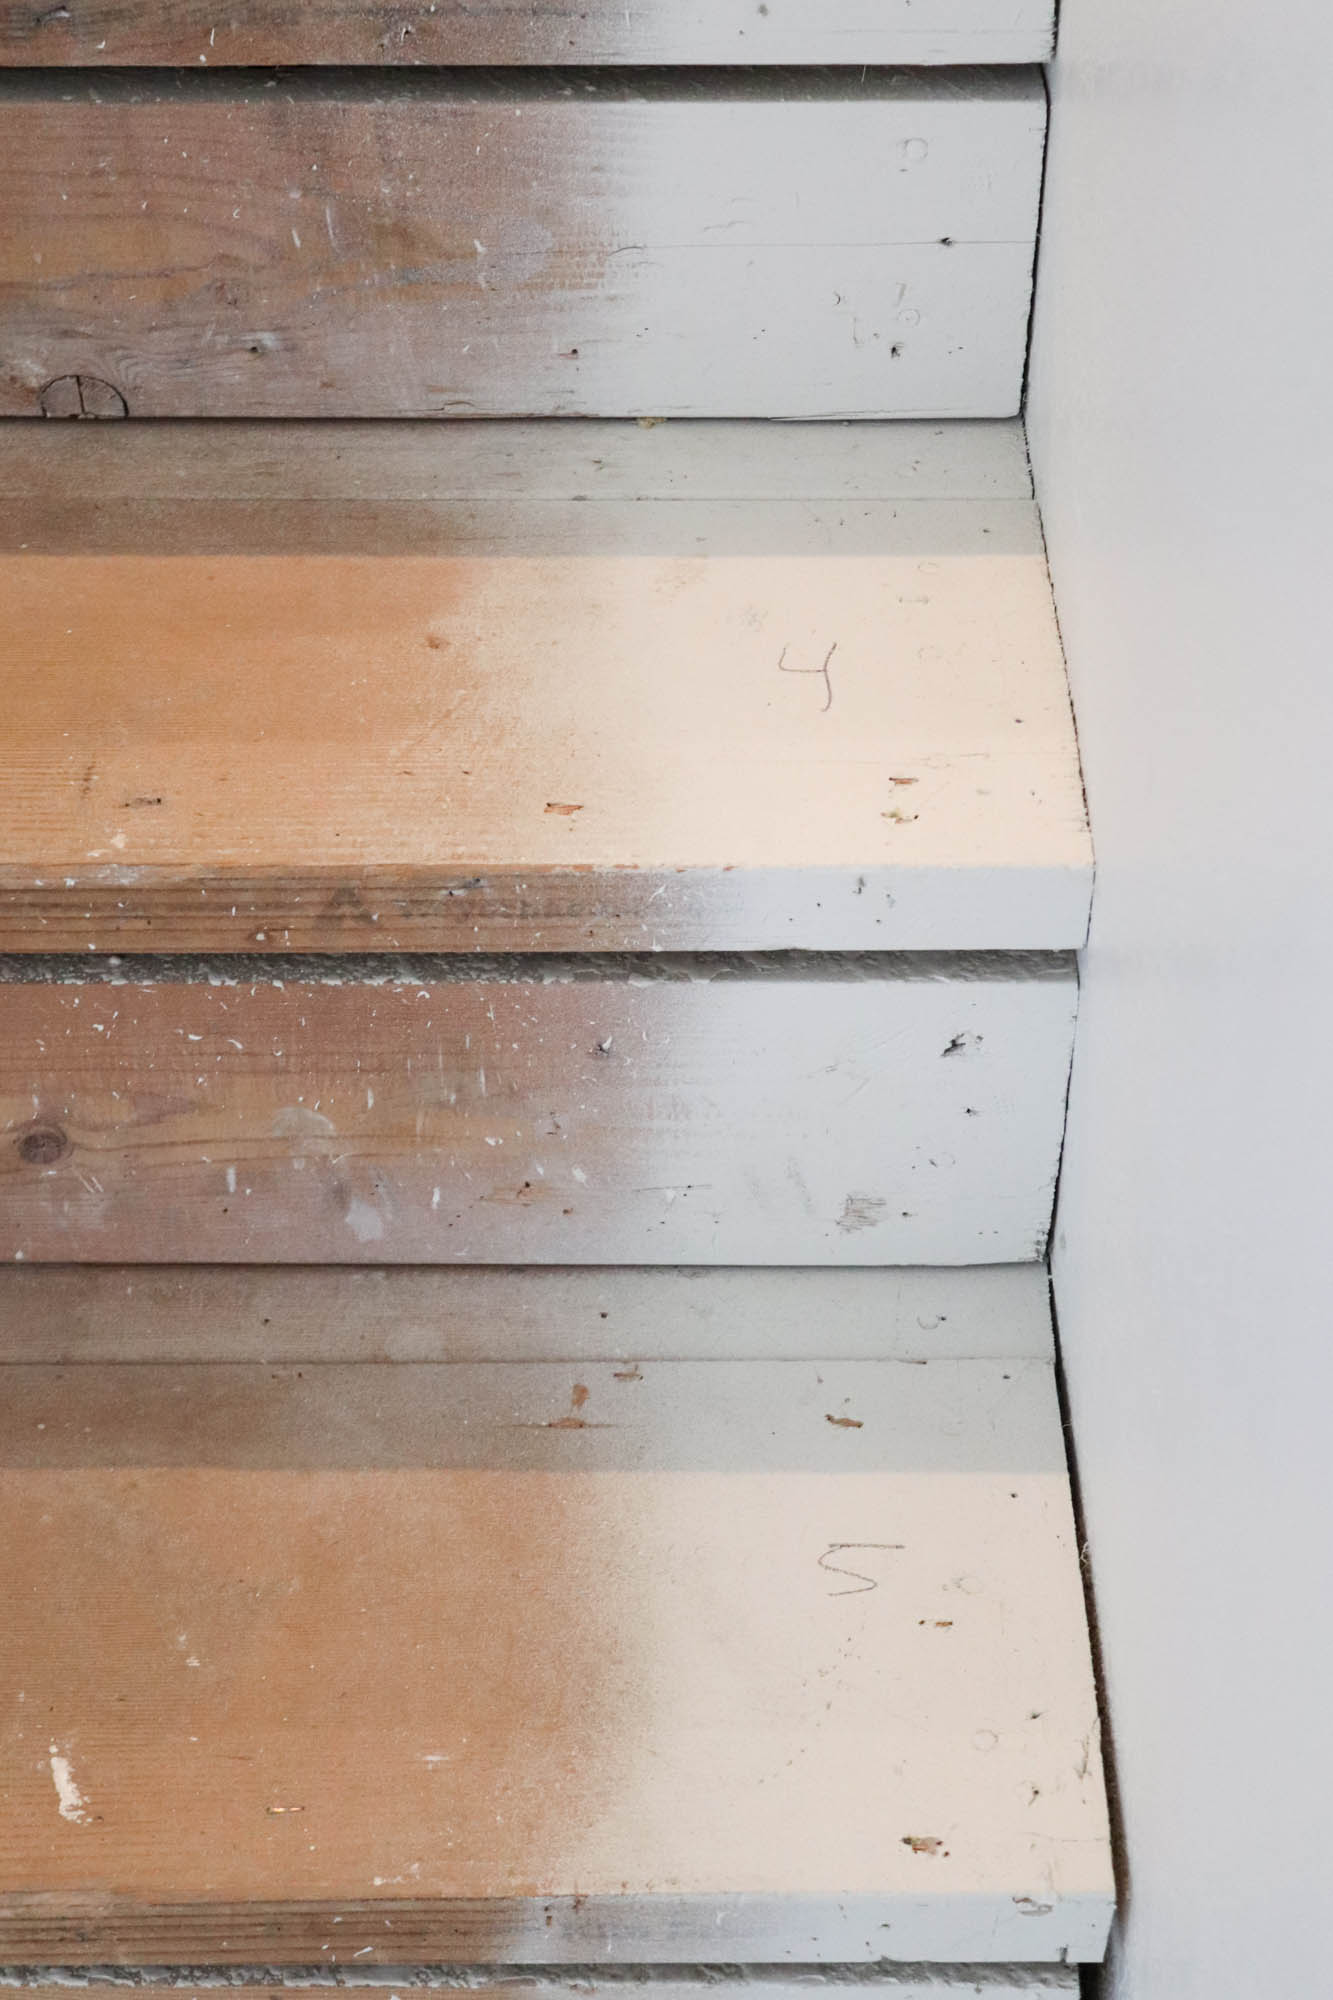
Then, Todd started measuring each individual stair. He took both the front and back measurement of the step to find any variance in the wall. He loves his laser measuring tool for projects like this. It’s incredibly accurate, but you can use a regular tape measure for this as well…
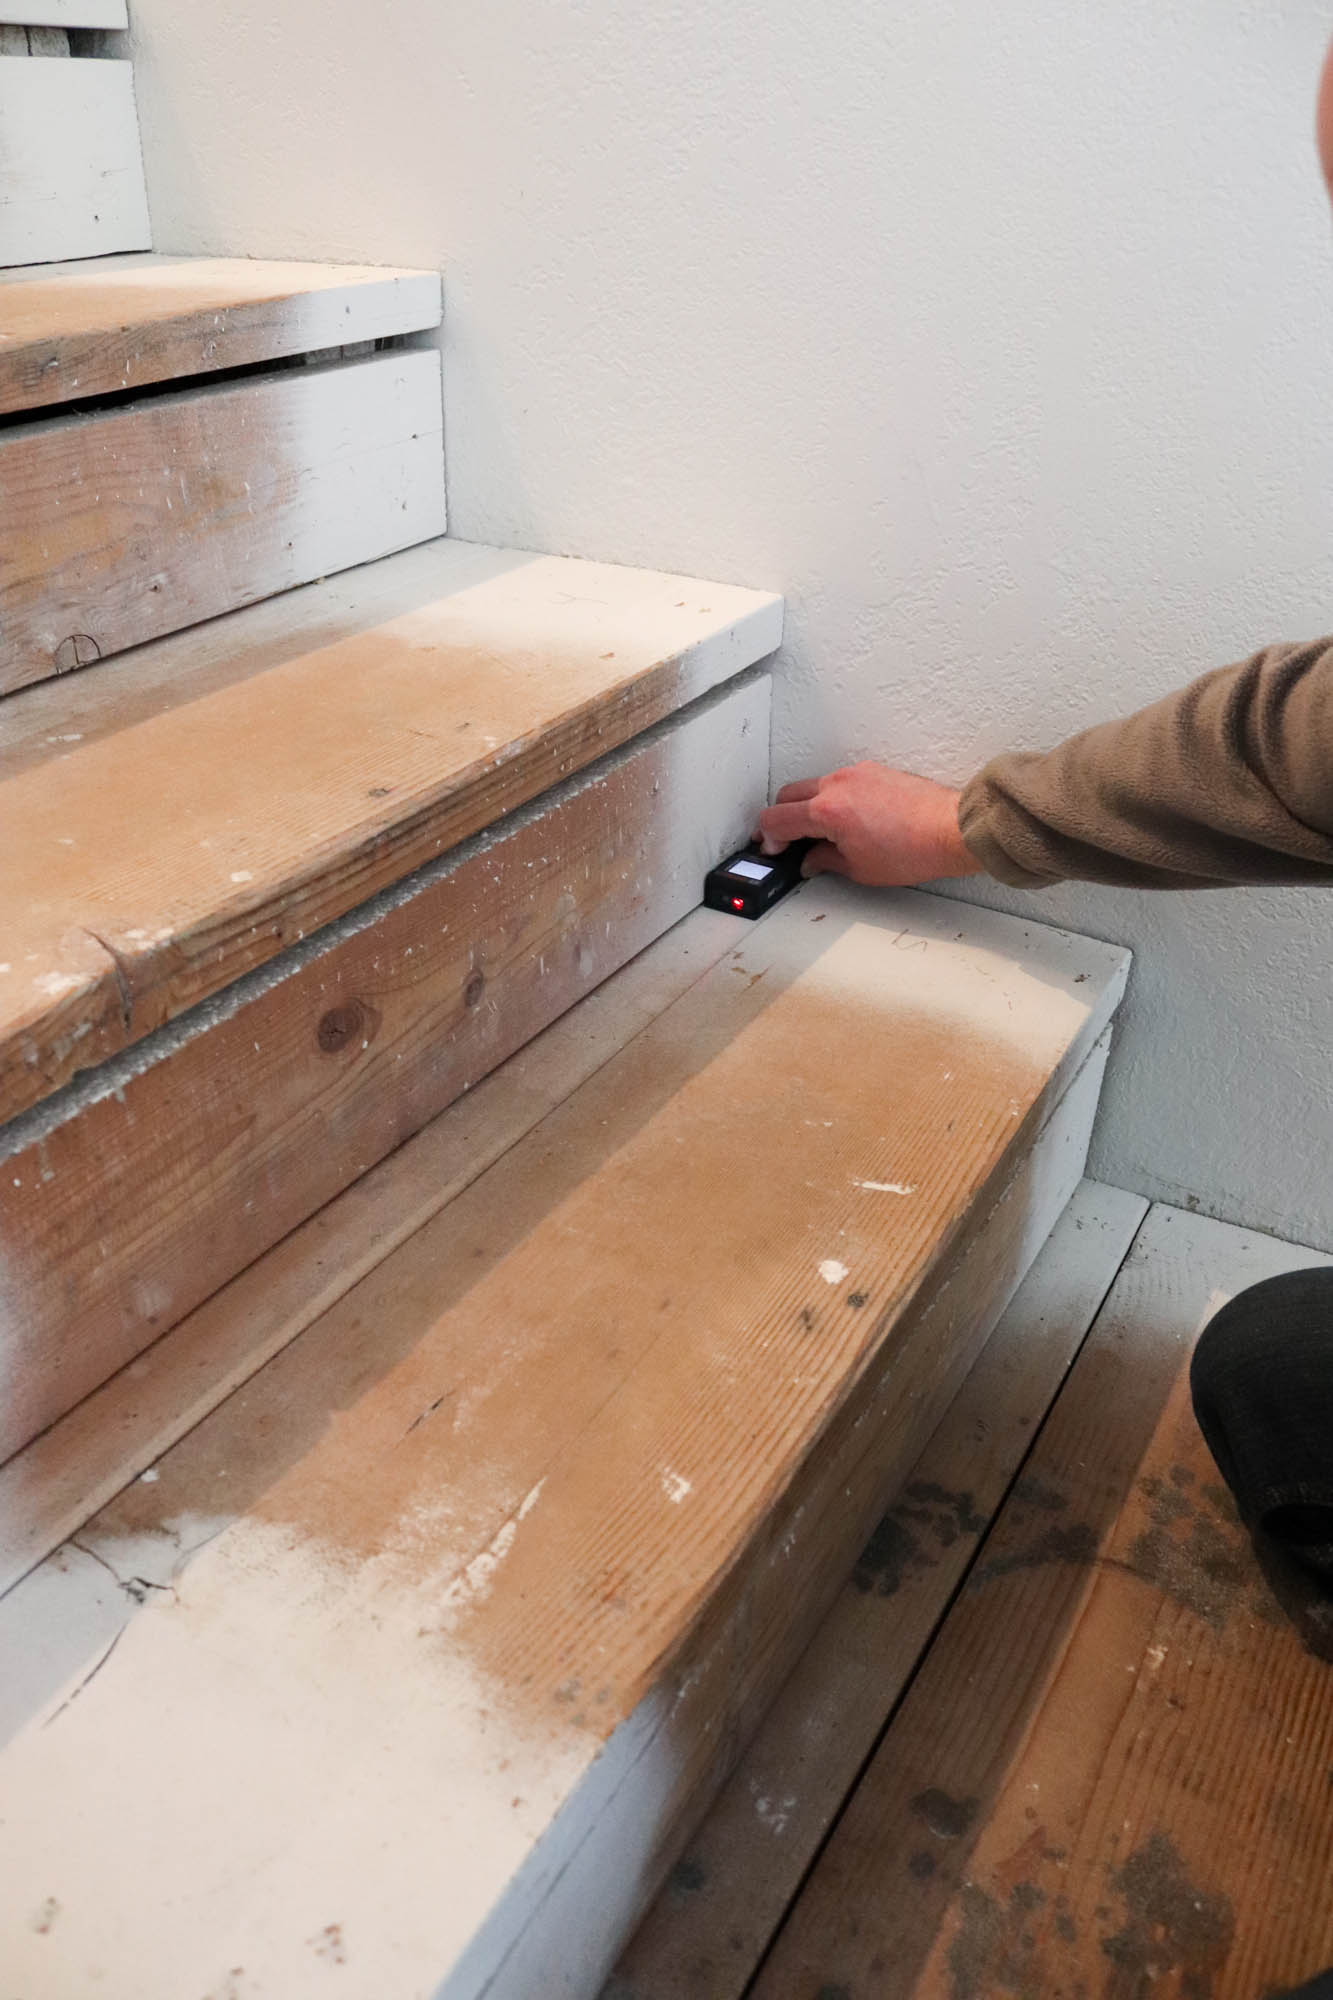
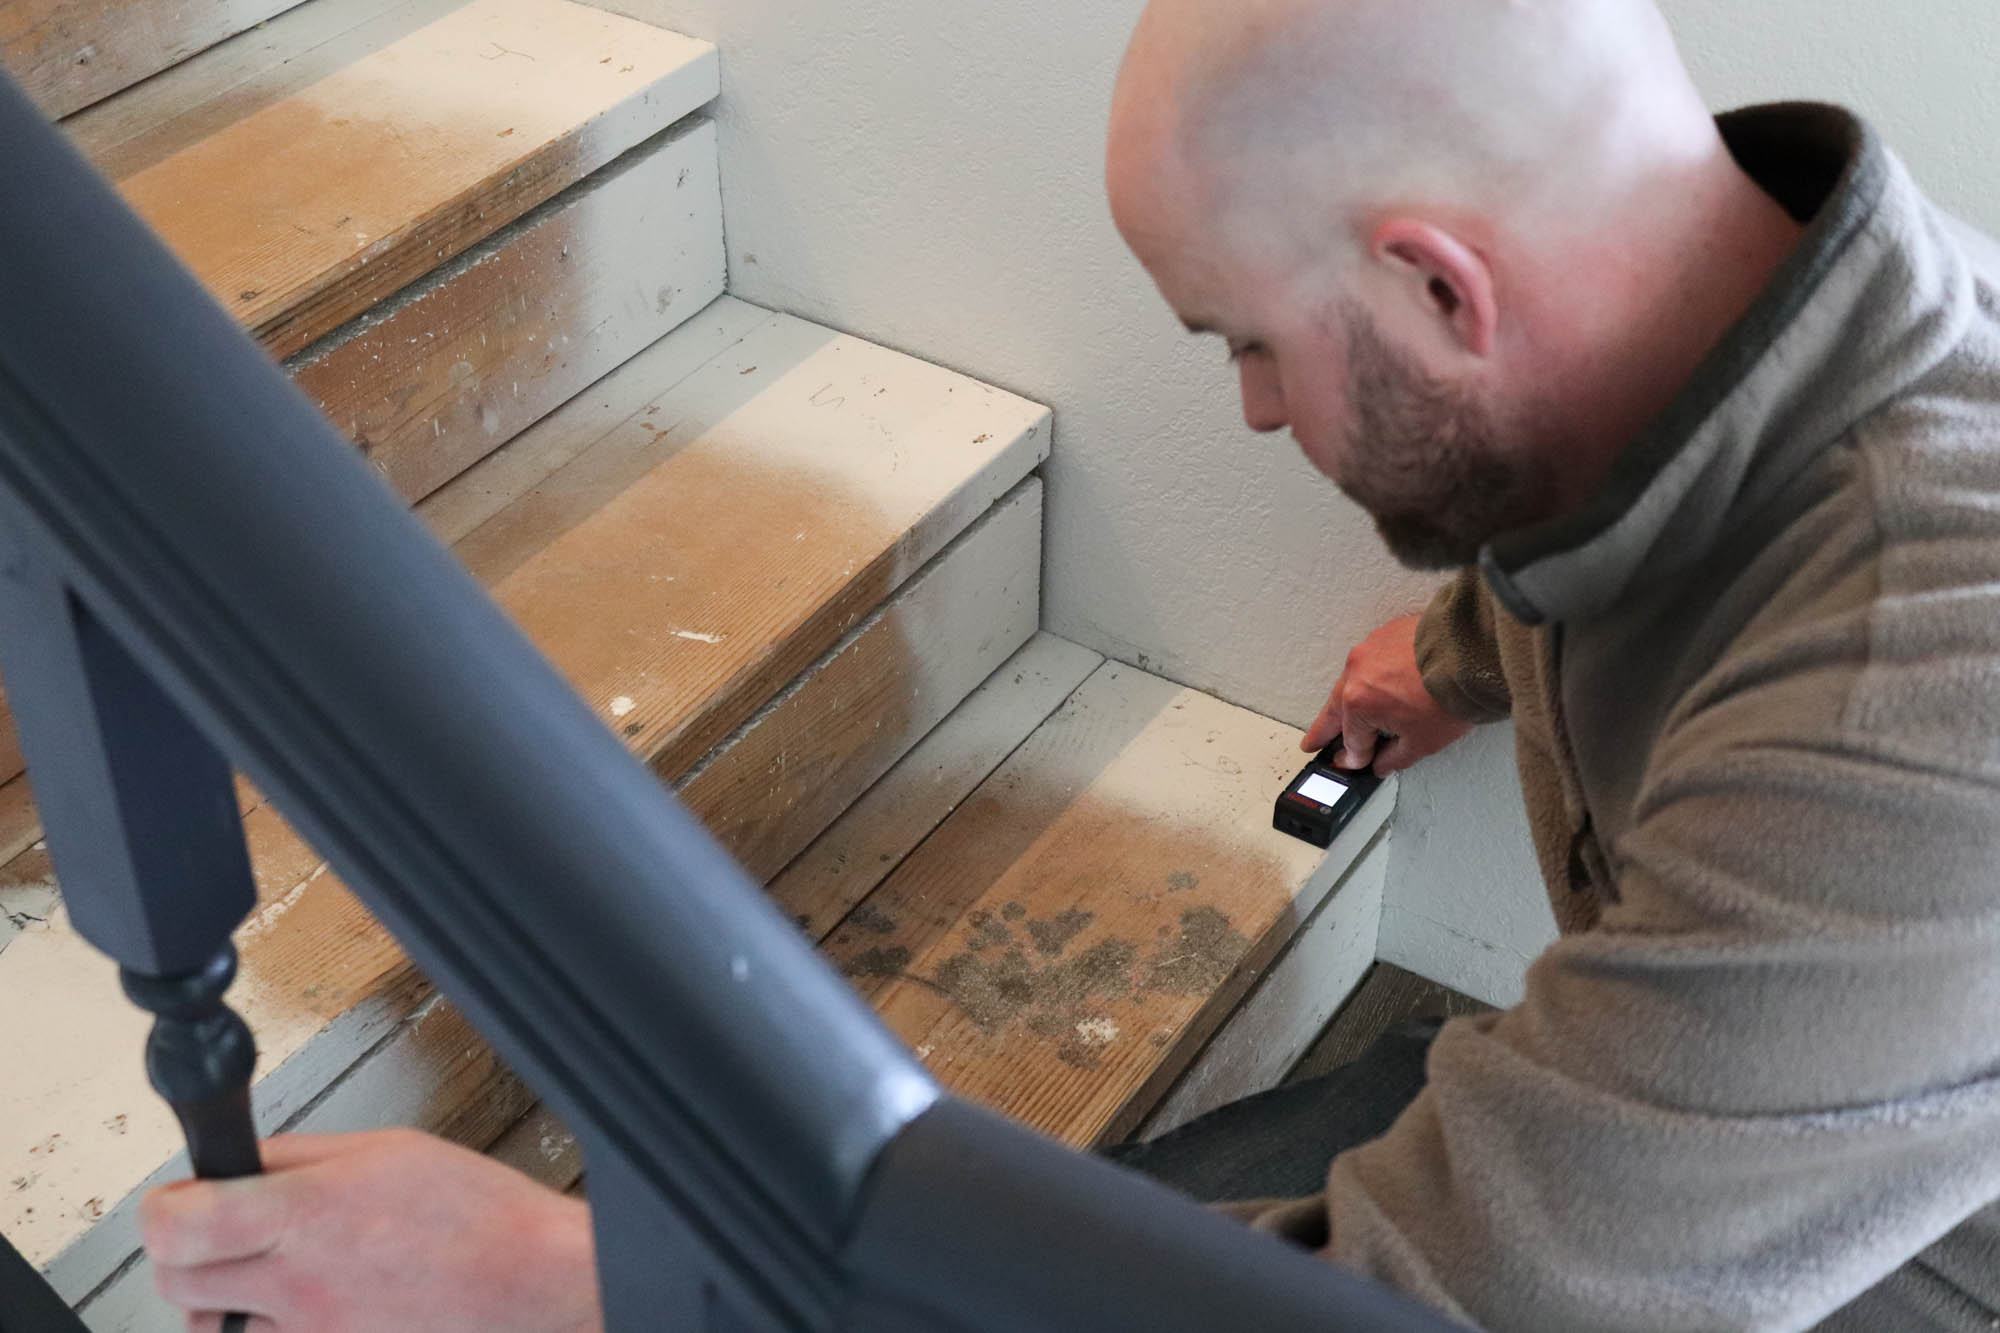
Because we bought 36″ wide stair treads, and our stairs were right around 36″ wide, he was able to double check measurements by placing the new stair tread on each step to make any needed cuts before we began staining and finishing the treads…
As he measured each step, he’d then trim the stair tread to size and number it to match the stair number…

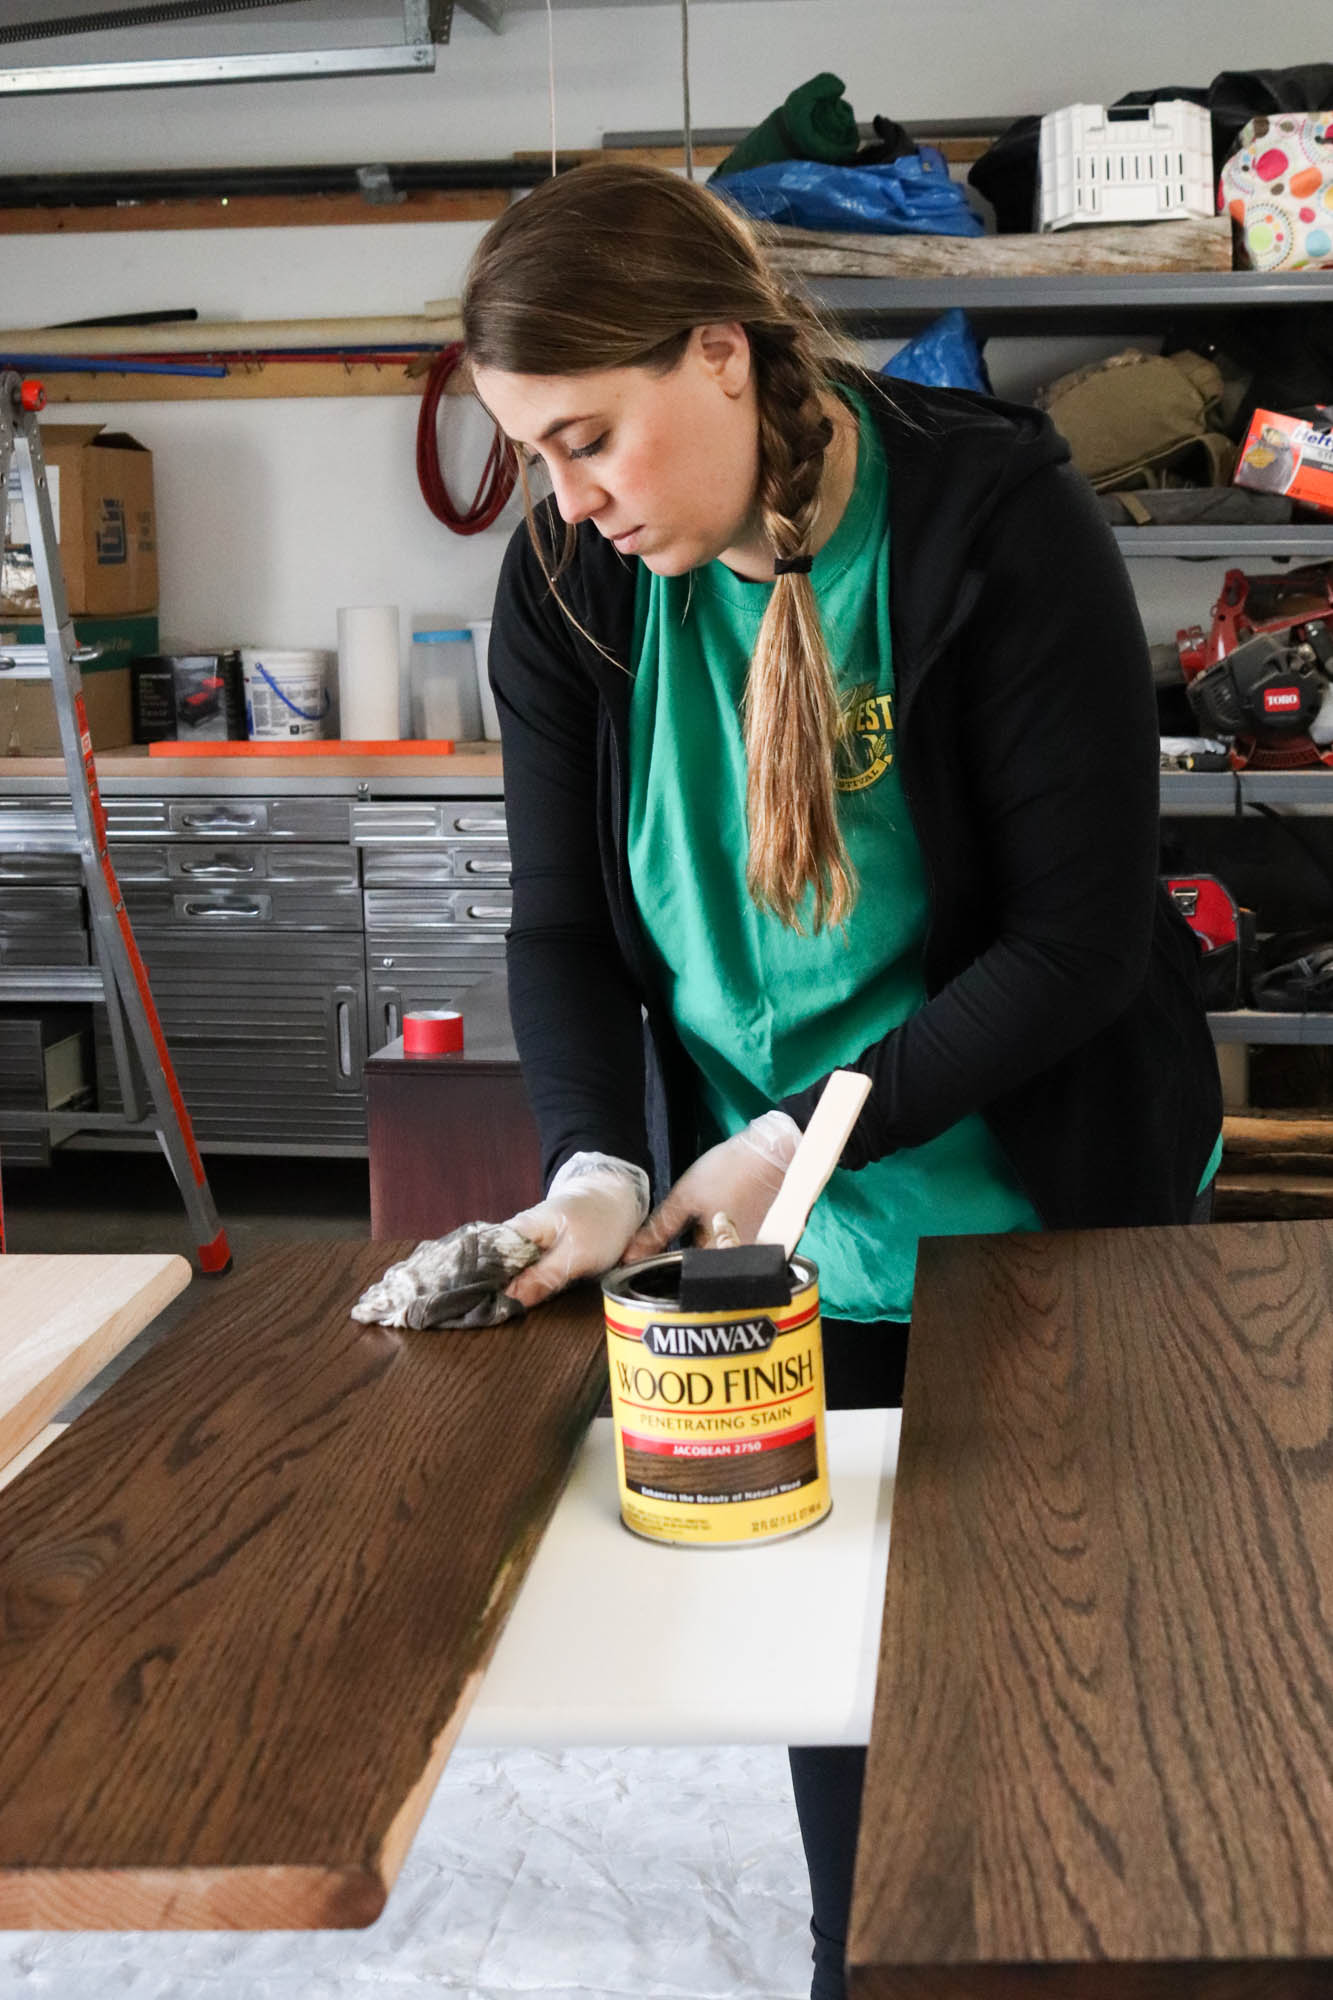
Step 2: Prep, Stain & Seal Stair Treads
Once Todd had each stair tread trimmed to size, we started staining and sealing. I took a rag and wiped off any dust, prepping the surface for stain…

Because we have lighter floors throughout the house, I wanted to have contrasting darker stair treads. We ended up going with Jacobean by Minwax. I absolutely love the color on these red oak treads…

We used a foam brush to apply the stain and it only took one coat to get the depth of color we wanted…
*Side note: Yes, I’m pregnant, but with two doors open, the smell of stain wasn’t lingering or strong. We’re very careful of this as we do projects.
With all the stair treads stained, we let them dry overnight before adding the polyurethane…

The next day, with the doors open, we started applying the first coat of polyurethane…

I wiped the treads down again to remove any dust that may have accumulated, and then applied the first coat with a cheap paint brush…


The brush did a great job of evenly, and smoothly, applying the polyurethane. On a few other steps I used a foam brush and I didn’t like the finish it provided nearly as well.
We let the stair treads dry completely before adding a second coat. Even with all the doors open, and using fast drying polyurethane, it took several hours before the treads were dry.

Once they were dry, and because it was such a nice warm day, we set up the treads outside before applying the second coat. They dried much faster and cured quickly.
I also want to mention, that while you can sand between coats of polyurethane, we didn’t. The polyurethane went on very smoothly, and to be honest, we wanted a little bit of “grit” on these stairs so they wouldn’t be so slippery. Looking at them, you’d never know we didn’t sand them between coats, and they are smooth to touch.
We also only applied two coats of polyurethane. Feel free to apply more as you see needed.
Step 3: Cut MDF Material For Stair Risers
While the last coat of polyurethane dried on the treads, we began cutting the stair risers for each step. We used 1/2″ MDF for the risers. Todd measured how many we could fit on a sheet, then we used a saw to rip the material down into a smaller section which was easier to work with…

To get the size for each new stair riser, Todd measured the bottom and top of each existing step riser…


Then, he used a level to find the variance in each step so he could cut the riser to the specific riser height. Doing this, ensured each riser would be cut level…

He did this on each side, and also in the middle…

He’d write down each measurement he was taking…

Then he cut the MDF material to the specific size using our table saw…

And then he’d measure them, and mark them to the correct length and use the chop saw to trim them to size…

He followed these same steps as he worked his way down the stairs…

Once he had a section ready, he numbered each riser and then it was time to paint…
Step 3: Paint The Stair Risers
We set up an area outside where I could paint the risers. The weather was really nice and the paint dried quickly…

To paint them, I used a 4″ foam roller and chose Super White by Benjamin Moore in semi-gloss to match our existing trim…

In total, I applied three coats. Once they were dry, which didn’t take very long out in the sun, they were ready to be installed…

Step 4: Install The Stair Risers
To start the installation process, Todd used a level to line up the new riser to the existing stair tread…
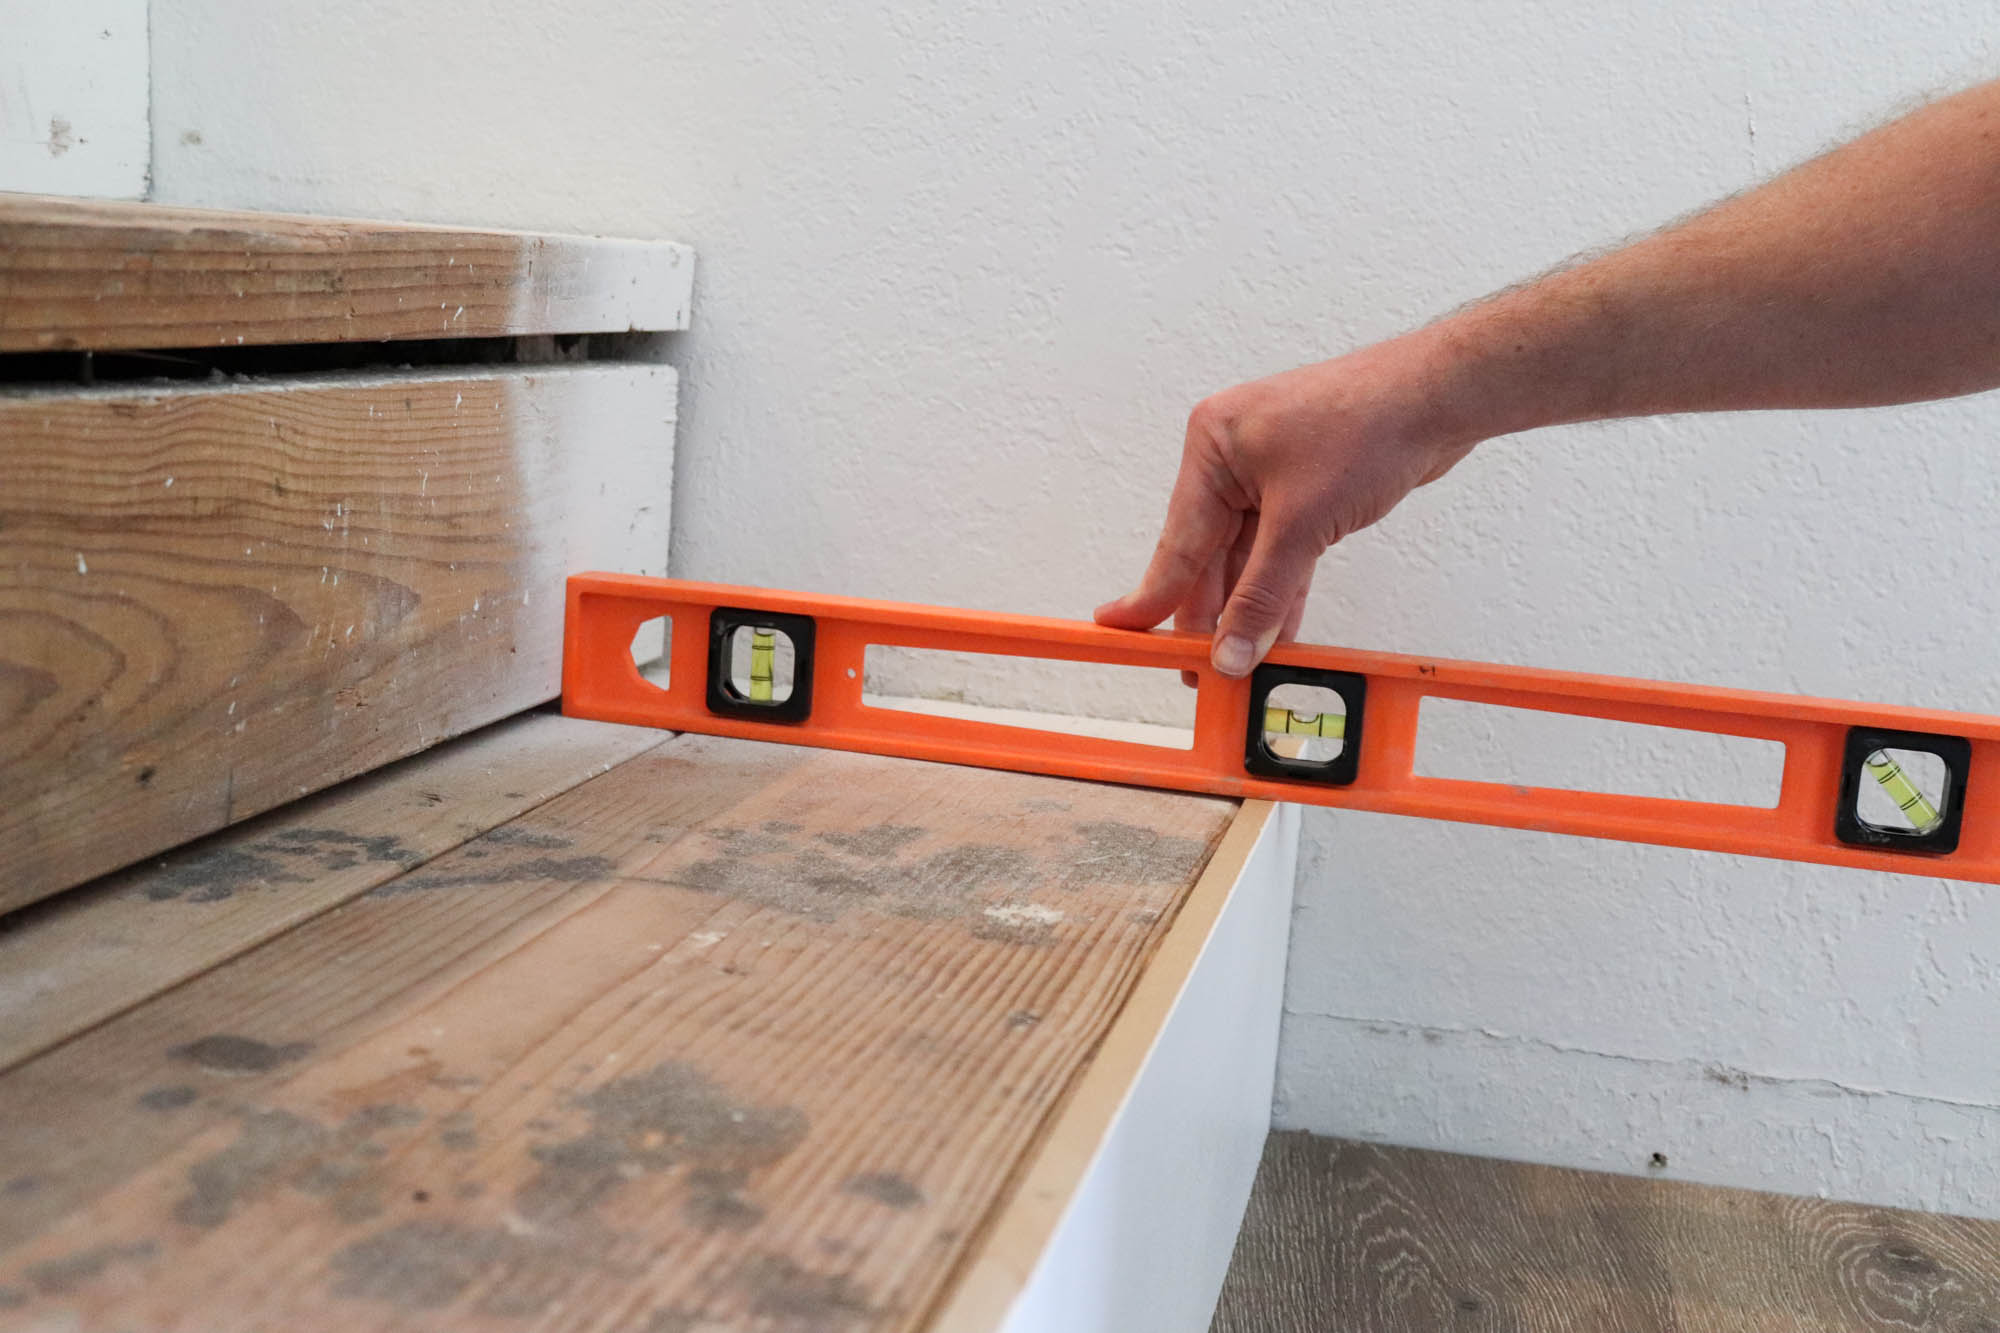
Then, he nailed them in place, along the top and bottom…

He followed these same steps as he worked his way up the stairs…

On one step on our lower stairs, he did have to shim behind the riser to create a level surface…

He used shims and a level to create a level foundation for the new riser to be nailed into…

Other than that one step, it really was as easy as putting them in place…

Making sure it was level. In this case, with the top of our hallway floors…

And then nailing them in place…

Step 5: Shim Existing Stair Treads
With all the new stair risers in place, it was time to start installing the new stair treads. To do this, we needed to shim any existing stair treads that weren’t level, or flush.
Todd started by using a level on each stair tread to see where the stair was off. Some stairs were better than others…

Depending on the stair tread and what it needed to be level, he’d use shims and nail them in place to create a level foundation for the new stair tread to sit on…

He’d also make sure the shim piece lined up evenly with the top of the new riser we’d installed (which was cut to be level)…

He worked his way across each existing step, making sure the entire step was level, and then he’d move onto the next step…

The top section of stairs was much better than the lower section. On one step in particular, he had to use several shims to make it level…


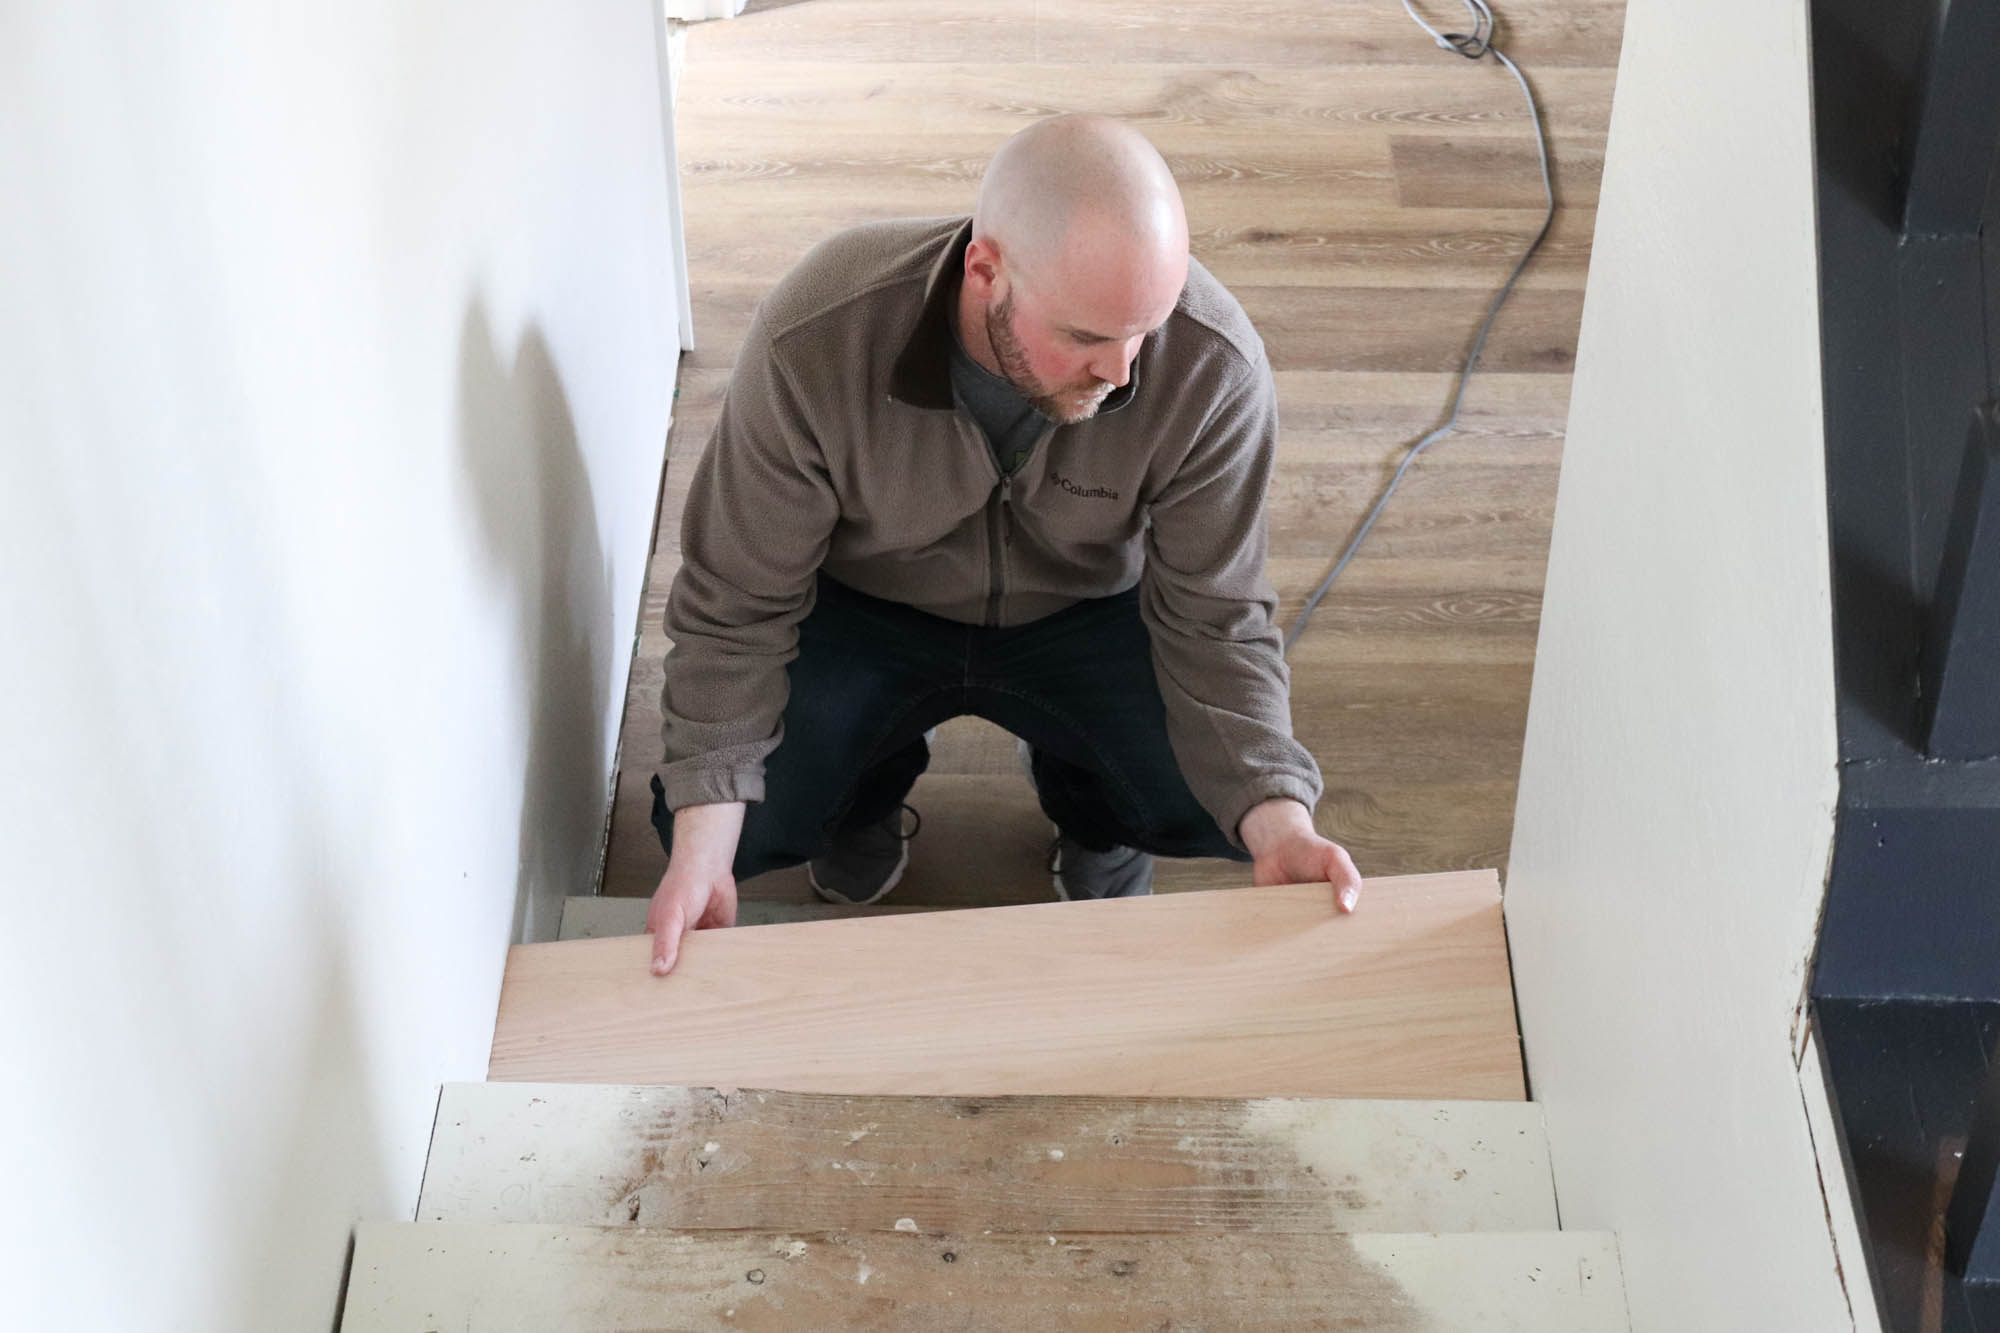
With the existing stair treads level, it was time to start installing the new stair treads.
Step 6: Install New Stair Treads
When deciding on the overhang for our stairs, we knew we’d need to add extra length to the back of our treads. Most of them wouldn’t be the same depth, simply because the existing stair treads weren’t the same, which meant there’d be a gap at the back of the stair treads once we had each tread overhanging the new riser we’d just installed.
For our tread overhang, we chose 5/8″. Half an inch didn’t feel, or look like enough of an overhang, and an inch felt like a tripping hazard. 5/8″ seemed to be the sweet spot. With that in mind, we started at the top step and working our way down.
The top step had by far the largest gap, which we knew was the case because it was the deepest step…

With the tread level, and pulled out to a 5/8″ overhang, Todd was able to measure the gap width…

To create a seamless look for the stair tread, we ripped down an extra tread for the filler pieces on each stair…

With the piece cut, we put it in place…

Then we slid the stair tread back in place. Unless you know there’s a seam, you’d never know…

Then we took the piece back out, put a bead of liquid nails on the back…

Then put it back in place and nailed it down with our brad nailer. The brad nails are barely visible when looking right over the tread, and not at all noticeable with regular movement on the stairs…

With the filler piece in place, he applied liquid nails to the back of the tread…

And then put it in place and used the brad nailer to secure it to the existing tread…

We used that same method on both of the top stairs of the two stairways, since the steps were deeper than the others.
For the other stairs, since they didn’t have as large of a gap at the back of the stair tread, Todd followed the same steps for measuring and ripping down a filler piece. If the wood splintered as Todd was ripping the pieces down on the table saw, I would touch up those areas with extra stain.
With the filler piece for each tread cut to size, we then began the process of combining them to make one solid tread. To do this, we ran a bead of wood glue along the back…
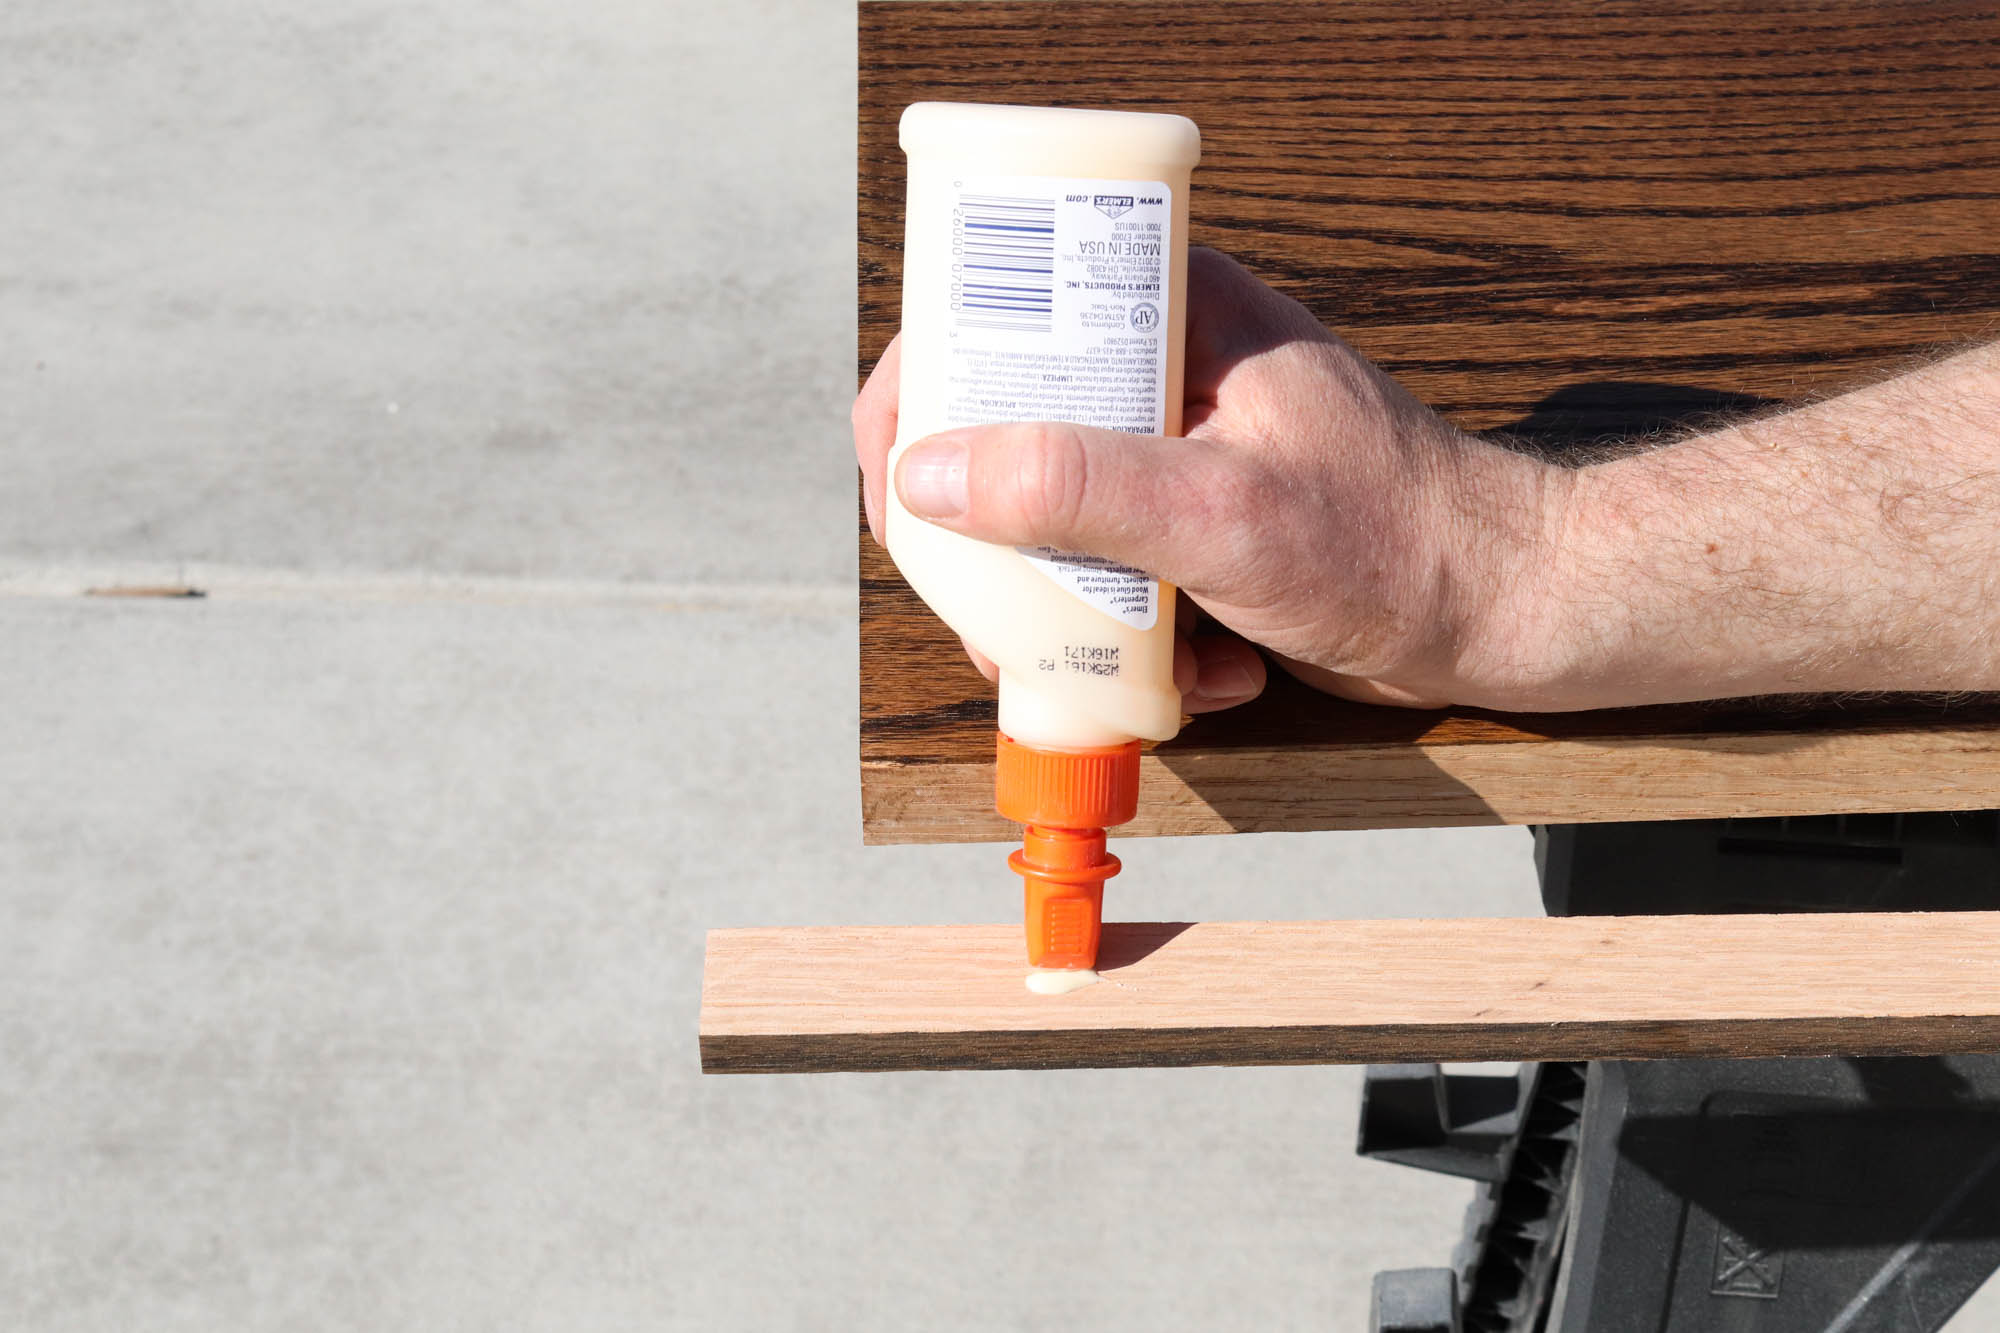
Then turned it over and made sure it was flush on all sides…

Todd then used the brad nailer to nail it together…

We followed the same steps on each tread, and then started putting them in place. We applied liquid nails to the back of every tread…

Then Todd would nail them in place in multiple locations…

Honestly, because of the variance in pattern of each oak stair tread, you can’t tell there’s a seam at the back of the step. This was the perfect solution to our gap issue. The stair treads are also very sturdy and in place. They feel solid underfoot.

Step 7: Fill The Nail Holes, Caulk & Paint
To make the risers more seamless, the next step was to caulk any gaps…

Todd did a great job of getting the risers to fit as tight as possible, but because the walls weren’t perfectly straight, there were a few small gaps on each side…

I began the process of caulking any gaps and filling the nail holes. Once the spackling was dry, I went over each nail hole with fine sandpaper, then wiped them down with a clean cloth.
The caulking made such a big difference in making the stairs look built-in…

Once everything was dry, I touched up those small areas with paint.
Step 8: Add The Transition Piece At The Top Of The Stairs
The last step, was adding the transition piece at the top of the stairs on both sections where we had a gap in the flooring…

This step will probably vary with each home, but because when we initially installed our flooring, and the flooring we purchased didn’t have a stair cap option at the time (they do now!), that meant we’d need to use a piece of t-molding as our transition between the top of the step and our floors. We ordered it to match our floors, then Todd cut it to size and nailed it in place…


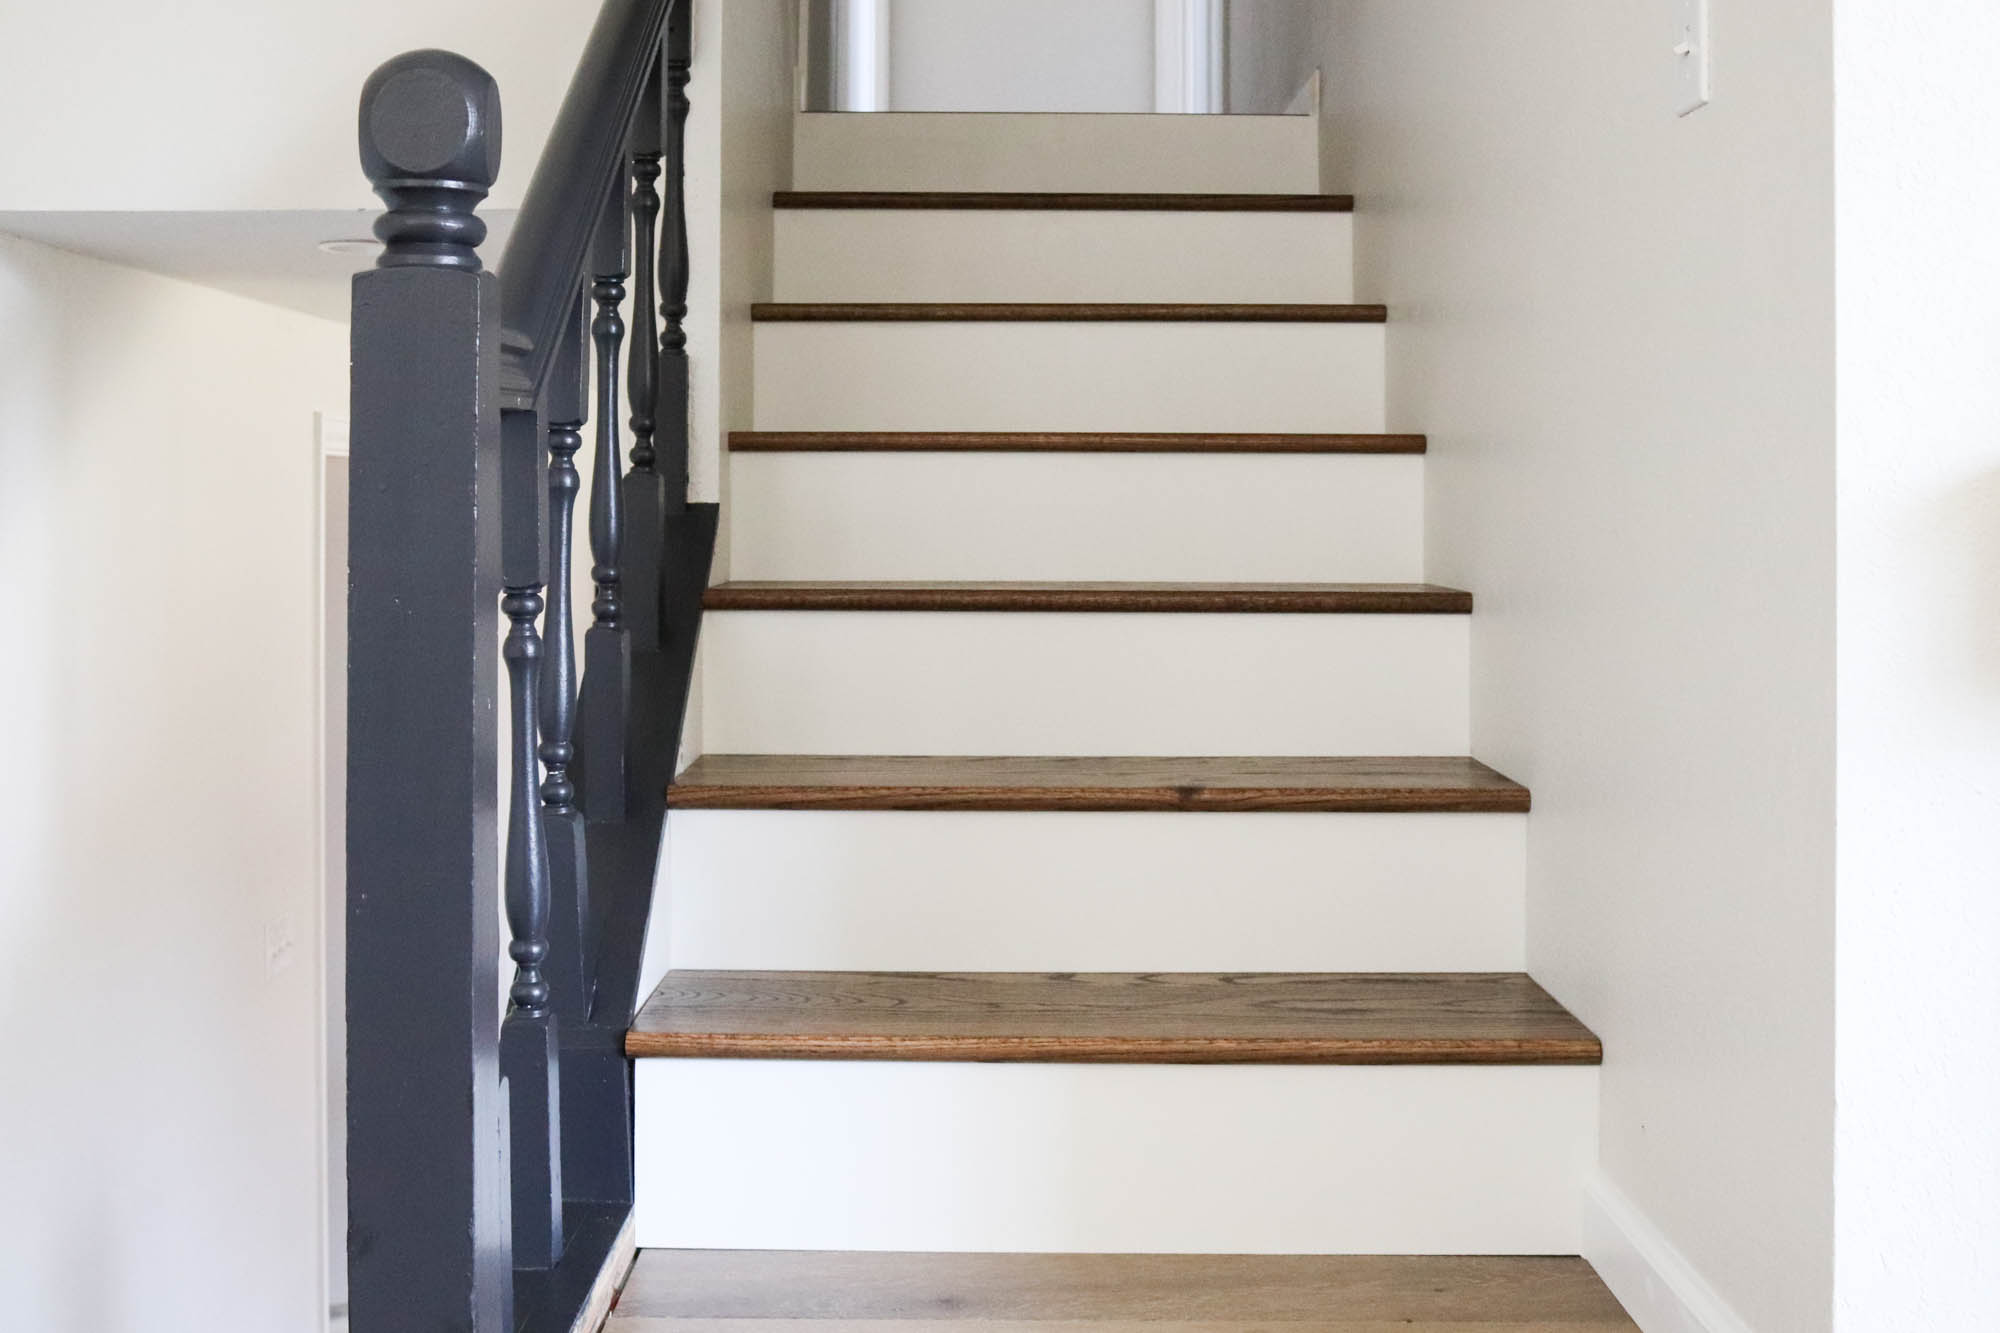
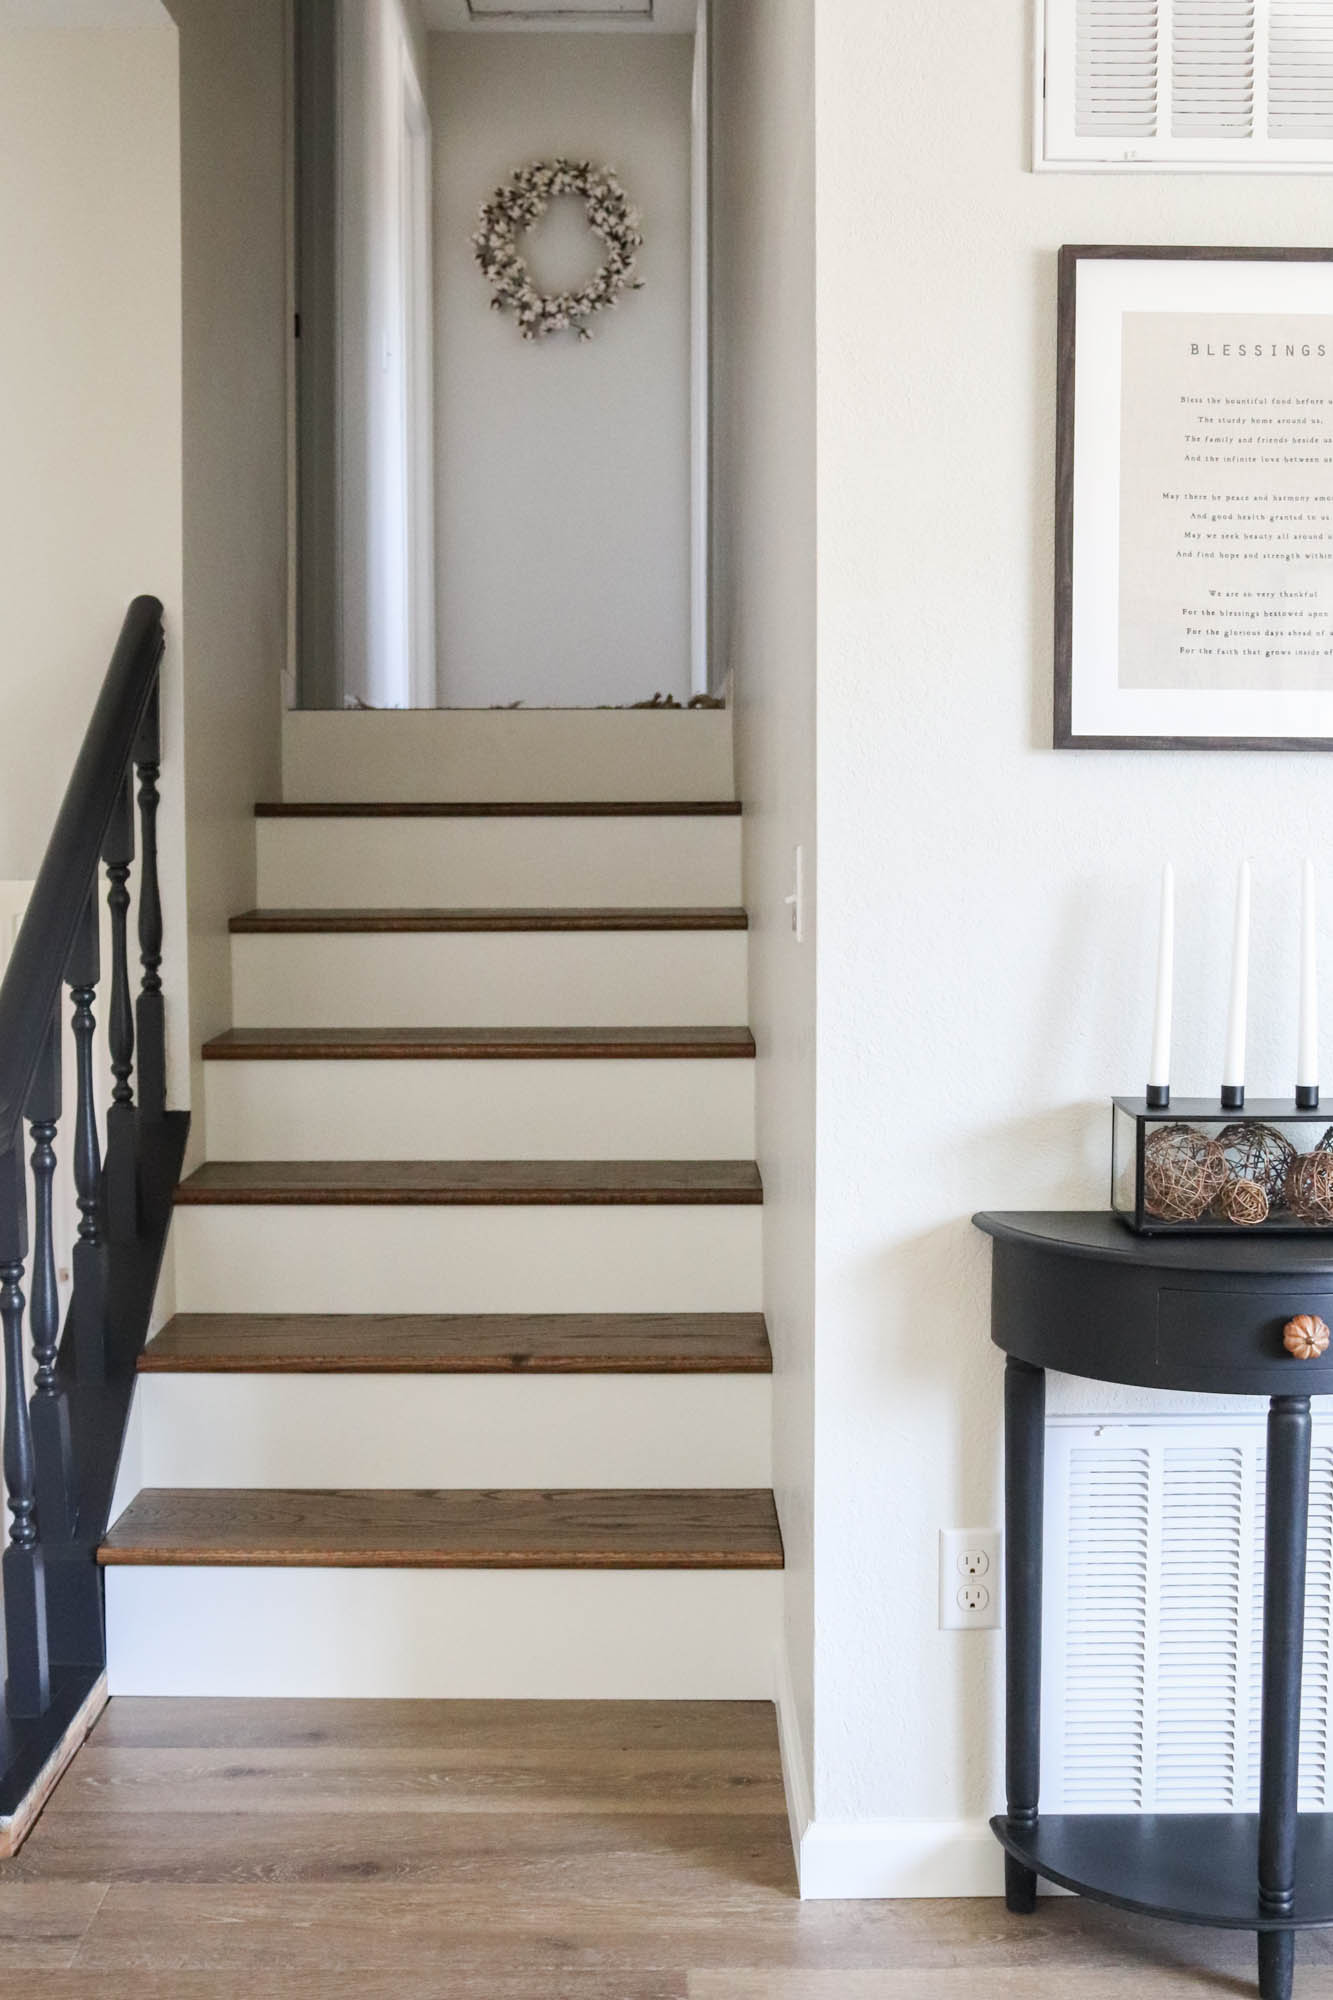
And with that, our DIY staircase makeover was complete! I can’t tell you the difference these stairs have made to the whole house. It’s one of the first things you notice now and it’s instantly made the house feel less like a fixer upper and much more finished!

Of course, now that the stairs are finished, the hand rail looks really out of place and dated… which it is. We’ve temporarily fixed it so many times, but knowing we’ll be replacing it soon, we left it as is for now… broken spindle and all. We really look forward to replacing it soon.

But, can we just take a minute to celebrate these beautiful stairs?


And, let’s also celebrate all the base trim we were able to finish because the new stairs are in place! That’s a big one!

And now that these stairs are in place, we can finally start adding in all those fun custom touches that really make things pop!


Oh the plans I have! Having the stairs finished has really given me an extra boost of inspiration and I’m excited to start adding in artwork, custom moulding and other fun things!
Just for fun, let’s do a little before and after!
Before:
After:
Such a huge transformation, right?! We are absolutely loving how this project turned out and are so happy we finally made the time to do it! Happy to have one more project off the to do list..
Your stairs look beautiful! Thanks for the in depth tutorial too! So much work, but so worth it. 🙂 Julie
Severe Coleman on FB can make them stairs look super nice. Gi check her out on facebook.
Wow. That is awesome.
The stairs looks fabulous. What hard work for the two of you but, so rewarding!
Wow, that was a lot of work! And the finished product is so pretty. I know you are anxious to get things finished, but i really appreciate the logical, methodical way you are taking on each task.
You are definitely “getting there”!!
I doubt a “professional” could have done a better job! Beautiful.
our stairs are done but there are some gaps along the wall where the wood just did not match. Is there a filler that will hide this? I am not sure a small wood piece would look right
Could you use caulking to fill in the gaps? It worked well for us! 🙂
Highly do not recommend shimming the treads, especular with that few spaces that far apart . You want a solid surface connection of the new tread to existing, with adhesive and sneaky nails. Shimming Under the tread with cause space and over time could cause squeaks. Also, not shown I. The video, but he should have taken the opportunity to rescrew and tune up the staircase before installations. You can fix tread level in this stage. All this, given the opportunity since the raw stair framed was exposed, is another step to prevent squeaks.
Stairs are under a lot of stress while being used. Just constantly being walked on by 150 avg lbs beings. The way they are constructed, with nails, staples and shines, these fasteners are usually just straight shank. They have no treading hold and can just loosen at the back of the riser, mostly in the middle of the tread. That is what causes squeaking in the stairs. Take the extra day and give her a once over with some screws
Question…..in one of the first pictures your base stairs took to have an overhang/lip; did you cut the overhang of the raw wood off to make them flush with the riser?
Hello! With the exception of the very top stair where it meets the flooring on the second level, all of our stair treads have an overhang of 5/8″. Hope that helps!