
Painted Front Door
It seems that lately I’m following through with projects I’ve had on my “someday” list. And while I’m not sure why I ever included painting the inside of our front door on that list, it’s done and completed and beautiful.
And now, I have no clue why I waited to paint it. I’ve known for at least a year what I wanted to do, but it’s always fell to the end of my list, which we all know, is quite long. Since we added our dining room shelving, I decided it was time to get our entry way in shape too. Suddenly, it’s started to feel like the odd man out, and changes are definitely coming its way.
Knowing what changes I want to make, painting the inside of our front door felt like the right first step. Enter in ScotchBlue™ Painter’s Tape, and we have a painted front door. And it’s basically life changing for our entryway…
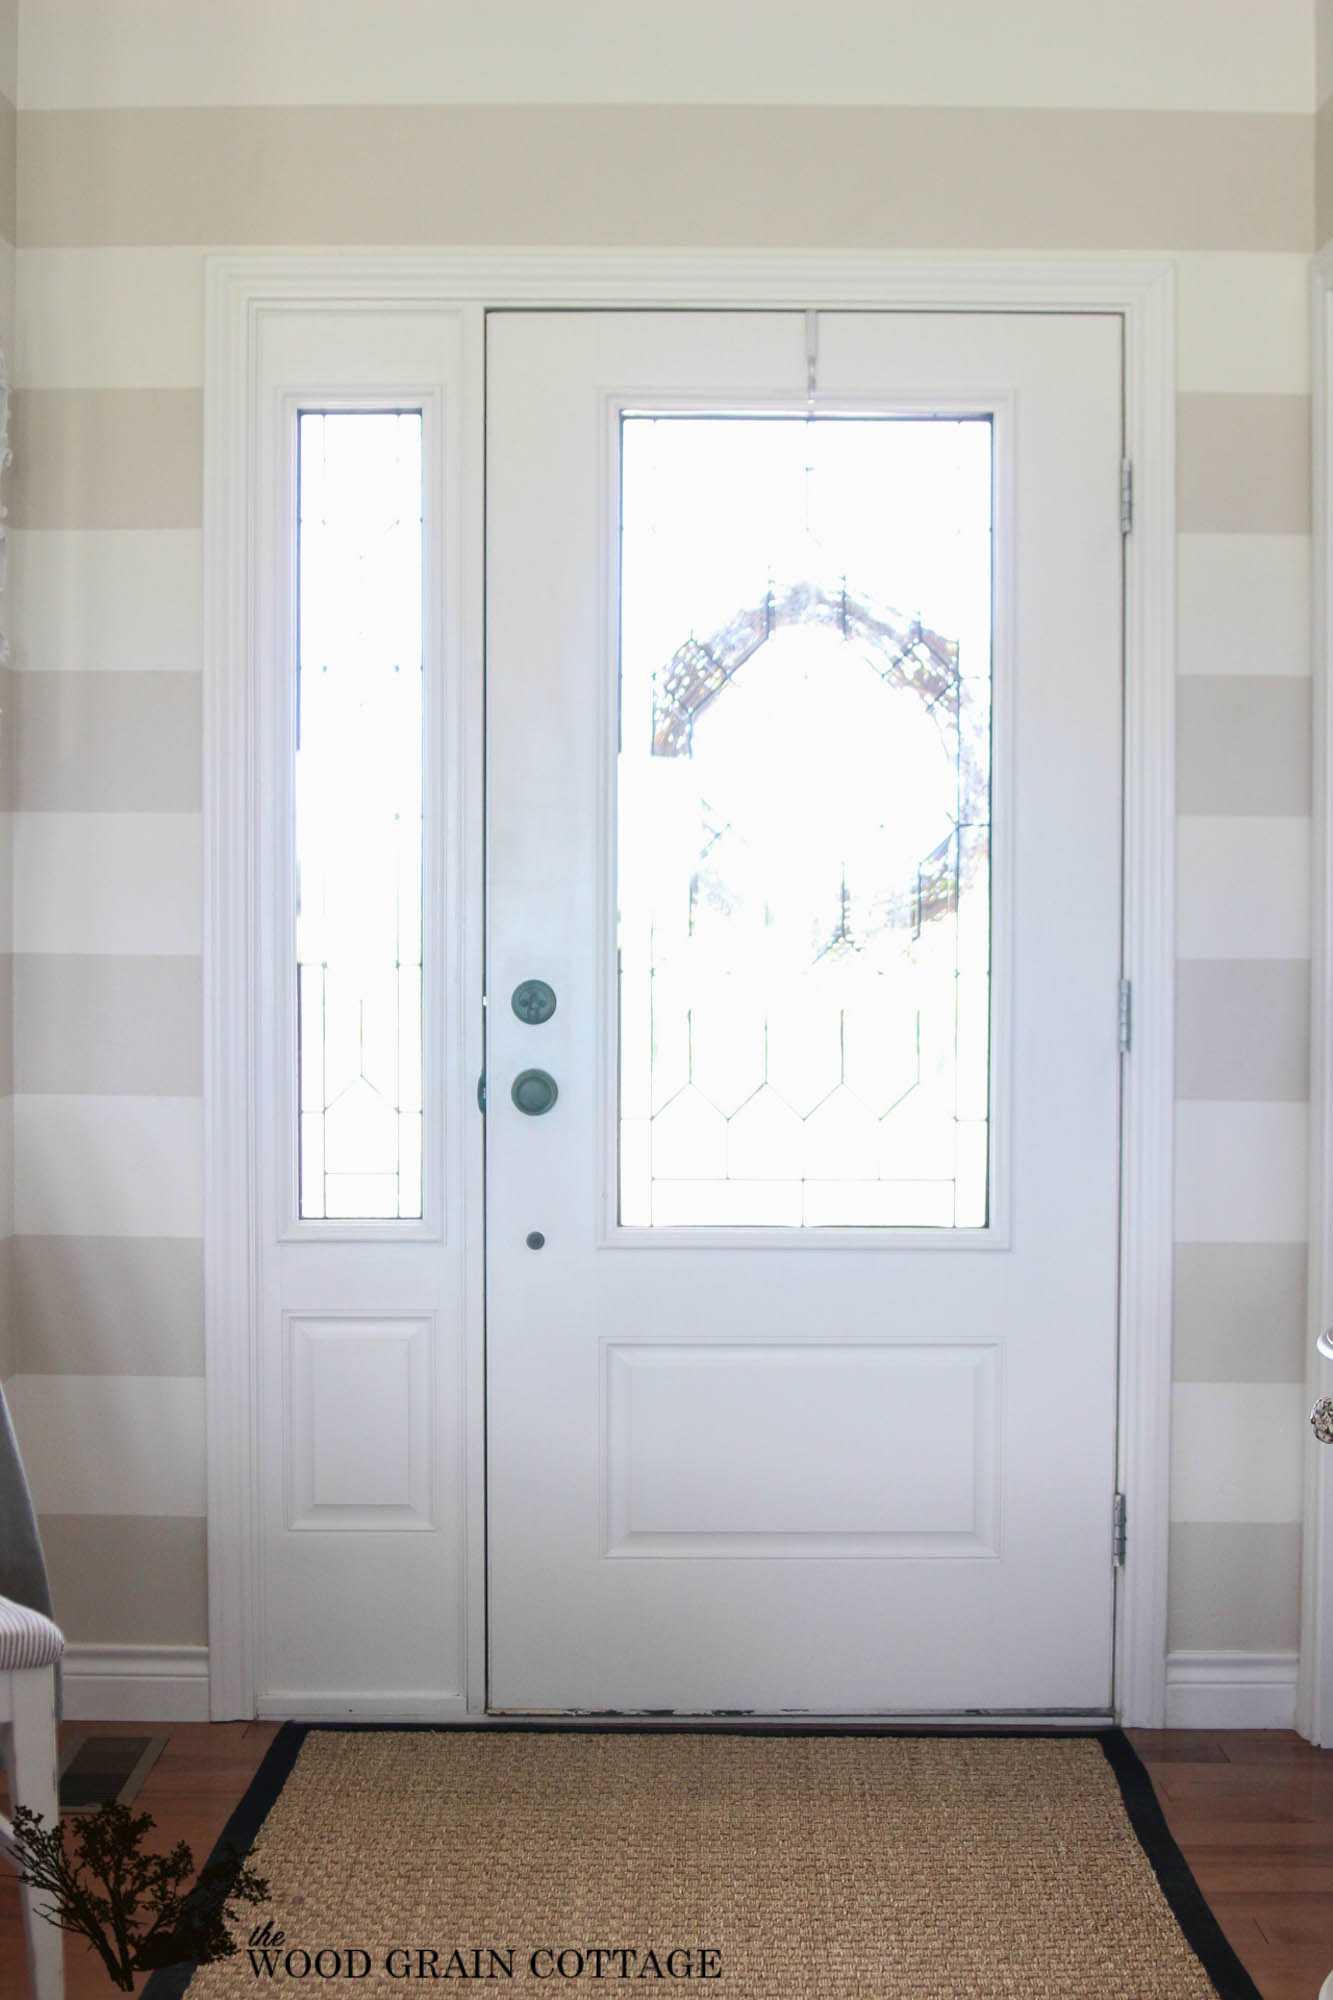
Here’s what we started with… a plain white door that needed a little character….
 Here’s my list of supplies:
-ScotchBlue™ Painter’s Tape for Multi-Surface with Advanced Edge-Lock™ Paint Line Protector (2093EL): ScotchBlue.com
-Paint
-Angle Brush
-Foam, super smooth roller
-Small Craft Brush
-Razor Blade, Optional
—-
I knew I wanted to keep the white trim around the door, so I grabbed my ScotchBlue™ Painter’s Tape and started taping.

Step 1: Tape off the door:
I taped off our door knob and deadbolt…

And the trim around the door…

And the inside of the door where our outside color meets the inside…

And because we had to replace our original door hardware a few months back, I didn’t tape around the lock because Anthony had to drill a bigger, wider hole and I wanted to use a craft brush to get inside those tiny areas.
Step 2: Paint
Once everything was taped, I started painting. I used the same color as our mudroom door, Onyx by Benjamin Moore®, but instead of using semi-gloss, I used satin. It definitely doesn’t leave the different roller marks, which semi-gloss had a tenancy to do on doors.

After a few coats, it was looking much better…
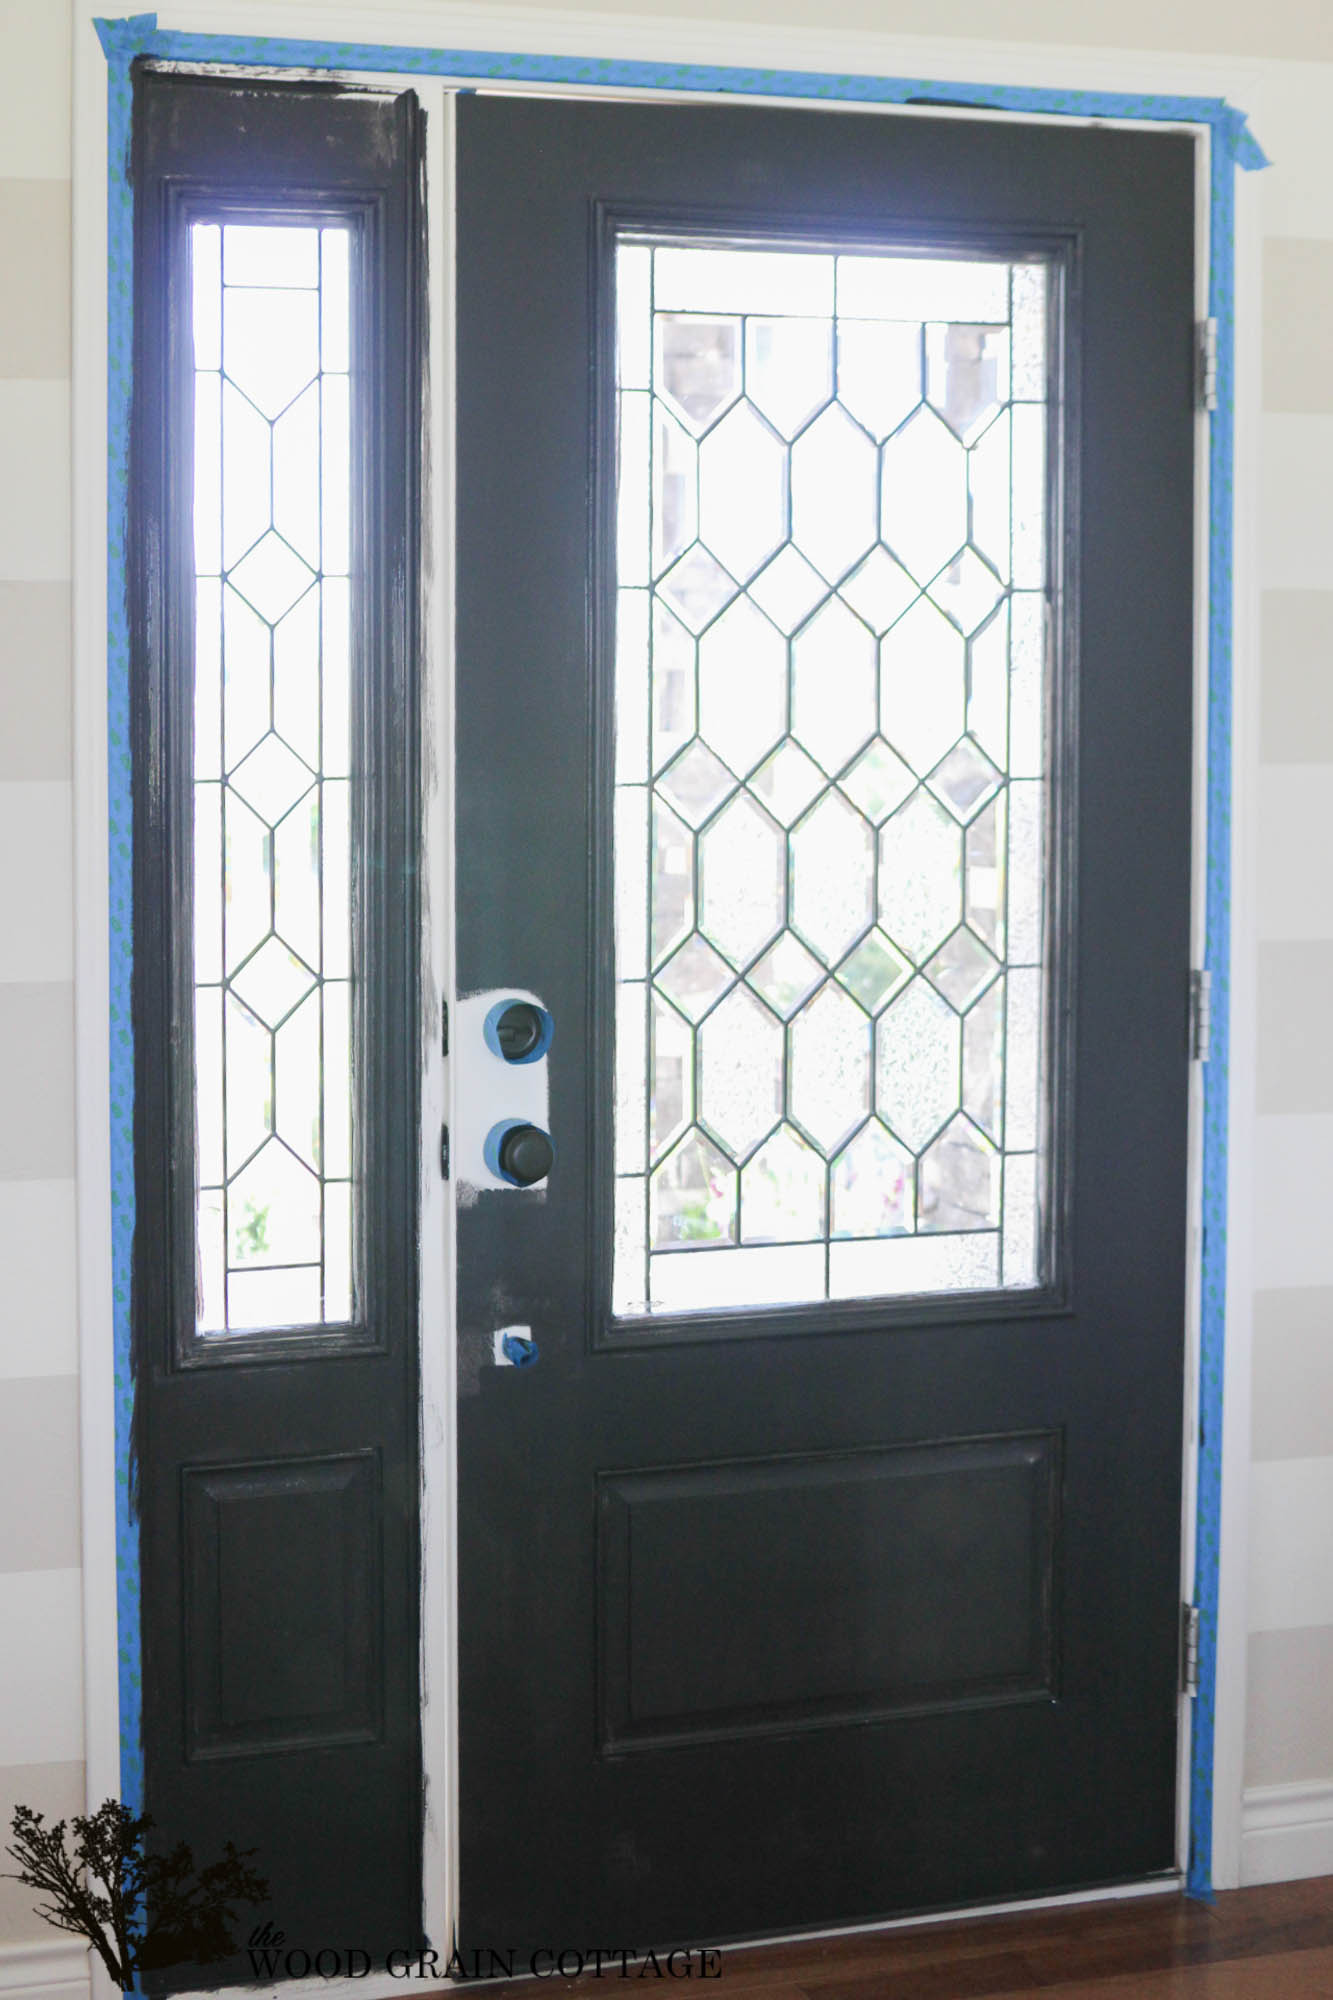
I used my angled brush for the grooves of the door, and around the door knob, which I quickly rolled over with my smooth roller…

And for the areas next to the trim, I also used my brush…

Step 3: Remove the tape:
As soon as I had my final and last coat of paint on the door, I started pulling off all the tape. I was left with super sharp lines…

The key to get sharp lines, is to press the tape firmly against the surface right before painting, then to pull off the tape as soon as the last coat has been added. The paint cannot dry on the tape.

And for all those teeny, tiny areas that my regular brush couldn’t reach, I used a small craft brush. Works like a charm!
Also, I didn’t tape around the glass portion of the door because we had a few areas where the glue had seeped out from underneath the trim during manufacturing. Instead, I used a razor blade to trim off what I could, then painted over it, let it dry and used the razor blade to gently remove the excess paint. It comes off really easy. If we didn’t have the glue issue, I would have taped the glass as well. But as is was, the tape wouldn’t have given me a very straight line over the lumpy and bumpy glue. Razor blade to the rescue! 😀
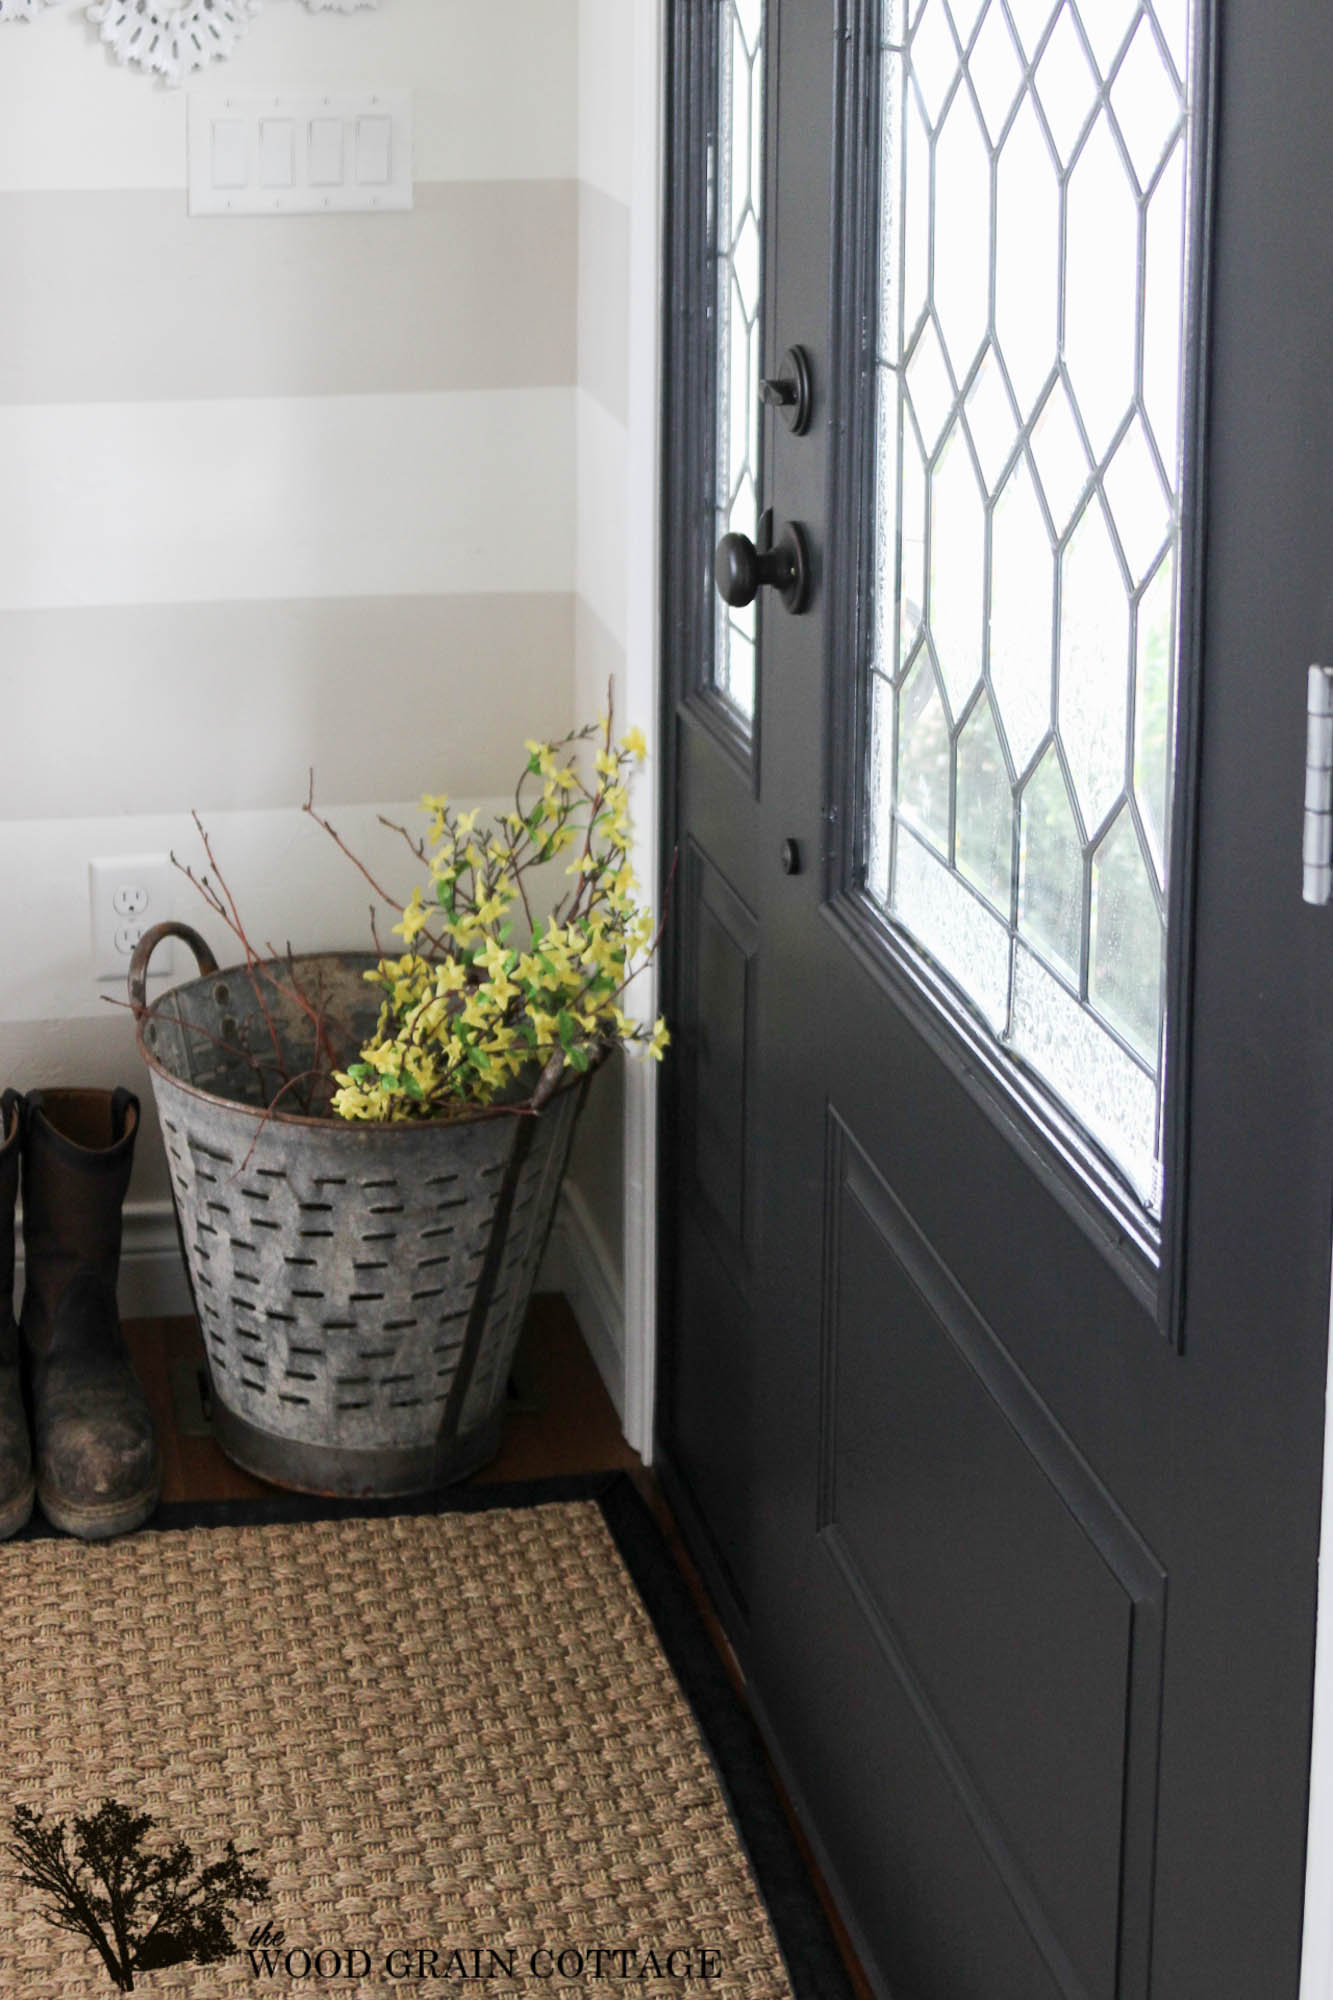
Here’s how it looks now…
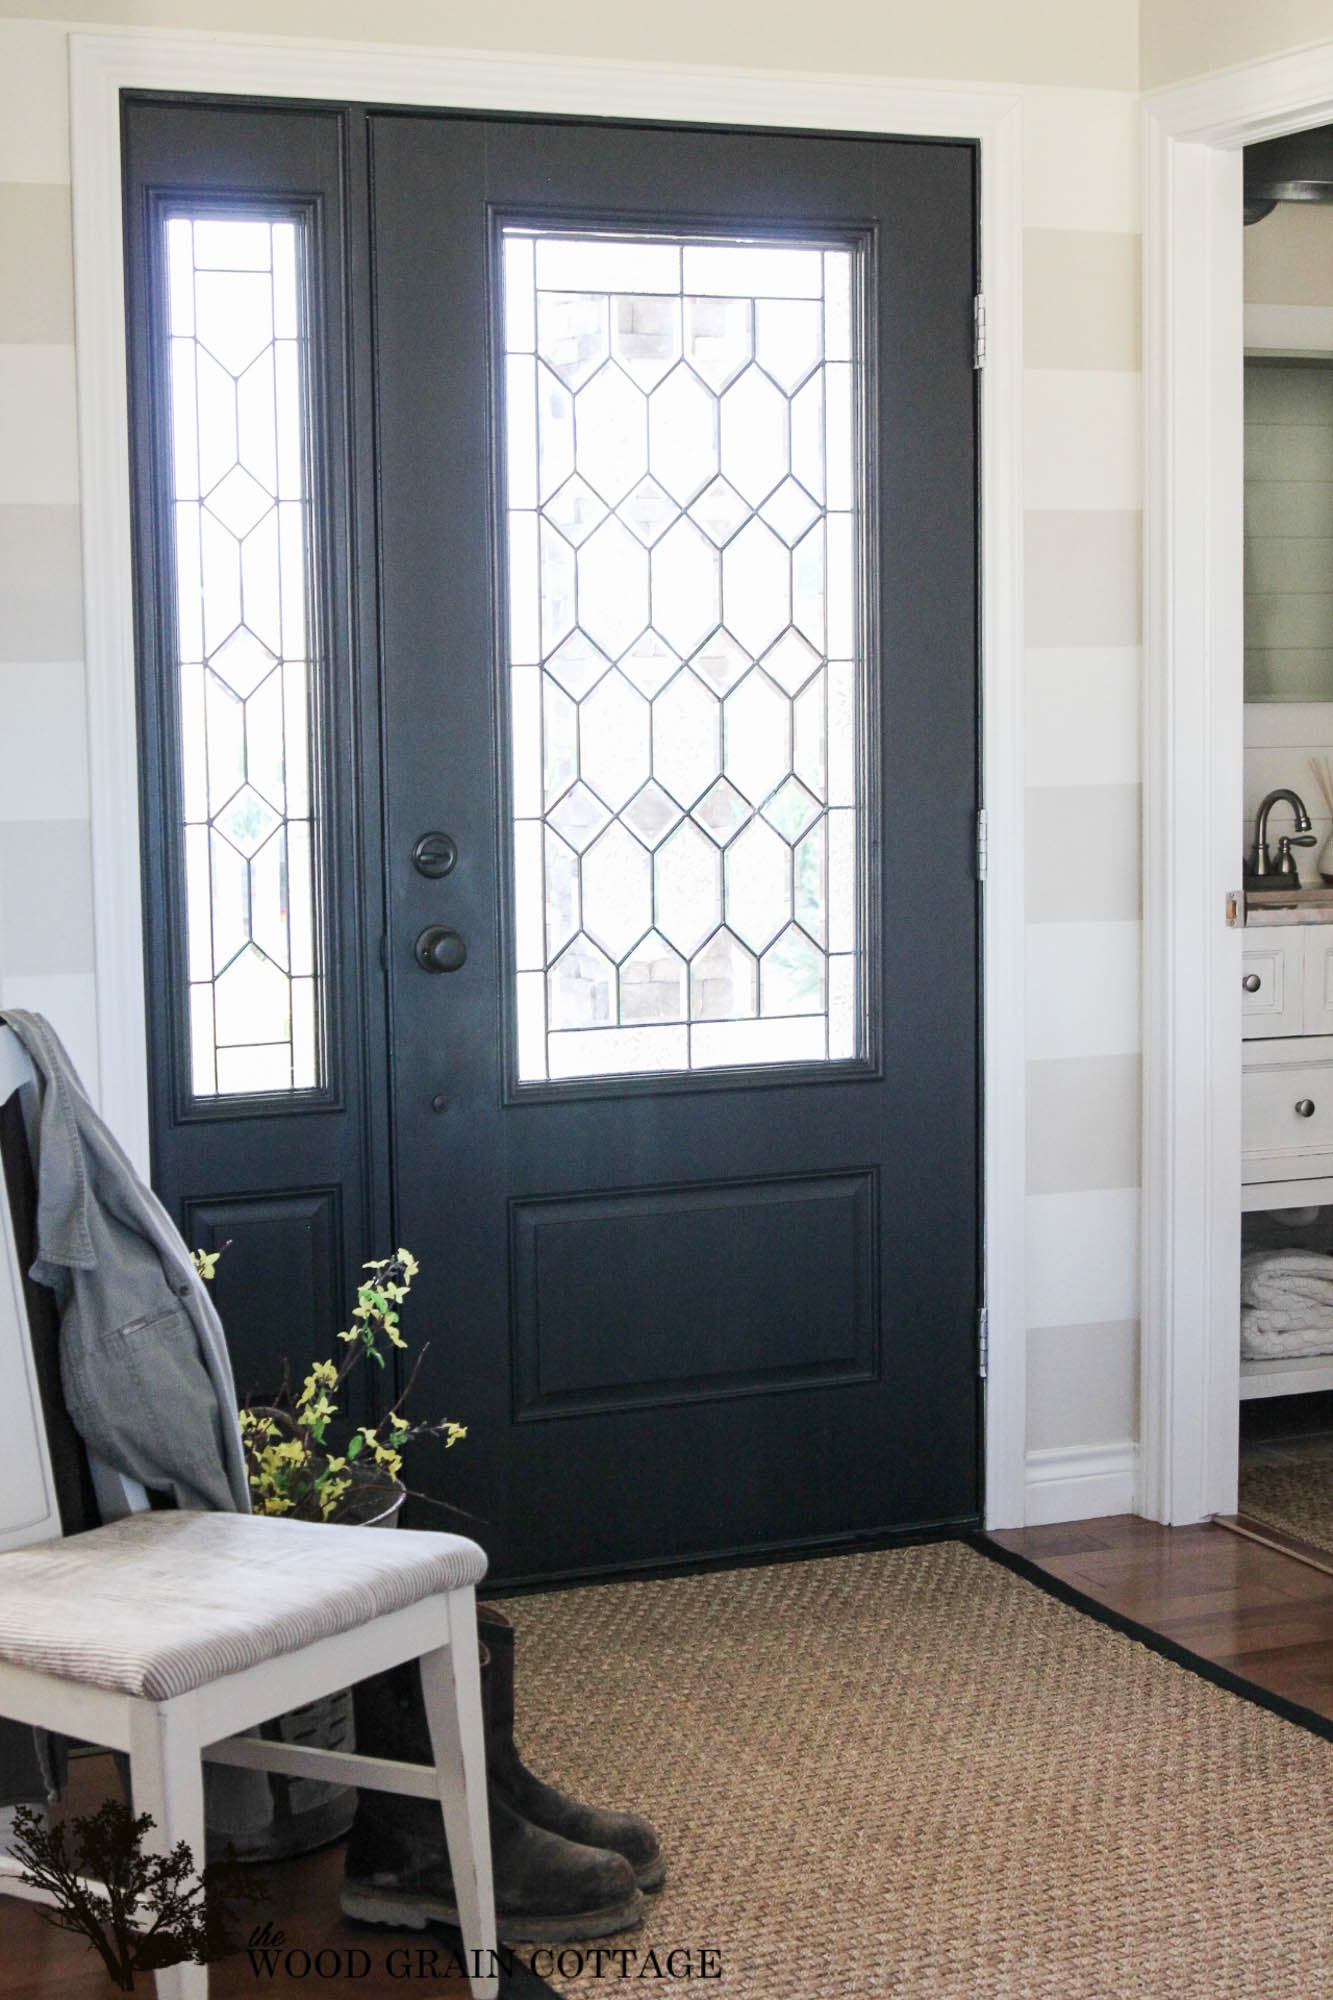
I’m so, so happy I decided to paint it….
It makes such a huge difference in our entry way. Kind of like night and day difference.

And now, we have a pretty black door that’s set the stage for the rest of our entry way…

I can’t wait to get started, but in the mean time, I’m enjoying our new front door…


Enter the Home of ScotchBlue™ Painter’s Tape Contest at www.scotchblue.com/homecontest October 1 through November 15, 2014 and you could win $5,000 to put towards a home makeover!
The first 500 to submit an eligible entry will receive one (1) roll of the new ScotchBlue™ Painter’s Tape with Advanced Edge-Lock™ Paint Line Protector!
Check out this project as a featured project example in the contest!
Contest open to legal residents of the U.S. and D.C. (excluding AZ, MD, NJ, ND, TN and VT), who are 18+ (19+ in AL & NE and 21+ in MS) at the time of entry. Void where prohibited. Enter from October 1, 2014 at 12:00:01 a.m. CT through 11:59:59 p.m. CT on November 15, 2014. All contest communications, entry/judging criteria and details subject to the full Official Rules. To enter and for Official Rules, visit www.scotchblue.com/homecontest. Sponsor: 3M Construction and Home Improvement Markets Division, St. Paul, MN.
You can also follow along here:
ScotchBlue.com
ScotchBlue™ Facebook page
ScotchBlue™ Twitter page
ScotchBlue™ Pinterest page
I am proud to be a 3M sponsored blogger, and, as part of my responsibilities, I get the opportunity to evaluate ScotchBlue™ Painter’s Tape. Opinions are my own and additional products used in the project were selected by me.
I always want to sing Back In Black when I see a freshly painted black door.
I know. I’m strange.
My front door is black and I love it!!
Looks fab girl.
Yes, it’s absolutely beautiful
12,000. was a bit expensive for a new glass door so I painted my old one for less than $20, best investment ever
I recently painted my front door four times. Crazy, I know. I had it pink, then blue, then went back to pink, and finally back to the blue. I love it now and that’s how it will stay. I love the black doors, but my place is so small that wouldn’t have been the right choice for me. Your home is stunning and I’m really enjoying all that you are doing. I’m a Christmas freak so I can’t wait till everyone starts trimming the trees!!
I would love to do some doors black in the house but not sure if they are kid friendly enough for my kids who seem to knick and knock everything in site. Pretty.
Beautiful! I love the change. Paint makes a world of difference 🙂
Wow. Huge difference. It looks totally amazing. I love the black.
The color change certainly brings a richness to the space! It seems that you have enough natural light in that area where the darker color doesn’t affect the overall brightness of the room. Our foyer is pretty dark unfortunately, so I had to stick with white. Your door face lift looks so nice! ~Michelle
love it. I have a black entry front door also. Never looked better in my opinion!
Love your door just wondering where you got your rug
I love the black! Great update!
Lovely? Did you purchase the door? If so, from where? I love the stain glass pattern. Revving up for a renovation…
Thank you so much! I wish I knew where the door came from, but I picked it out of the book our contractor gave us. I don’t remember. I’m sorry! 🙁
So beautiful! Can I ask what your paint colors are in the entryway? I want to paint my front door black but also want to re-paint my entryway and am trying to figure out a paint color
Thank you! The entry paint colors are Edgecomb Gray and White Dove. Both are Benjamin Moore colors. 😀
Love the door and paint.What is the name and shade? Is it demig
What is the shade andbrand? Is it semigloss? Looks great!
Thank you Donna! The paint color is called Hazy Skies by Benjamin Moore. It’s painted in exterior, satin.
Hi! I’m so in love with your blog and this door! Would you mind sharing where you bought the door?
Thank you so very much, Rachel! Unfortunately, I don’t remember the exact specification of our front door… we bought it several years ago. I think it was made by thermatru: http://www.thermatru.com/
I hope that helps! 🙂
Hi when you say do not let the paint dry until you remove tape…I’m assuming you painted a few coats first with drying time in between each? Did you take off tape after each coat and re apply the tape again for each new coat?
I’ve been wanting to paint my front door black and now I’m going to do it. Just wondered if the outside of your front door is painted the same color and finish? Can you use satin on the outside? Thanks!
The outside of our door is a different color, but I still used a satin finish on both sides of the door. For the outside of the door, I used exterior paint. I hope that helps! 🙂
Your door is fabulous inside and out. This is the color I plan to paint our front door this year. Thank you for sharing. You NEVER DISAPPOINT
Thank you, Ivory! I’m so glad you enjoyed the project! 🙂
The door looks beautiful. Can I ask where you got the rug by your front door ? I have been looking for one like that
Thank you! Here’s the (affiliate) link to our entry rug. It’s been a really great rug! Highly recommend! https://rstyle.me/+E0pzi1g2XWUKZbB813M-Qw