
DIY Painted Curtains
Curtains. They’re not an easy thing to find and love. I’ve bought my share of panels, thought I would love them, and turns out I didn’t. Not only was that a bummer, but often they didn’t fit my windows right in length. That in itself is frustrating, but then there’s the fact that buying those extra length curtains practically means you won’t eat for a month. Those things are expensive.
So, I decided to make my own DIY painted curtains. I’d been on the hunt for something in our master bedroom, but since I needed a total of 6 panels, I knew it wasn’t going to be cheap. And then, I ran into this tutorial. I absolutely loved her curtains, the light pattern and the neutral colors. Now those, those I could do. And just in case you haven’t looked at her blog yet, please do so now. You’re welcome.

Some of the products I’m sharing in this post have affiliate links… thank you so much for helping support this blog!
To start, I used the same drop cloth fabric as our outdoor cushions. Sometimes dropcloths can be a shade or two off from a light cream, and these are perfect! Plus, all the flecks in the fabric, are neutral. Win and win. In total, I used 3 . I did wash the first panel, and that was a mistake. I lost about 2 1/2 feet in length. After I saw that, I decided not to wash the other two. Since it shrunk so much, I ended up cutting a little extra fabric from the other dropcloths and sewing it on the top of the two panels that were too short.
With that, I ironed the washed dropcloth, and cut it right in half (I did the exact same thing with the other two panels, then cut them to length for our windows).


Then, I laid down a strip of plastic so the paint wouldn’t bleed through onto our floors…

With that, I started painting. I used , and basic white paint right off the shelf…

For the stencil, I made sure I kept the pattern straight on the top, then I kept working my way down the panel. On the sides, I did overlap the stencil, that way the pattern continued off the curtain. See the right side of the picture below…

Once the panel was finished, I let it sit for a second, then I carefully transported them to our bedroom to hang on the curtain rod. Since I didn’t want to sew a pocket at the top, I just used clips…

They took a bit of time to dry, but it was worth it…

Up until now, we’ve only had curtains hanging on our large window, and they were too short. I decided to live with them for a while, but once I found what I wanted to do, I knew the days of short curtains was over.
These curtains are much, much fuller than the original set I had in there, so I had a bit of time getting used to them…
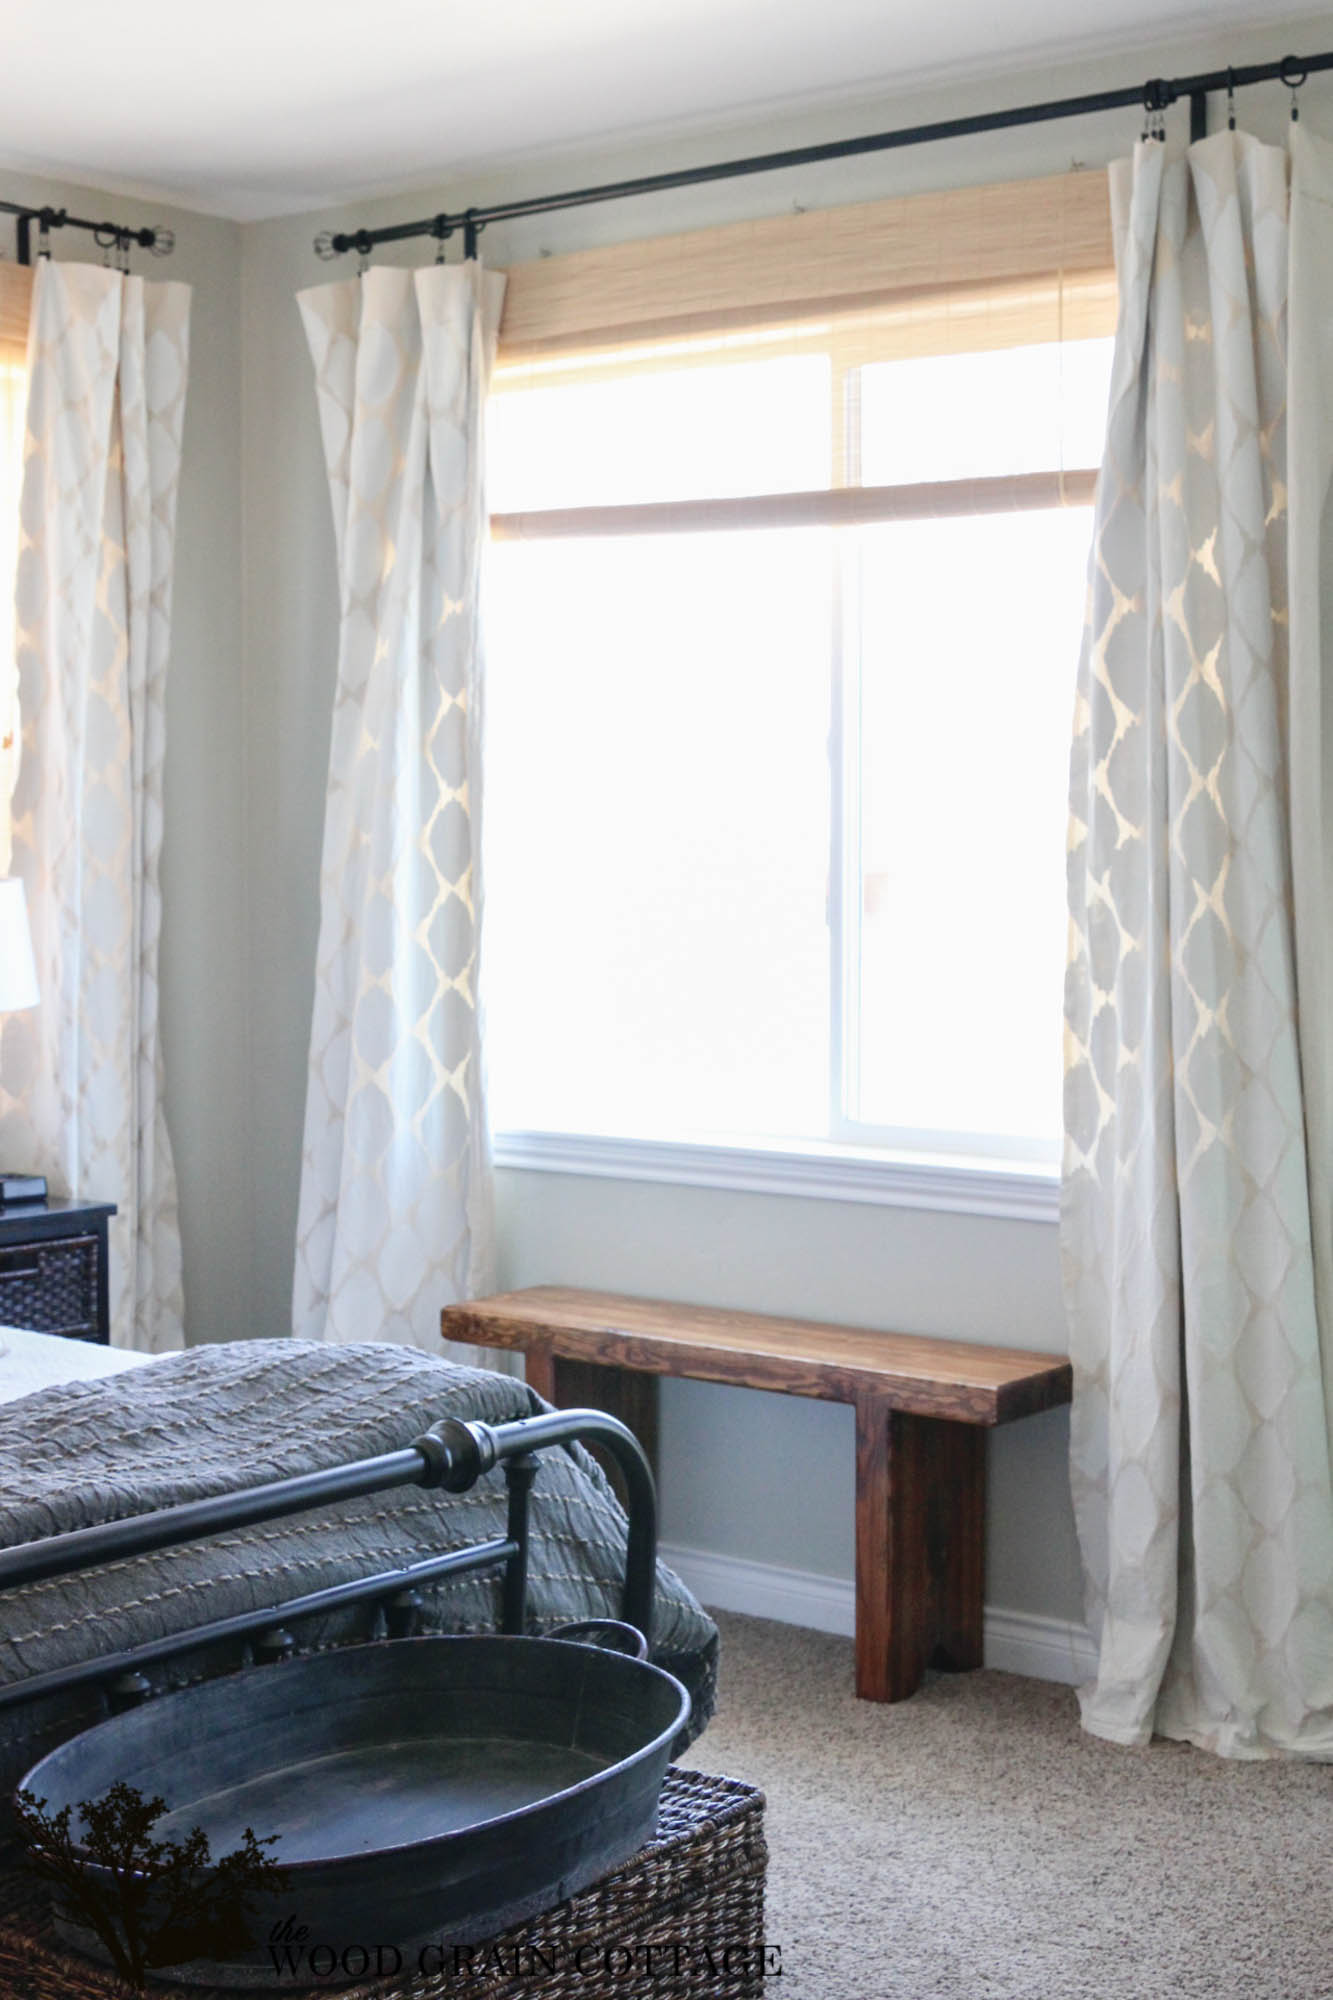
Our room is still very much a work in progress, but I felt safe going forward and making these. I’ve finally decided what I want to do in our bedroom, and these curtains bring in the soft pattern I wanted.

Honestly, I’m really, really, really excited to get started in here. I have a birthday coming up and I already know what I’ll be asking for… More on that later!

But, back to the curtains, here’s a few little bits I picked up from doing them…
-At the top of the curtain, start with the stencil hanging over the edge. Instead of the pattern looking like it starts at the top, it will seem like it was cut to size, just like regular printed fabric.
-Hang the stencil over on the left side, it will give you the same look as the top, and you will most likely end up having a partial pattern on the right side as well.
-Keep your stencil straight as you move across the panel. You definitely don’t want to have the pattern crooked.
-I used 1.5 gallons of paint on 6 curtains.
-Use a thin, smooth foam roller.
-I spent a solid day painting 6 of them.
-If you make a mistake with the pattern, or have any overlap, you can’t tell when they’re hanging. Trust me, I speak from experience.
-The curtains are stiff, if you don’t want them to feel stiff, try adding an additive for washing. I don’t mind them being stiff, but you may.
-Patience is crucial. It’s a time consuming job, and probably better if broken up over two days. My legs, neck, shoulders and back were definitely tired.
Overall, I am so happy I made them. They have completely changed the look and feel of our bedroom, and they are really, really, making me anxious to get started on the rest of the room. 🙂

Looks great! Question, and I’m thinking it might not matter because the paint will soak through a little to the other side, but did you hang them with the painted side out or in?
Hi Brittany! I hung them paint side out. The paint does soak through a little bit on the back side, but not for a full pattern. I hope that helps! 🙂
They look fabulous. They look like they are an irridescent design. Amazing.
Hi Shayna,
I love the simplicity of everything that you make. I’ve been ‘following’ you for quite a while and have thoroughly enjoyed watching the transformations!
I have a question about the paint color in your bedroom. What color and brand is it?
Thanks!
Theresa
Thank you so much! So happy to have you as a reader! 🙂 Our bedroom is painted Hazy Skies by Benjamin Moore in satin. Hope that helps! 🙂
Wow! I love how the light streams through the pattern. I’m so excited to see what you do in here! I’ve been highly anticipating it since I started following you two years ago. That bed is gorgeous! Can’t wait to see what you’ll be asking for for your birthday. I wish I could play that card right now. 😉
They look amazing. I stenciled the curtains in my Great Room, and it was only 4 panels. I know what you mean about your back bothering you. It is pretty time consuming, but worth it. I got my Ballard inspired panels at a fraction of the cost.
love them! never would have thought to paint curtain panels.
They look great! I love your ideas. I also really like the quilt (blue or gray) on the bed. May I ask where you got that?
Thank you so much! I got our blanket/ quilt from Ikea! 🙂
Wow great job! You really took drop cloth curtains to the next level!!!
I love the gold and the pattern. I have white Ikea curtain in my room and have been contemplating stenciling them…but this may just be the tutorial that is going to kick my butt to do it!
Pinning!
Love these curtains. Curious about your pillowcases — they look so comfy. Are they cotton? May I ask if you made them or if you purchased them. Love all your projects — you have great taste and always make it doable for the rest of us. Thanks for taking the time to share all these wonderful projects and to answer our questions.
These are beautiful Shayna, thanks for giving me a great idea for my bedroom. Happy 4th. Sincerely, Diena
So, you’ll not be able to wash these curtains because they’ll shrink? Then how will you clean them? Just curious. Thanks
Hi Rebecca! I can wash these curtains, but will not be able to dry them. I rarely wash my curtains, but vacuum them and spot clean instead. I hope this helps.
Okay, these look amazing! So question- I am trying to get some sort of pale green curtains for our dining room. Do you think I could do something similar with a pale green fabric and then pain that is just a touch darker? I’m wanting a pattern, but can’t find pretty patterned curtains in a sage color that don’t break the bank.
Thank you so much, Kelsie! I do think you could do the same thing and have great results! Good luck! 😀
Love this look – its very subtle and the stencil design is fabulous!! I made drop cloth curtains for our living room and they look great but lacked “something”. THIS IS IT! Thank you for much for the picture heavy tutorial! I’m a visual learner!! 😉