
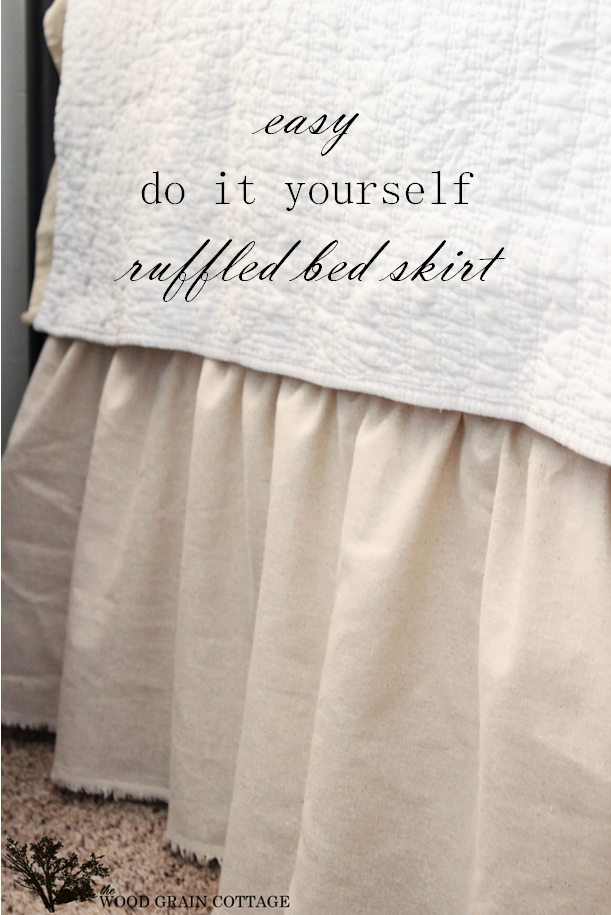
Easy DIY Ruffled Bed Skirt
Slowly, project by project, our master bedroom is making small strides. Getting this room in shape is on my project goal list for the year and it’s one room that really needs it.
I have no idea why it seems to “collect” the miscellaneous decor items, but it does. And every time it collects a bit more, I make it my mission to fix it. Today, I’m sharing an easy DIY ruffled bed skirt. It’s made me so excited to keep moving forward with the our bedroom. I have so many ideas and plans for the room and I can’t wait to tell you more about them.
In the mean time, I am positively thrilled with this easy project!
Here’s how I made it, and the supplies I used:
Please note: Some of the links in this post are affiliate links, which allows us to make a small commission from your purchase, but your purchase price stays the same. Thank you for helping support our blog! We greatly appreciate it!
Supplies:
- 5 yards fabric, I used muslin. This is similar.
- Fabric Scissors, these are similar to mine
- Elastic
- Sewing Pins
- Sewing Machine
- Thread
I started with 5 yards of fabric. I used the same muslin fabric that I used on our breakfast nook bench cushions. I basically completely love this fabric and I turn to it time and time again. Plus, it’s cheap!

Then I stretched it out…

And used my fabric scissors to cut down the middle…


Then for the “ruffle” part, I bought elastic at our fabric store! This was such an easy way to achieve the ruffle. More on that later.

Based on our bed, I measured 16″ from the bottom of the fabric, then started pinning the elastic in place…

I kept pinning the elastic in place about every 12″…

Then, I used my sewing machine to run a stitch down the middle of the elastic. While I was pushing the material through my machine, I pulled the elastic very tight….

Once I was done sewing the elastic in place, I instantly had the ruffle. Because the fabric was light enough, the elastic sucked together leaving me with a very lovely and EASY ruffle. If you’ve ever made a ruffle with the “sew a seam at the top, then pull the top thread and push the fabric down the thread” method, then you know ruffles can be very frustrating. Especially if your thread breaks in the middle of your ruffle… I’ve been there!
The elastic was such a time and sanity saver! I will definitely be using this method to create ruffles again!
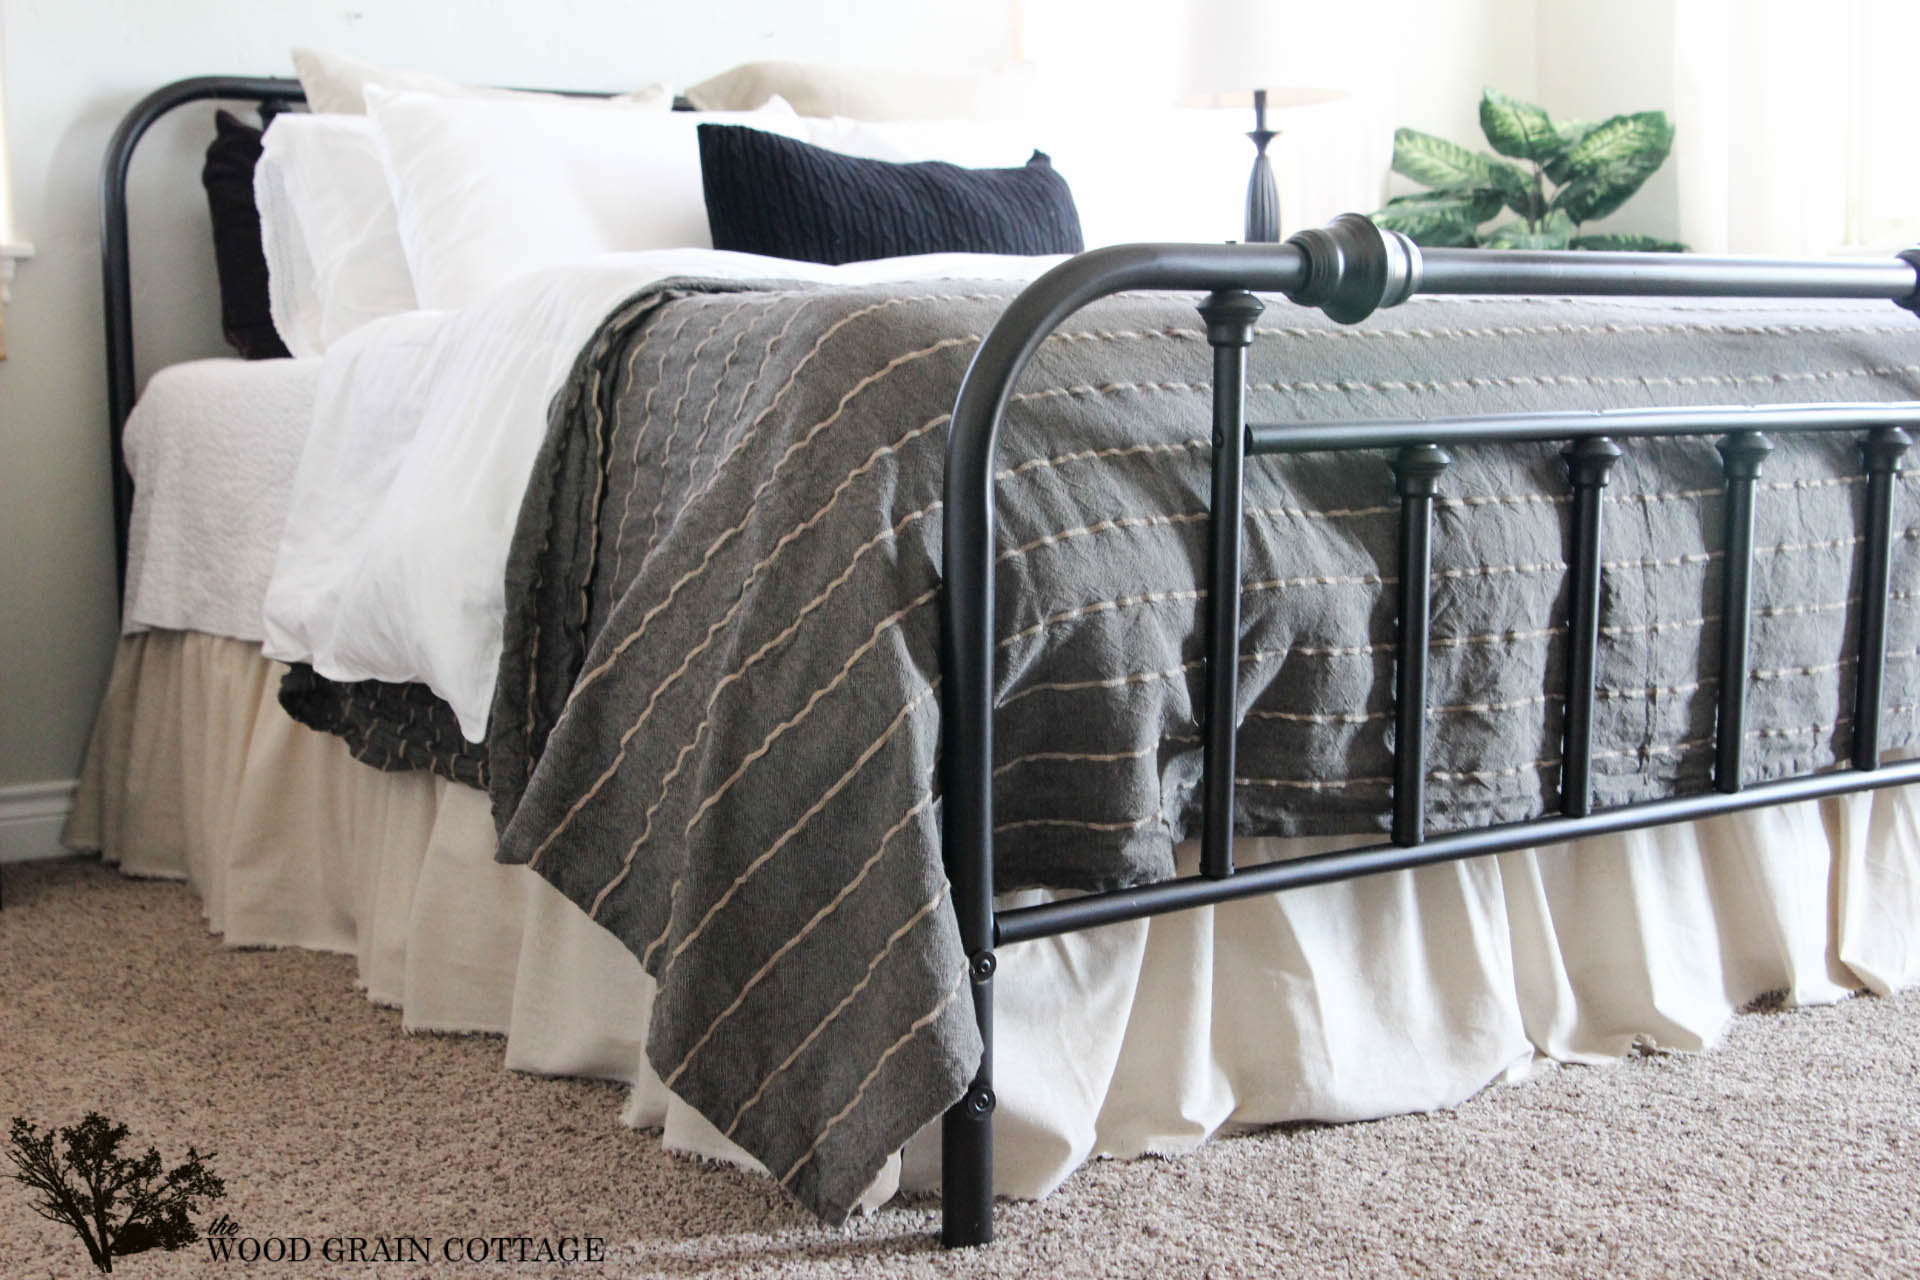
Once I had enough fabric “ruffled”, I started pushing the extra fabric at the top of the bed skirt underneath our mattress…

Because I left a good 6″ or 7″ of fabric above the ruffle, the bed skirt is secured down by the weight of our mattress…

Plus, having the extra fabric at the top allows me to alter the length of the bed skirt in some areas…

Then, for the corners at the end of the bed, I pulled the skirt straight out…

Then made a small cut at the bottom…

I placed the fabric over the metal bed frame…

Then quickly pulled down on the fabric…

It left me with a lovely frayed edge and I trimmed off the extra strings.
And because I really liked the frayed edge on the fabric, and the fact that I didn’t want to finish the bottom edge, I left it. I really like how it looks!

I’m absolutely thrilled with how it turned out! I’ve had my eye on a similar bed skirt, but I couldn’t bring myself to pay the steep price.
Now, I have one that was easy to make and will be easy to remove if I ever change my mind, which we all know could happen since I have decorating ADD.

Those soft ruffles completely changed our bed…

Now I’m feeling really inspired to complete a few other projects in our bedroom. They might just make it to the top of my list.
Have a great weekend!

P.S.- For all of you non sewers out there, I bet you could make this with hot glue. Instead of sewing the elastic in place, run a bead of hot glue, pull the elastic really tight and push it into the hot glue. It should work. Just don’t burn yourself!
I really wish I had a sewing machine! This is the prettiest dust ruffle I’ve seen in a long time. I like the “rawness” of it, and it’s not so girlyish either. I really really like it!! saving this on Pinterest for future use! 😀 Keep those great DIY projects coming Shayna!! Love them all so far!
THANK YOU so much, Amy! I love the organic feel of it too, and it doesn’t look too girlie! It’s just prefect! 😀
-Shayna
You can make ruffles with a needle and thread. Just do staight stitches down the length of the fabric and pull them up to make the ruffle. Much less likely to break than by machine which makes smaller stitches. Then hot glue in place. That way they won’t break and fall out.
Great idea and looks easy to do. Like that you can just tuck it under the mattress, but how well does it stay tucked in?
Thanks for sharing.
Audrey Z. @ T
Timeless Treasures
THANK YOU so much, Audrey! I’m so happy with how it turned out! I’ve changed my bedding twice since I’ve used the new bed skirt. So far, it’s stayed in place really well. The long part of the fabric above the ruffle is stuffed pretty far underneath our mattress, so I would have to pull on it pretty hard to get it out of place. For extra security, you could pin it in a few places too.
I hope that helps! 😀
-Shayna
Well I will definitely be trying this, having been a victim many times of the “broken gathering thread” disaster. Also loved the fact, this bedskirt had no “platform.” There’s no way I can ever lift up my mattress and wrangle that stupid platform into place. Would be interested to know how simply tucking the skirt into place is working– does it come untucked quite often? Or is it OK? And approx. how many inches of fabric above the elastic did you leave for tucking?
THANK YOU so much, Judy! I know exactly how you feel with the “broken thread”. There’s nothing more frustrating… Been there! The elastic has changed my life forever! 😀
I’ve changed my bedding twice since I’ve used the new bed skirt. So far, it’s stayed in place really well. The long part of the fabric above the ruffle is stuffed pretty far underneath our mattress, so I would have to pull on it pretty hard to get it out of place. For extra security, you could pin it in a few places too. I’d say there is about 7 inches of fabric above the fabric that is laying underneath our mattress.
I hope that helps! 😀
-Shayna
This is sooooo good! Totally pinning for later…I still don’t have a bed skirt on our master bedroom bed…I’m so ashamed! 🙂
THANK YOU so much, April! I love how it turned out… it’s easy to make too! 😀
Thanks for pinning… and I won’t tell anyone you don’t have a bed skirt! 😀
-Shayna
I’m pinning too and I’ll be using the hot glue for mine, I love the unfinished edges!
I’m so happy you’re going to make your own! I love those unfinished edges too! 😀
Enjoy!
-Shayna
OMGness, there we go again… I’m working in my bedroom as well! Love the bed skirt! I wish I could sew, I wish I could sew… lol;) You can do everything beautiful… blessings & <3
M
THANK YOU, M! I love how it turned out too… we’re separated at birth! 😀
-Shayna
Love it – I also like your bedding – where did you get the top coverlet??
I am addicted to your blog !!
THANK YOU so much, Alisa! 😀
I found the top coverlet at Ikea. We love it! Reasonable price too!
-Shayna
Shayna,
This is a great tutorial. I do have one question though. What kind of elastic is that? I have never seen it before. Did you purchase at Joann Fabrics?
Thanks in advance.
THANK YOU so much, Cheryl! I’m not positive on the brand of elastic that I used, but I bought it by the yard at our local sewing store. It was about .39 a yard.
I hope that helps… 😀
-Shayna
Joanns has that elastic. Comes in 5 yard package. Dritz 3/8″ 4.49$ 40% off =$2.70
I love this! I found it on Pinterest. You say you started with 5 yards. How did you determine how long the yardage is for the size of bed and the length of the gathers? I’m assuming a queen bed would need more yardage/length than a twin and less than a king-size bed. What size is the bed you show here? Was there leftover fabric length when you put it on the bed? Thanks for answering these questions! I’m hoping to add this to my bedroom remodel plans in the future!
THANK YOU so much, Julie! I knew that with the “ruffle” it would take extra fabric, so I bought 5 yards, knowing that I would cut it in half and end up with 10 yards, which would be enough. Yes, different bed sizes would need more/ less fabric. 5 yards was just about perfect for our queen bed. I had a bit of left over fabric, but not too much. I just cut off the excess and wrapped the end around the top of our mattress. To measure the fabric yardage, I measured our bed, then converted it to yards. When I cut the fabric in half, it instantly doubled.
I hope that helps! 😀
-Shayna
hi shayna! am planning to buy a portable sewing machine anytime soon. but i don’t know what brand of machine i will buy. brother or singer? since those two are the only ones available in our market. thanks
Hi Arnie! I think either the Brother or Singer sewing machine will be wonderful! They are both great brands! 😀
Hi Shayna, I’m going to make this beautiful dust ruffle and one of my questions was already answered in the comment section, so my other question is, how much of the elastic did you have to buy for the queen size bed? I hope I can find that elastic, I really like it and see how it would work so well in “sticking” to the fabric. Thank you for making this available to us. Blessings to you!
Hi there! 😀 For the elastic, I bought about 5 yards. Once I pulled it tight, I was left with extra! I hope that helps! 😀
Thank you Shayna, I must have been having a “brain fog,” I knew the answer after thinking about it. I was going to write and tell you, but you already answered it for me. Many thanks and Big Hugs! I can’t wait to start my project and have a lovely bed skirt like yours!!!!!!!!!!!!
Hi. I love how the bedskirt turned out. I’ve been looking for someone who tried making it this way. What kind of muslin did you use or where did you get it? I love how the edge is fringed slightly so no hemming needed. It has just the look that I want in my bedroom. And lets me get a 16″ drop which is almost impossible to find in ready made bedskirts.
THANK YOU so very much! I love our bedskirt too! For the fabric, I bought it at our local craft store, Clubbs. I have seen similar muslin fabric at JoAnn’s. It’s not a super heavy fabric, but it’s one of my very favorites for home sewing and craft projects! And the fringed edge was very helpful indeed! 😀
Hi! I love this tutorial! But I do have a question.. How big is the bed you did this for?
Thanks!
Selina
Thank you so much, Selina! Our bed is a queen. I hope that helps! 🙂
This is the exact thing I was looking for! I already had a vague idea in my head of how to do an elastic bed skirt, but your tutorial has cemented it. I hadn’t thought of using muslin, but seeing yours, I now realize it will go perfectly with my grandmother’s old iron bed frame and my quilted coverlet. I think I’ll pick up the materials after work and whip this up tomorrow evening! Thank you for posting this (even if I am commenting on it almost two years later…)
Thanks for sharing this beautiful bed ruffle. I went straight into my sewing room and made one for my room.
I love your easy way to do the ruffling on this project as well as the idea to stuff the top into the mattress. The last bed skirt I made I ruffled it and sewed it onto a fitted sheet. The skirt stayed looking lovely but it sure was a pain to wash.
In looking at the link of the muslin that you bought the specifications the muslin is 58 inches wide. Is that the width you used or did you use 45 inch fabric
Thank you! I believe I did use the 45″ wide fabric, but that type of material/ color is what I used. Depending on your bed height and the drape of the skirt, the 58″ wide fabric may work better since it would give you plenty of room to tuck the skirt under the mattress. It shouldn’t budge. 🙂
What length of elastic did you use for the long sides. In the picture it looks like the elastic was cut to the length measurement. Than when you pulled the elastic tight when sewin did’nt you have elastic left over at the end.
I did have elastic leftover at the end. Because I pulled the elastic tight as I sewed it to the fabric, there was plenty of it leftover once it was sewn! I’m not exactly how much I bought, but a few yards shy of your total fabric length should work!
I have a question please:
How do I know how much extra fabric to go around the bed? Did you double the amount? I am thinking once I pull the elastic tight like you said when I sew isn’t my end product going to be much shorter than I started with? Trying to figure how to make one for a full size bed. Thank you in advance
I made sure to buy quite a bit of extra fabric for this reason. I would think and extra yard or two, just to make sure!
Hi! I am looking to make this for a full size bed. How long should the fabric be? The box spring is about 75″.
Thanks for the elastic tip! I wouldn’t have thought of it myself… so easy for a long gather… ☺️
Love your post! I was just wandering are there slats underneath your bed? and if yes, does it just stays? Like I dont have a flat base underneath my mattress, I have slats and the exact metal structure frame as yours.
Sorry for my delay in getting back to you! If you leave enough material at the top of the bed skirt to tuck under the bed, I would think it would stay in place regardless of the style of your boxsprings. I hope that helps! 🙂
loved your post . I just sewed elastic on an old premade bed skirt that kept sagging and slipping using the same technique. I can’t wait to make a new doing the same thing. great idea. I have been searching for a bedskirt for my granddaughters room. I have a limited budget and want something different to go with the Iron headboard that i just painted white. You have just inspired me. YEAH>