
DIY Paver Planter
Ready to make your own planter for the patio? I’m sharing the full step by step tutorial for my DIY Paver Planter.
I’m in full “spruce up the yard and back patio” mode. No joke. Other than putting out a few pots and flowers every year, our back patio doesn’t get much attention. Since we built the house, I’ve been saying I’m going to give it a little TLC. I just know it would be a place we’d love to hang out and relax, but that would mean we’d need more than a few random pieces of furniture!
So, I’ve devised a plan to get our back patio into shape. And one of the first things I wanted to get done in time for planting flowers, is our DIY Paver Planter….
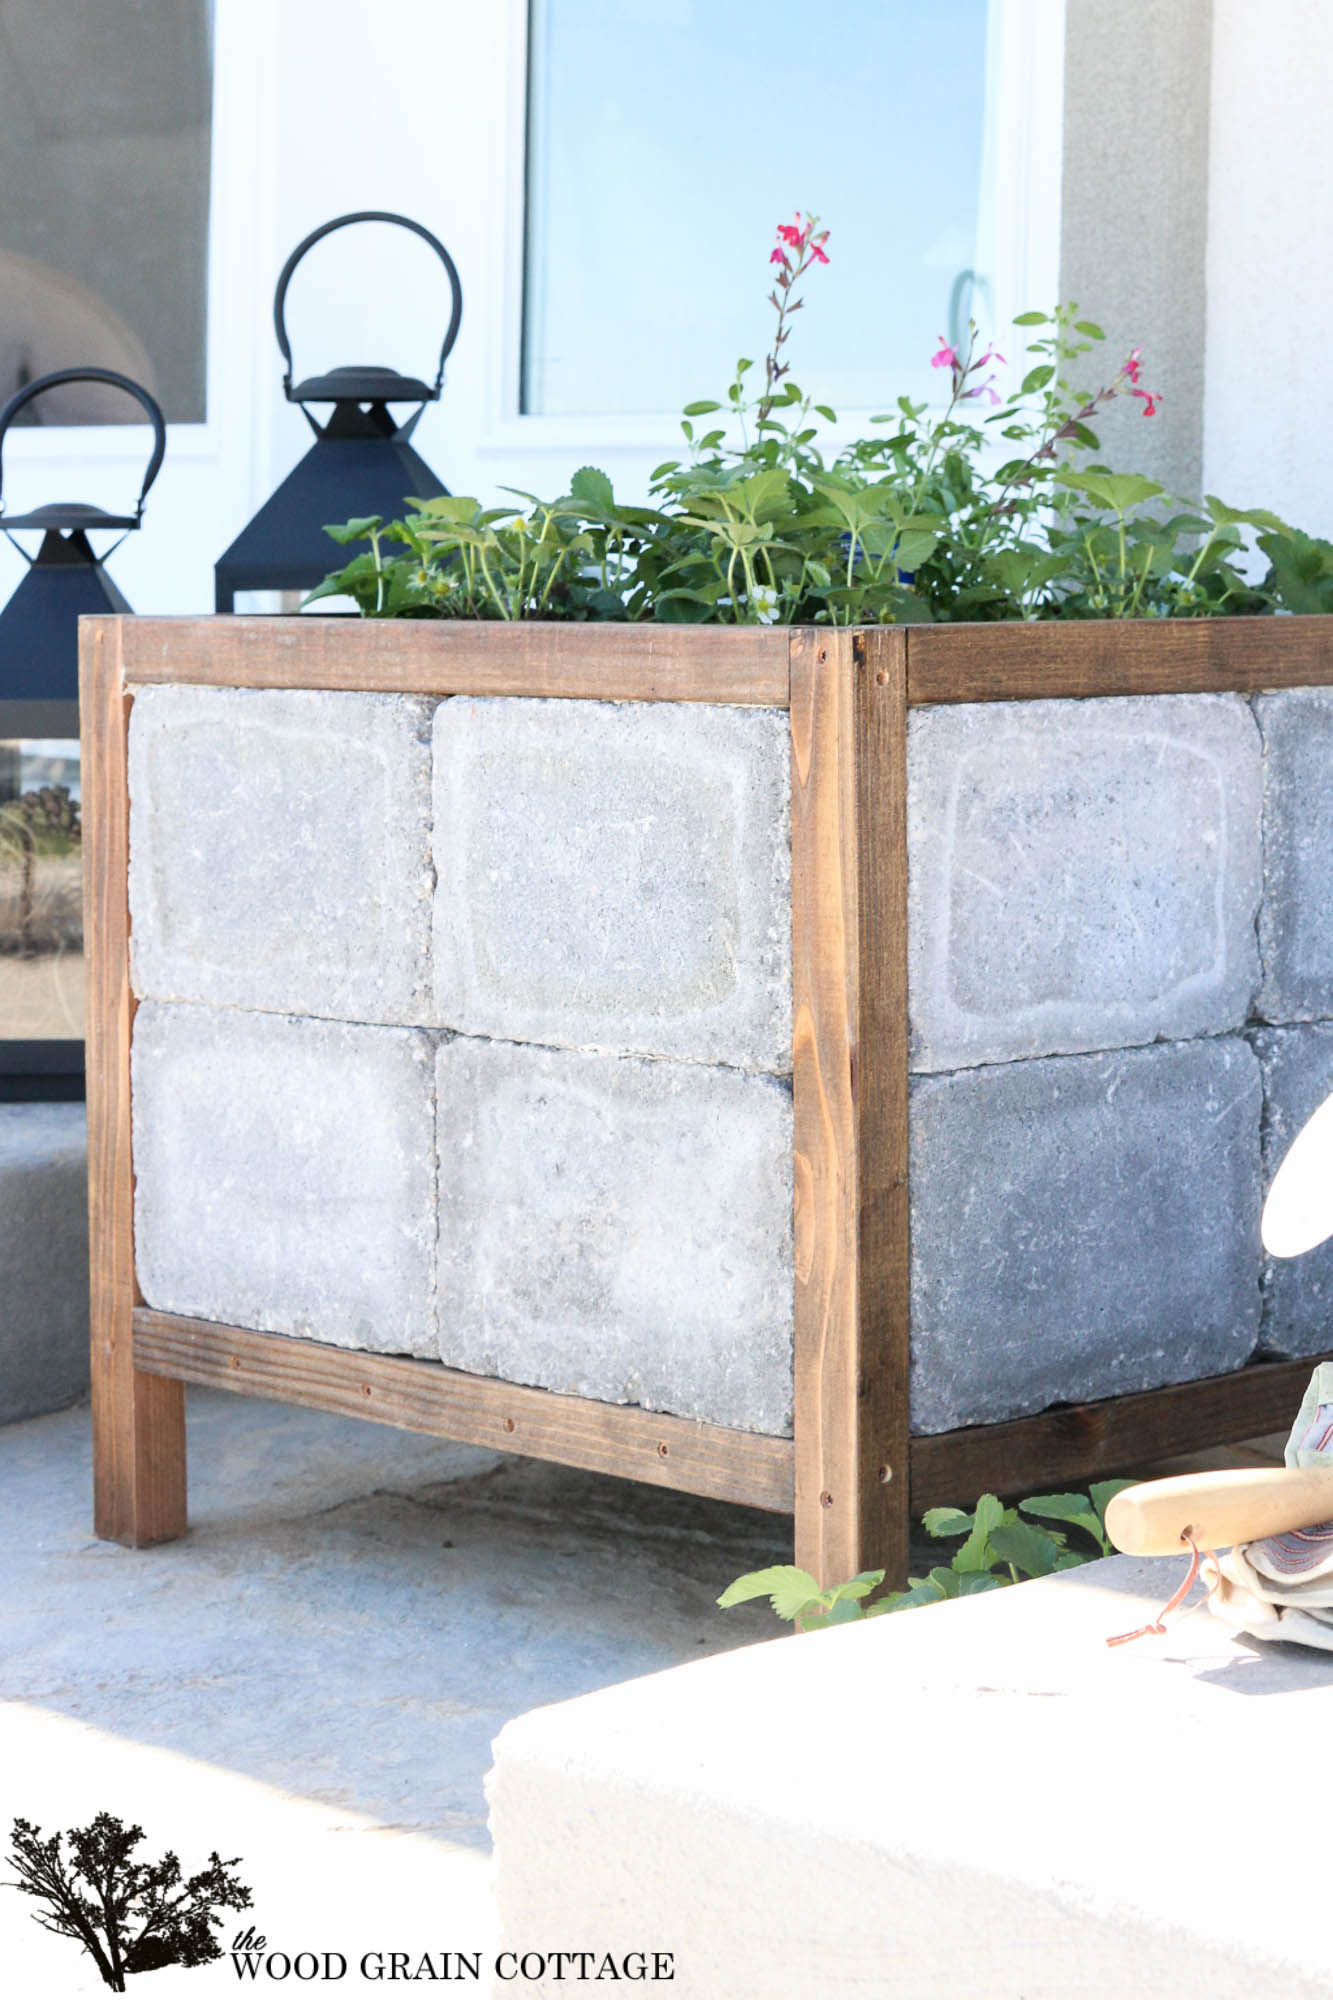
I am giddy with excitement! It turned out so amazing, and we plan to make two more to finish off the back of our house.
Here’s how we made it, (PLEASE NOTE: it’s not hard, but there are a lot of steps and dry time!)
DIY Paver Planter

Affiliate links are provided below. Full disclosure here.
Supplies:
- 10.5″ x 7″ Pavers
- 2″ x 4″ x 8′ Redwood Boards
- Chop Saw
- Table Saw
- Tape Measure
- Stain, I used Early American by Minwax
- Helmsman Spar Urethane
- Clamps
- 1/8″ Drill Bit
- Driver/Drill
- Screws
- Landscape Adhesive, for stone and brick
- Landscape Fabric
- Scissors
- Staple Gun
- Potting Soil & Plants
Step One: Layout Your Pavers
We started by buying these 10.5″ x 7″ pavers…

We laid them out to start building the frame…

Step Two: Build The Frame
We used 2″ x 4″ x 8′ redwood boards, which we later cut in half to resemble a 2″ x 2″ board.

I cut each 2″ x 4″ board into 21″ lengths…

Then, we ran them through the table saw to cut them in half…

From there, we laid the wood around the pavers., and because the boards were 21″ long, we ended up with 4″ long legs. Perfect!

Step Three: Stain & Protect The Wood Frame
Once all of the pieces for the frame were cut, I stained them with Provincial by Minwax, let it dry, then added two coats of the Helmsman Spar Urethane.

Even though we used redwood, I wanted to make sure it would hold up over time…

Step Four: Assemble The Frame
Once the legs dried, we started building the frame. To eliminate the wood splitting, we pre-drilled our holes…

Then laid out the frame…

And screwed both sides of the frame to the bottom board…

Step Five: Add Stone Pavers
With that attached, we used this stone glue…

We added it to the side and bottom of the boards..

Then started adding in the pavers one at a time…

We added the glue to each side of the pavers, making sure they stuck together…

And then added the second paver…

We repeated the process with the other two pavers, and once we were done, we had this…

We ran a bead of the glue on the top pavers…

Then added the top board, clamped it all together, and screwed the top to the sides…

Step Six: Build Second Side & Let The Pavers Dry
We left that side to dry and built the second side of the planter the exact same way. Once it was finished, we left both sides to dry overnight (at least 24 hours).
Step Seven: Build The Third Side
The next night, we started making the third side. We pre-drilled our holes on the first set of sides we had left to dry…

Then stood it up to start adding the other side…

We added the bottom board, and screwed it in place…

Then applied glue to all edges of the frame…

And added the pavers, one by one…

Step Eight: Attach The Sides
Then, we added the second full side and top, and clamped it together, then added our screws…

Step Nine: Build The Fourth Side
We left it to sit and dry another full 24 hours. When we came back the next day, we added the fourth and final side…

We started by carefully flipping it over- this is where we were very happy we glued, and glued, and glued some more to all those pavers…

Then, we started gluing and adding the pavers, as well as the top and bottom boards…

Step Ten: Add The Bottom Boards
With the final side built, we added the boards to the bottom. We just evenly spaced them, then screwed them on…

We also made sure to add plenty of glue to those bottom boards as well…

And just like that, we had our planter! We left it to dry another 24 hours, then moved it to our patio the next day. Let me just tell you, this baby is heavy. Like, wow! It works out perfectly since the wind strikes in full force… This isn’t moving.
Step Eleven: Add Landscape Fabric

To line the planter, I used landscape fabric. I rolled it inside the box…

…Stapling the top along the bottom of wood frame…
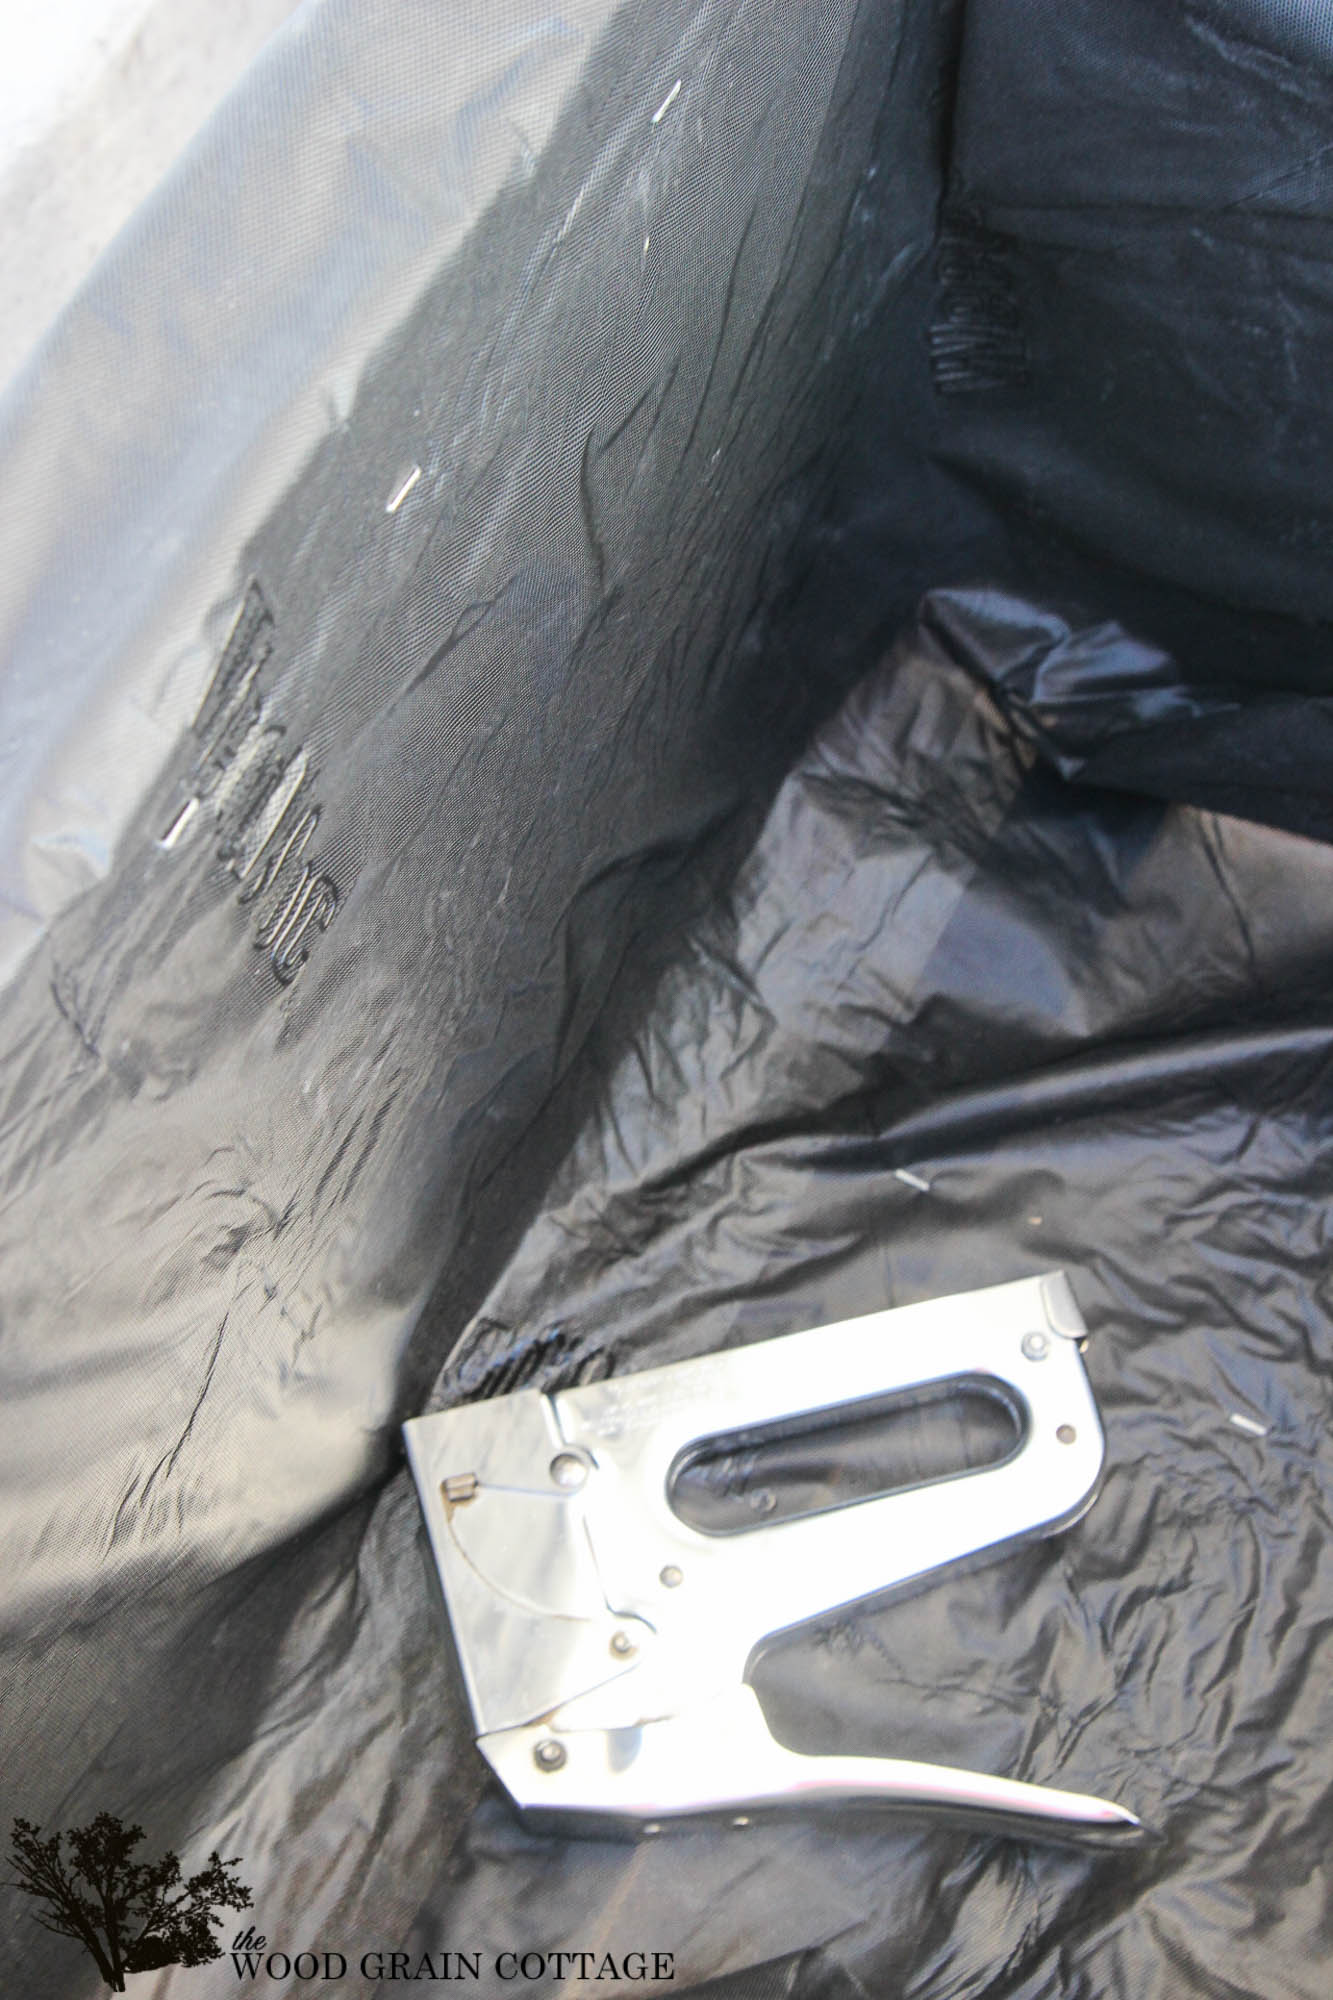
Then I added another layer of the fabric going in the opposite direction…

After it was stapled in place, I trimmed off any long pieces of the fabric, then folded it over the staple…

That gave me a nice clean line, and then I added a second row of staples to hold it all together.
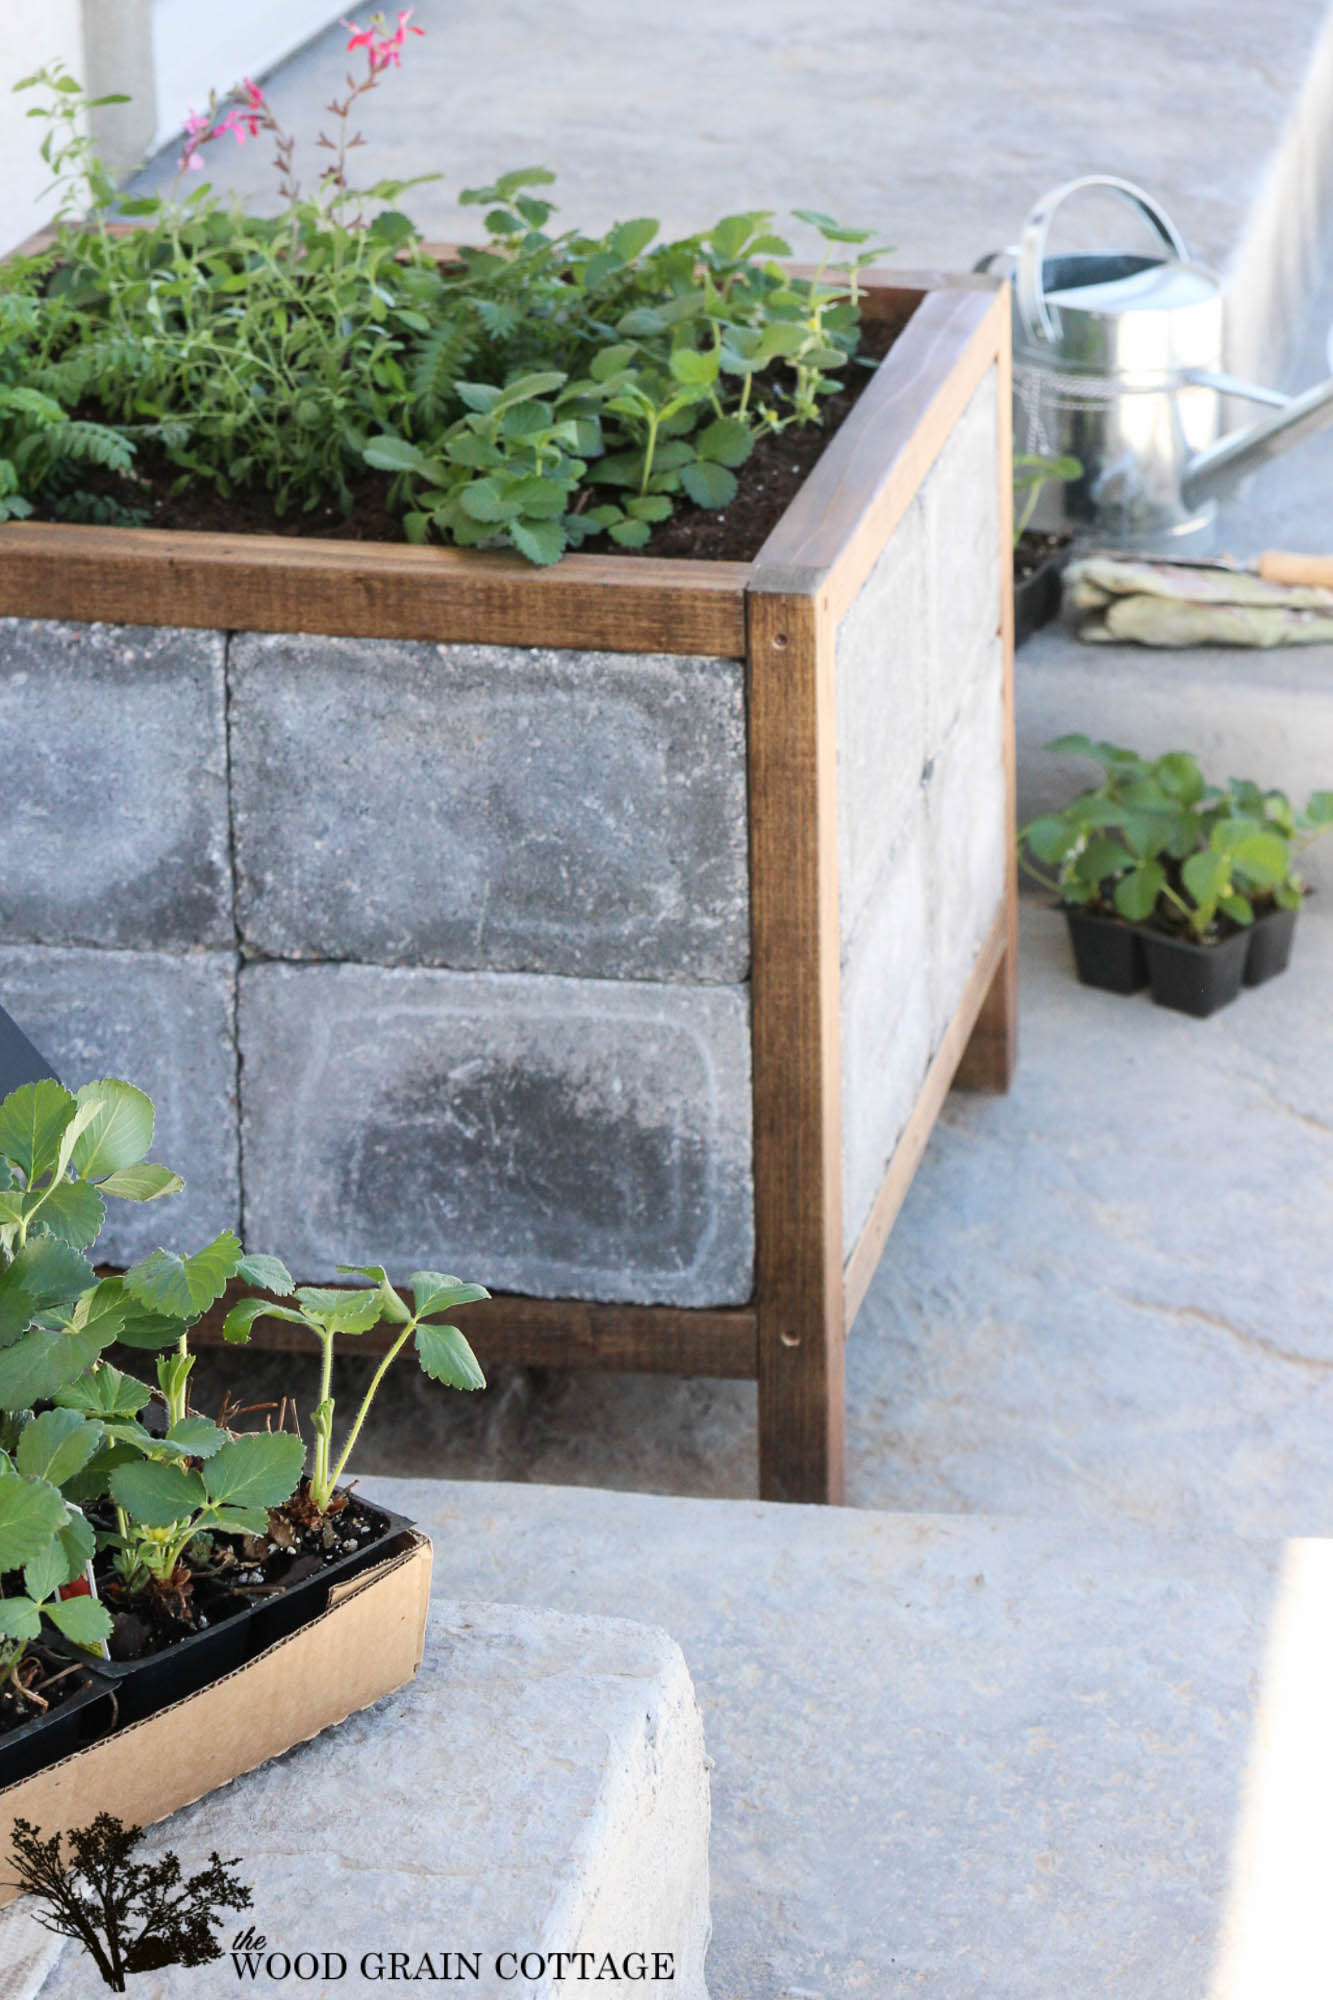
Step Twelve: Add Fabric & Plants
Now it was ready for potting soil and flowers!

Let me just tell you, after I got those plants in there, I was completely in love…

It’s just lovely!

And I can’t wait until the plants are big enough and spilling over the sides. It’s going to be absolutely gorgeous!

In the mean time, I just stuck some of my strawberries and perennials to show you how the box looks. Poor things wouldn’t last long if I left them out over night…

And now you can completely understand why I must have two more. They are going to frame our doors…

And as for that combination of stone and warm wood, well it’s just perfect together…

And boy oh boy was I ready to start planting the rest of my flowers. This was a great warm up run, but I need to patiently wait for the weather to warm up a bit at night. I know I can’t be the only one who’s trying to wait ever so patiently. 😀

I am so happy to have this lovely DIY paver planter on our back patio. It’s absolutely motivating me to keep making progress. With enough DIY projects, we will have the patio space I’ve always hoped for. 😀

AND- I’m so excited to share about The Home Depot’s Do- It- Herself in-store workshops. They are held monthly at all The Home Depot store locations on the third Thursday of each month. Grab your girlfriends and have a fun filled ladies night learning new skills, knowledge and confidence from the pros! You can be a great DIY’er, promise! They’ll help you gain hands- on experience, step- by- step instruction and so much more! If you have any project plans, this is your time to shine!
Want to learn more? Register online today to attend this month’s workshop!
![]() This post is sponsored by The Home Depot.
This post is sponsored by The Home Depot.
Disclosure: Compensation was provided by The Home Depot via Mode Media. The opinions expressed herein are those of the author and are not indicative of the opinions or positions of The Home Depot.
This is an awesome project. What patients you have waiting for each side to dry. It was well worth it, because your end result was great. I believe you are right, this little gem isn’t going anywhere in the wind.
Well done ! I love the step by step directions!
We just added this to our to-do list, we both love it!
I am loving this Shayna! The combo of the wood and concrete is perfection!
I love how you used the smaller pavers together – this is awesome! Here’s the version I did. I made mine a little stubbier:
modpodgerocksblog.com/2015/04/how-to-build-a-paver-planter.html
LOVE this planter, Shayna! The combination of the cement and the wood is perfect! It looks like I could actually make it too!
This is absolutely amazing Shayna! Such a creative idea and I love how it came out!!
I love the rustic and industrial combo on this planter!!
This is such a cool project, Shayna! Love the wood and concrete combo!
What fun, Shayna! I love the wood tones mixed with the pavers.
Wow, Shayna, what a great idea! It turned out beautifully. I love the pavers and wood together.
Hugs, Jamie
Cannot wait to see it on the finished patio!!!
How do you not have the weight of soil, water, and plants pushing out the sides?
Awesome!! How is the drainage with this? Did you have to poke any holes in the landscape fabric, or was the fabric porous enough?
Thank you! The planter always drains really well, but it will depend on how thick the landscape fabric is that you use. If you don’t notice it draining, you’ll want to poke some holes in the fabric. I hope that helps! 🙂
I lovs this rustic looking planter, wonderful instructions. Im making one, or a couple for veggie boxes since I can no longer bend over and garden the traditional way, in the ground.
So clever and nice design!
Amei muito a ideia, vou tentar fabricar a minha. Parabéns pelo lindo trabalho.
Aqui no Brasil temos muitas plantas para embelezar.
I’m so glad you like this idea and are going to make one of your own! Enjoy! 🙂
Thanku Shayna for a great tutorial, all the photos are a godsend. Im so tired of looking for something to repot 2 big Pony Tails into, getting to the point were I was going to spend up to $100 on one pot to hold one, they’re pretty big!
I’ve seen heaps with the floor tiles which are cool too but im not sure about putting such big plants into them, id much prefer the solid concrete pavers idea.
Thanks again, much appreciated 😃
I’m so happy you found it helpful! 🙂