
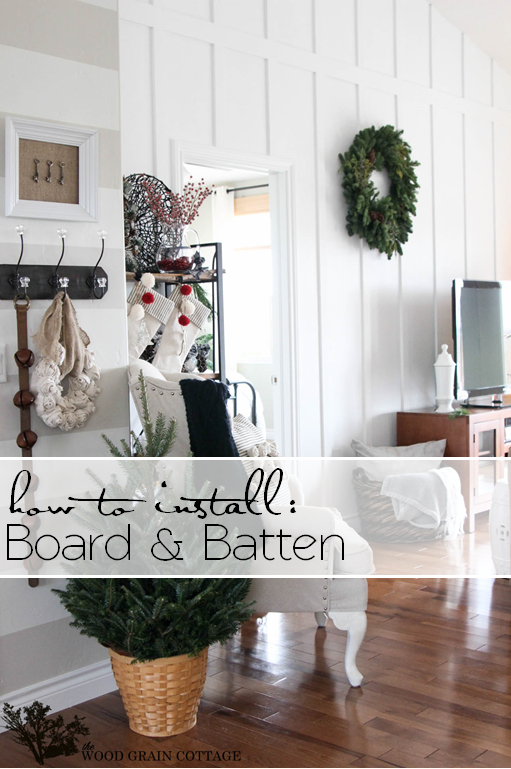
How To Install Board & Batten
See how to install board & batten in this easy to follow tutorial. We share our process and several helpful tips and tricks.
A week before our Christmas home tour, I decided to sweet talk my hubby into doing Board & Batten on our living room walls…. I just knew they would look perfect (which they do!)! I also completely underestimated the intensity of it… Regardless, it was completely worth it and those walls are one of my absolute favorite projects of the year!
Today I’m showing you how we installed our board and batten!
How To Install Board & Batten
Here’s our list of tools and supplies.
Please note: Some of the links in this post are affiliate links, which allows us to make a small commission from your purchase, but your purchase price stays the same. Thank you for helping support our blog! We greatly appreciate it!
SUPPLIES:
- 1/2″ MDF 4′ x 8′ sheet, cut into 4″ and 2.5″ strips
- Saw To Cut MDF
- 18 Gauge Nail Gun
- 1 1/4″ 18 Gauge Brad Nails
- Air Compressor
- Level
- Tape Measure
- Caulking Gun
- Caulking
- Wall Putty
- Paint, I used Super White by Benjamin Moore in eggshell
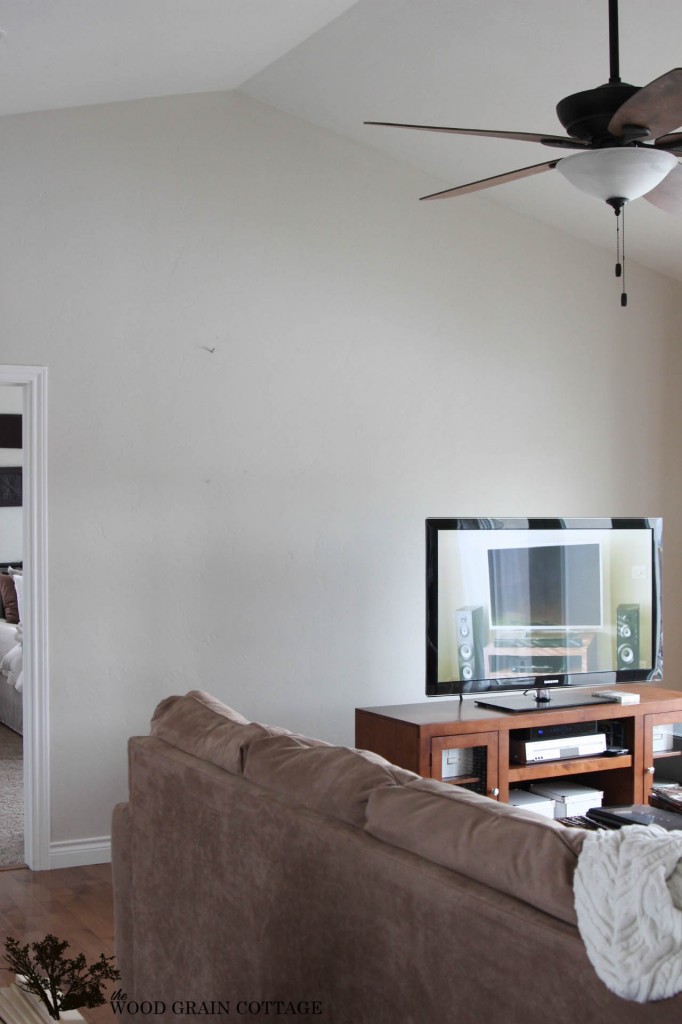
We started with your regular ol’ walls…
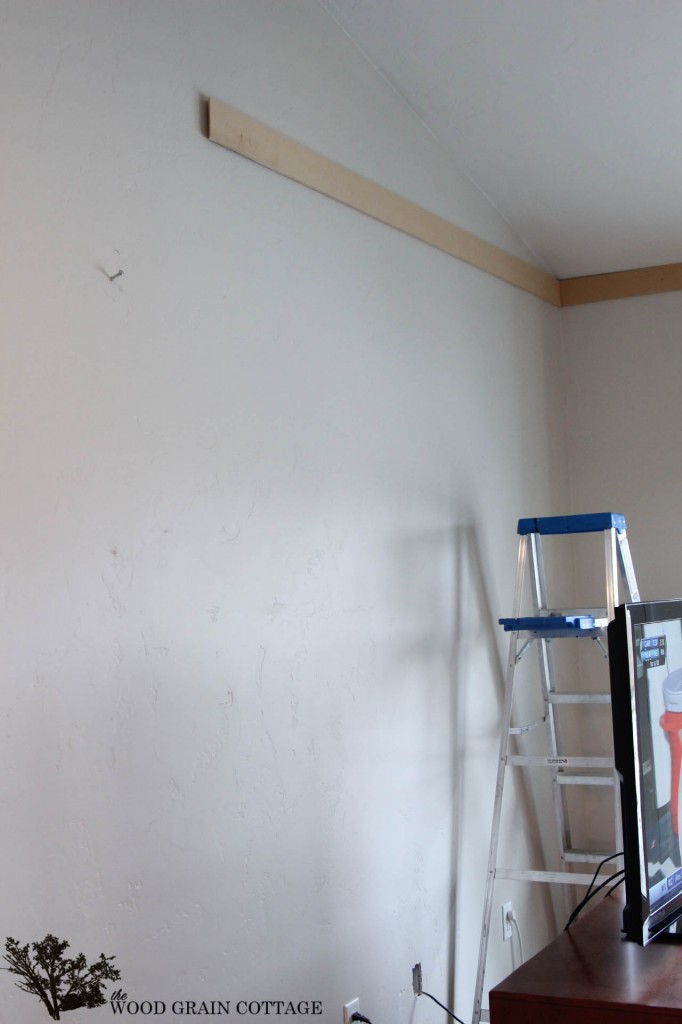
We bought 2 sheets of 1/2 inch MDF, which we cut into strips with our table saw. For the horizontal boards, we cut the boards at 4″ wide. For the vertical boards, we cut them at 2.5″ wide.
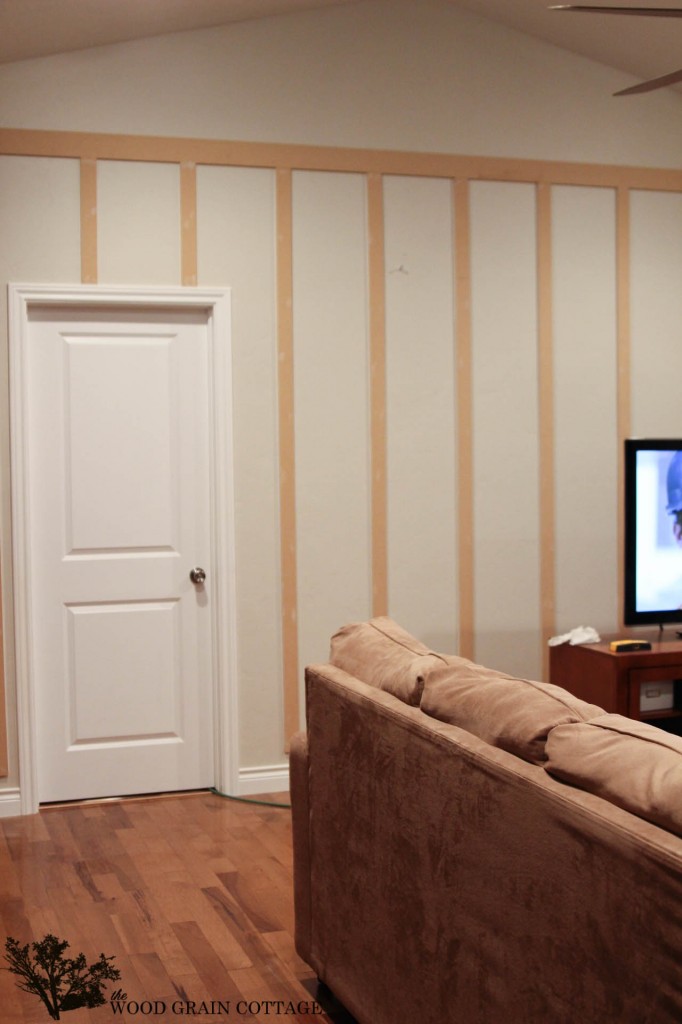
Once the MDF was cut, Anthony installed a 4 inch board at the top of the wall with our doors…

He made sure the board was level, which left gaps along the top. Caulking would save the day!
Then, he installed the 4″ board along the other wall…
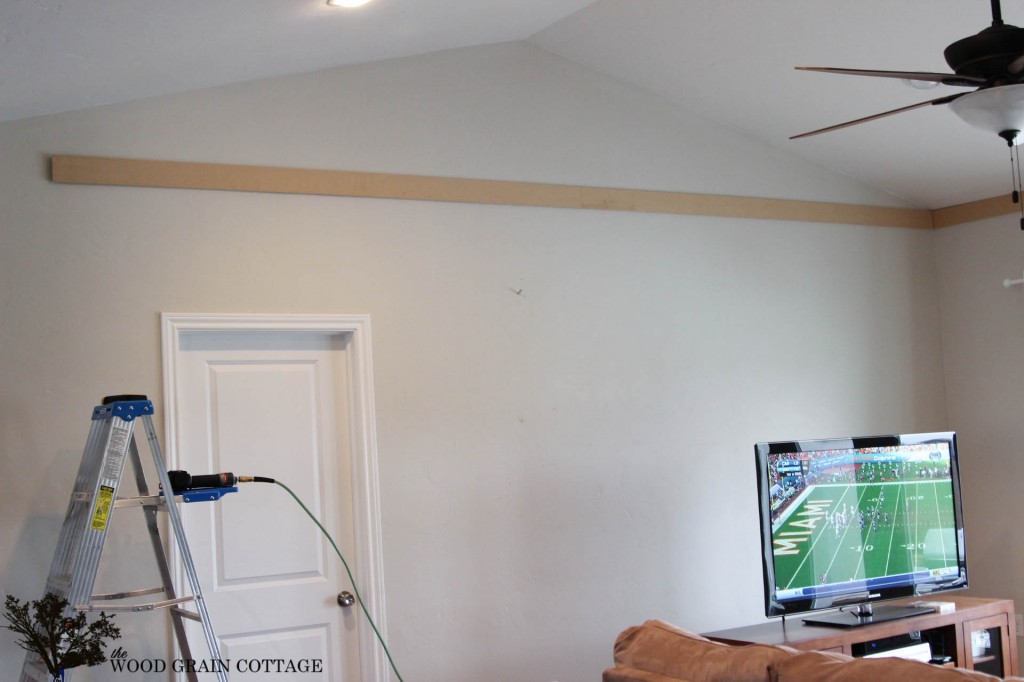
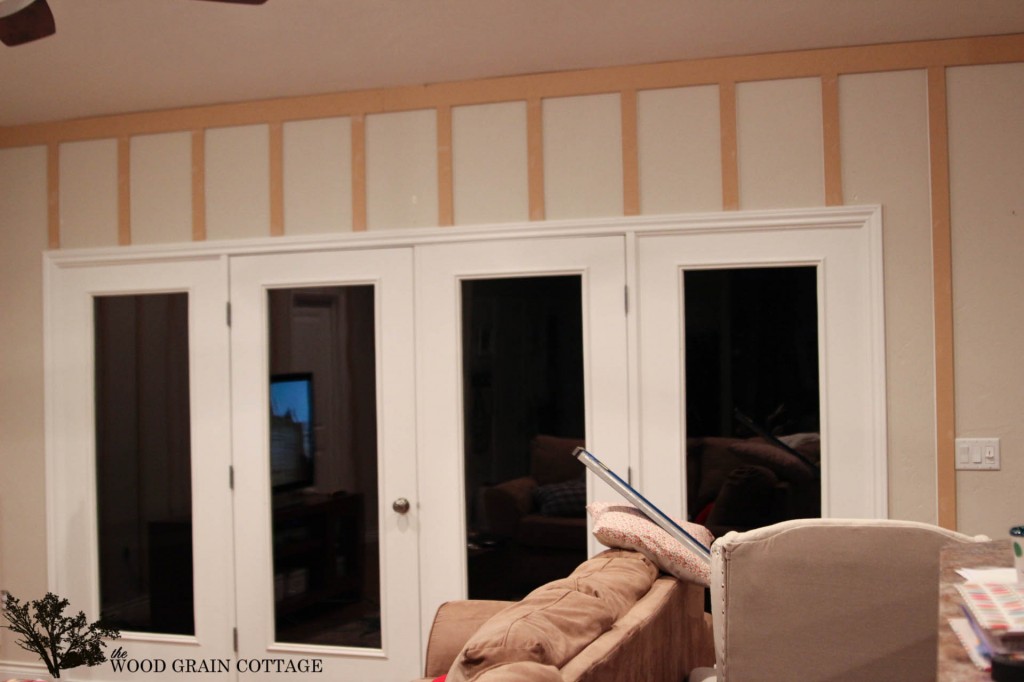
Since I wanted the vertical boards 14 inches apart, he measured the wall, found the center and measured 7 inches out. He used a level to make sure the board was straight…

And nailed it in place…

Then, he just built out from there, measuring, leveling and nailing…
And installed the vertical pieces above the doors…
I began caulking with white paintable caulk… This guy and I were BFF’s!

After the caulking was done, I filled and sanded all the nail holes and added my first coat of paint… Anthony also installed the vertical boards above our 4 ” divider in the vaulted area…
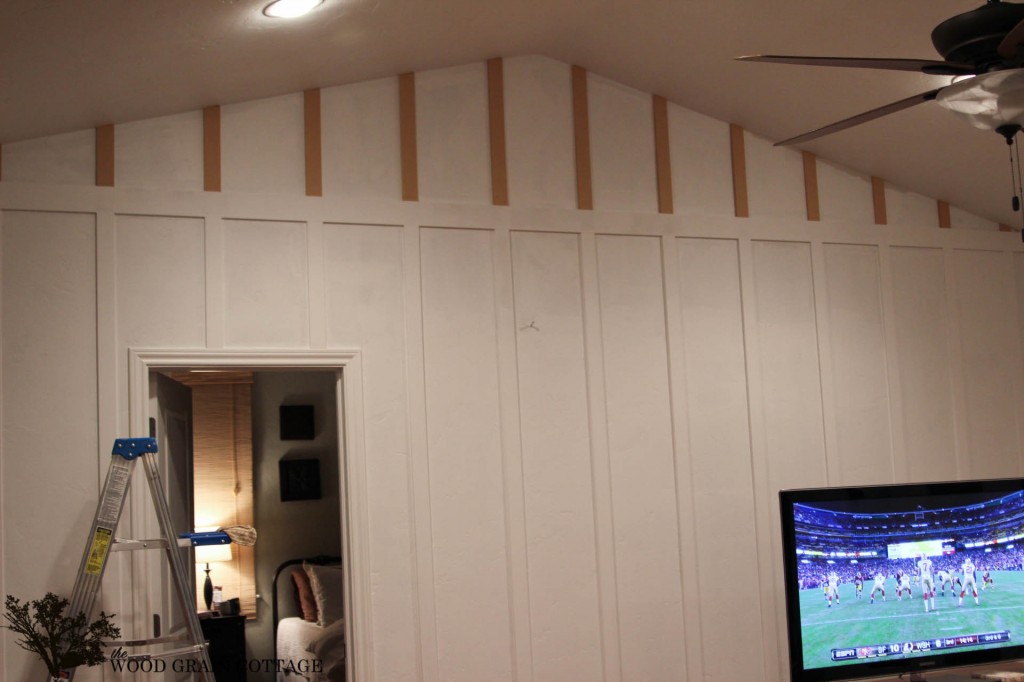
For the paint color, I used Super White by Benjamin Moore. It’s the same color as the trim throughout our home. Three coats later, I had a finished wall…

Things I learned…
-DO paint the walls first! PLEASE trust me… I can’t even begin to count the long hours that I spent painting and cutting in…
-DO pre-paint the MDF strips… they actually painted better than the walls, but it would still save major time!
-DO wear comfy shoes whilst standing on the uncomfortable metal ladder for hours on end… Lesson learned!
-DO have lavendar essential oil on hand to soothe new blisters from the paint brush… Life saver!
-DO NOT think this will be a super easy project that can be whipped up in a day… That may be the case, but only if the wall is pre-painted and you buy the pre-cut strips!
But really, if you take nothing else away from this post, just please promise me you will paint your wall FIRST! That would have completely changed the name of the game… which I loving gave a new name every time I re-filled my paint brush.
Now, let me clarify that I am 150% in love with the outcome… I couldn’t have envisioned it turning out any better! I would absolutely (& probably will) do this again, but I will be painting the wall first!
But really, how could I not love these results?
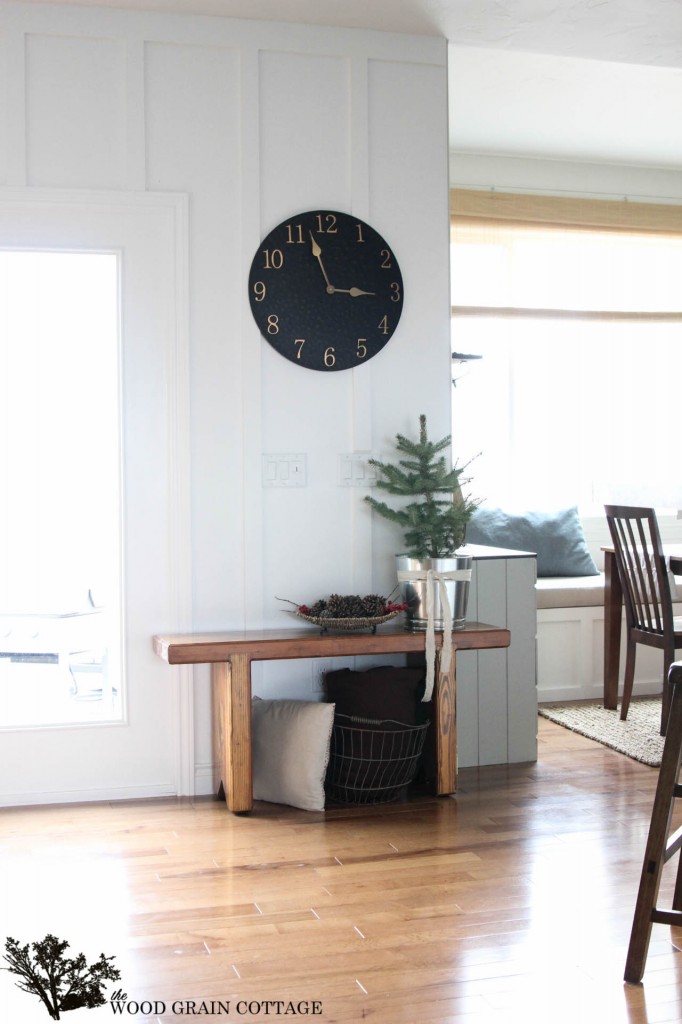

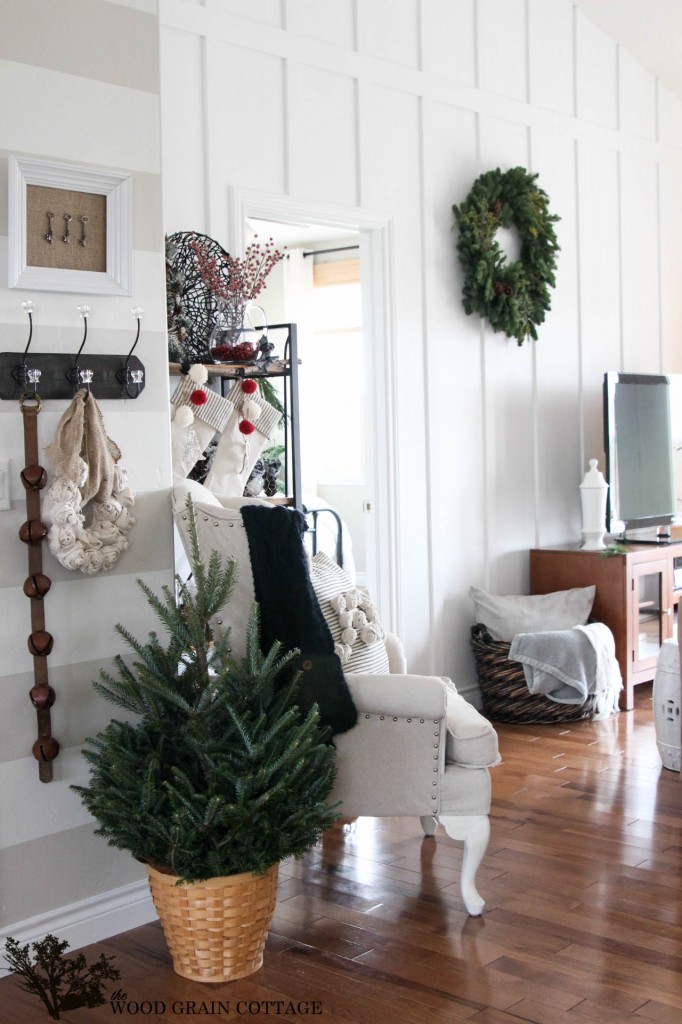
The new walls have completely changed the way our entire home feels. Since we have an ultra open floor plan, I wanted something that would look great with all the other wall treatments we have going on (think stripes and planked walls), but something that would also make our family room feel like its own separate room, all while giving the illusion that it is wider and taller than it really is… WIN!
I couldn’t be happier with the outcome! And, we created a whole new look for $70! Now that’s the best part of it all…
Just as lovely as I imagined it would be. Now can I start this in my own house even before I put the Christmas tree up? 🙂 I’ll wait, impatiently.
THANK YOU so very much! I’m so happy you love it as much as I do! 😀
-Shayna
Can you explain in more detail how painting will save me time? My thoughts are, I’m still going to have to paint over the caulk. Will be doing this soon so all the instruction I can get would be great!
Thanks
Hi Shiree! I’m so happy you’re going to be doing this soon! You will love it! Painting before hand will definitely save you time. My roller was a little bit snug inside each of the boxes, and I ended up doing a ton of cutting in. If I would have painted the wall before we installed the board and batten, the wall would have already been painted and I wouldn’t have had such difficulty painting inside of each “box”. You will have to paint over the caulking, but it’s much easier to just lightly paint over it, then fill every small gap in the texture.
I hope that helps! 😀
-Shayna
It looks absolutely beautiful! I’m a huge fan of board and batten!
THANK YOU so very much, Laurie! This is the first B&B project we’ve done… we’ll be doing it again soon! 😀
-Shayna
I cannot express how much I LOVE this look Shayna – I seriously think we might need to do this!! Pinning and showing my husband how stunning this is!
I’m showing my husband too, Krista! Then we can blame Shayna for putting these ideas in our heads 🙂
Ha ha! You can totally blame me… 😀
Hugs!
-Shayna
THANK YOU so very much, Krista! I know exactly what you mean… I absolutely love the way it looks too! 😀
Hugs!
-Shayna
It looks amazing!! Great job!
THANK YOU so very much, Anne! 😀
-Shayna
Ahhh, so worth the wait lol;) love the look…so rustic & cozy! I <3 your home, girl!
Blessings & <3
M
THANK YOU so much, M! I love the look too— and I love how it makes our living room look! 😀
-Shayna
Love, love, love it. Soooo… you think we should paint the walls first??? lol Thanks
for the tip!! 😉
THANK YOU so much, Diane! Ha! YES, please pre-paint your walls… lesson learned! 😉
😀
-Shayna
Wow – you’ve made this fabulous job look so easy 😀 Well done – it’s brilliant 🙂
These walls are the star of the show for sure! Love LOVE love LOVE !!!
Awe, Christy! THANK YOU so very much! I feel the exact same way about them! 😀
-Shayna
Awe, THANK YOU so much, Petra! I’m glad it looked easy… if only I would have pre-painted those walls! Lesson learned! 😀
-Shayna
Shayna, you and your husband did an outstanding job! It looks absolutely gorgeous and like it should have been there the whole time! When I buy my new house I want to do this, and will most definitely take your advice on all of the do’s and don’ts! 😀 Enjoy your beautiful “new” home!!
THANK YOU so very much, Amy! We love the walls— and I can’t imagine our living room without them! 😀
Just make sure to pre-paint your wall… 😀
-Shayna
love it love it love it
THANK YOU so much, Angela! Me too! 😀
-Shayna
This wall treatment adds soooo much character! LOVE IT!! WANT IT! Thanks for the inspiration-may do it in my bedroom….
THANK YOU so much, Kris! I agree, it add soooo much character! I absolutely love it! 😀
-Shayna
It looks amazing and those blister will heal faster just looking at the beautiful wall 😉
Debbie
THANK YOU so very much, Debbie! I agree… those blisters have healed faster since I started staring at the wall! 😀
-Shayna
If the board you used for the strips is 1/2″ thick are they flush with the baseboard moldings? I love the look but I’m super picky about things being even. I also don’t want to change the baseboards since I live in a new house. It would be hard to convince my husband to tackle the project if he has to change the baseboards as well. I’m going to try an use your gorgeous pictures to entice him!!!
THANK YOU so very much, Terry! I completely know what you mean, and yes the 1/2″ board and batten match up perfectly with our baseboards. I wouldn’t have replaced our baseboards either… they’re not even 2 years old yet! 😀
I hope that helps!
-Shayna
Beautiful, Beautiful! Shayna, are these textured walls or just a flat finish you worked with? Thanks, Allison
THANK YOU so very much, Allison! Our walls do have a bit of texture to them, but they are mostly smooth.
I hope that helps! 😀
-Shayna
Merry Christmas! Your walls are lovely! I have a little B&B experience, but I’m wondering a few things. 1) It looks as if your wall texture is smooth to mostly smooth? Mine are not. Boo. So in my house I have to actually apply smooth board to the wall, of course increasing time, cost, and labor to the project… 2)Would you mind sharing what paint finish you used and did you match the finish to your trim finish (glossy? satin?) 3) What product did you use to fill the nail holes in the MDF? I’ve had a hard time getting it completely smooth even with sanding. Not sure what I’m doing wrong. I know you’re busy like the rest of us this time of year so I REALLY do appreciate it if you’re able to answer my questions. Thanks a bunch! 🙂
THANK YOU so very much, Vickie! Yes, our wall texture is mostly smooth… For the paint sheen, our trim and baseboards are painted in semi-gloss, but I painted the walls in an eggshell finish. Same color, but I didn’t want the walls to have too much sheen to them. For the nail holes, I use two things to fill them. First I fill them with caulking, then once that is dry, and the caulking has sucked in a bit, I go back over the holes with patch and paint wall filler. Once that’s dry I just sand it smooth. I find that’s the best way to remove those unsightly nail holes. 😀
I hope that helps!
-Shayna
Thanks so much, Shayna! I really appreciate you taking the time to answer my questions. I’m getting super close to starting on this new b&b treatment throughout my dining area. Hope your Christmas was super merry! 🙂
Thanks for the great tutorial, Shayna! And what a difference it makes. It looks stunning! Someday I’ll tackle this project, and I’ve got all your wonderful tips pinned for when we do. Thanks for sharing! Happy Wednesday to you!
THANK YOU so very much, Brooke! I’m so happy you enjoyed the tutorial! 😀
Thanks for pinning! 😀
-Shayna
I am seriously in love with this and want to do it to our living area like stat. We have an open concept as well. Question though- did you go all the way down to the base trim with your vertical boards? It looks like there is a bit of a gap in some of the pictures. We have honey oak trim that I am really not a fan of, but if I paint this trim white I would have to paint everything on the first floor white. Uhh such is life! Looks amazing though!!! And I cant believe for only $70!!
THANK YOU so very much, Courtney! Yes, we did go all the way down to our baseboards. Because we used 1/2″ MDF, the strips lined up great with our existing baseboards. I was a bit worried that the MDF would hang over our baseboards, but it sits perfectly flush!
Can’t beat that $70.00! 😀
I hope that helps!
-Shayna
Love it! I’ve been wanting to do this to our living room for awhile now. Just showed your tutorial to my husband, and I think he has a better understanding now. I, too, have a question about the wall surface. We have the “orange peel” finish. So we would have to do something to smooth the surface. Any suggestions? I’ve done lots of painting projects and have to know…WHY paint the walls first???? Thanks so much for sharing!
THANK YOU so much, Stephanie! I’m so happy our tutorial was helpful! Boy, I’m not sure what you should put over your walls to get rid of your current texture. The only thing I know to do is to re-texture your walls. My parents just did it to cover their orange peel texture and it turned out wonderful… 😀
So, painting the walls would have made this job so much easier! I ended up doing a TON of cutting in because our gaps in between the MDF were a bit narrow for our rollers. If the walls would have been pre-painted, all I would have had to do was caulk and then paint the MDF strips. The painting on this project was VERY labor intensive! Well worth it though! 😀
I hope that helps!
-Shayna
Shayna. So beautiful!!! I loved the Board and Batten the moment I laid eyes on it. I should have known it would be a lot of work 🙂 My husband and I will be trying this in our new sun room. I will try to send you a pic. Your use of eggshell paint is probably what I need to do also to keep the walls from shining from a the windows and sunlight in our room. My husband suggested that we paint all of the boards and walls before we hang the batten. He said that painting at waist high is better than bending and stretching all the time. Sounds good to me. Thanks for everything I have this pinned. Have a great Holiday Season.
THANK YOU so very much, Karen! I love that board and batten too, but it was a lot of work! Please do send me a picture when you get yours completed! I’d love to see it! Yes, please promise that you’ll paint the walls first. It’s a must!:-D
Merry Christmas to you and yours!
-Shayna
I’m kind of late to the party, but how did you manage the bottom where it butts up against the baseboards? Looking through some of the pics, it looks like you added another trim piece, but did you notch the end down or leave it flat? I’ve seen tutorials where people have done both.
Looks AMAZING. I couldn’t believe the difference! 🙂
THANK YOU so very much, Bethany! It made a huge difference! 😀
Because we used 1/2 inch MDF, the board and batten matched up perfectly with our original baseboards. I really didn’t want the MDF to be thicker than our original baseboards, so I made sure the thickness would match. To get them flush with the baseboards, we just left them flat and I caulked any gaps.
I hope that helps! 😀
-Shayna
I am also late to the party but I have a similar question about the bottom. As some other commenters have said some of the pictures show the vertical boards not going all the way to the base board. Is this because your wall is taller than 8′ + the baseboard height? If so, did you just cut shorter pieces of MDF to take it to the floor? Can you see a seam if done this way?
Yes, our ceilings are taller than 8′. We used a solid 8′ sheet, and then cut smaller pieces to fill in the gap to the top of the trim. Honestly, it’s barely noticeable, and not something you look at. Yes, there is a seam, but if you fill it in correctly, you won’t notice it by the time it’s all painted the same color. Hope that helps! 🙂
Beautiful job Shayna. What is the material of your walls? Is it drywall? Thanks,
Also, just out of curiosity, what would you recommend for a ceiling that already has crown molding? Start near the top or just stop at like 6 or 7 feet?
I’m not sure how it would look with crown molding… There would be a definite difference in the width where the MDF strips would meet the crown. I think if that were the case, I would only install the board and batten 6 or 7 feet high. That would look pretty too! 😀
I hope that helps!
-Shayna
The board and batten looks wonderful in the living room. Your husband did a wonderful job on the installation of the boards, and you did a wonderful job on all of the finishing work.
THANK YOU so very much, Candy! I’m so very lucky to have such a handy husband! 😀
-Shayna
Do you have any close ups of your wall texture? I am trying to decide if I could do this with my walls. I have a newer house so I have a knock down texture but it isn’t really extreme. I’d just hate to start doing this project and have it look terrible without my walls. Any suggestions/opinions?
I also have floor to ceiling batten on a project with 8′ ceilings and am going “batty” on where to change sheens..when you said trim….and baseboards…does trim include the crown mold (upper portion) of batten…and I assume that does not include vertical batten trim. Thanks for sharing your experience and trying to save us headaches.
Hi there! 🙂 For the sheens, I would keep the walls and crown molding the same. Ours is all the same color, so you really can’t tell a difference. Our walls and board and batten (including the crown) is satin. The trim around the doors and floor is semi gloss. I hope that helps. 🙂
Loveeee this!! Question… Did u paint ur ceiling the same color as ur walls? And what sheen/finish is your ceiling! Xoxo
Thank you so much, Vicky! We did not paint the walls the same as the ceiling. Our ceiling is painted “White” by Benjamin Moore in a flat sheen. I hope that helps! 🙂