
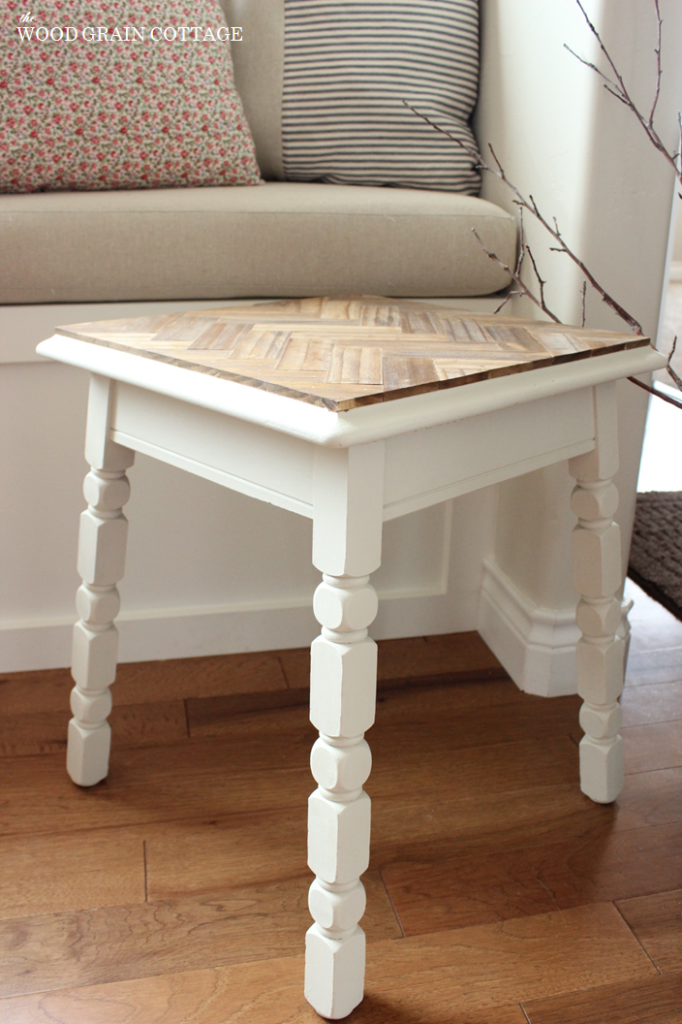
Herringbone Side Table Makeover
See how this herringbone side table makeover came to life and our step by step tutorial.
Sometimes things happen that make you want to cry. You cry out of sadness, out of joy, out of sorrow and you cry because of happiness.
This little side table made we want to cry, but out of pure joy and happiness!
Herringbone Side Table Makeover

What started as a really sad little side table quickly became so much more.

A while back my grandma called and said that she had something for me. When I got there, she led me out to the garage. I took home what she called me for (more on that later), but I couldn’t help but notice this beat up little side table. It had definitely seen better days, but there was so much potential that I couldn’t help but ask what she had planned for it.
Music to my ears, she told me I could have it! Insert very happy granddaughter with huge smiles and big hugs.
🙂
I felt the need to forewarn her that I would be painting it. I would hate it if she felt that I was going to keep it that way, only for her to come over and see it completely made over. Luckily, she didn’t care.
I proudly packed that table into our house, for I knew what was going to happen in its near future.
Not too long ago, KariAnne from Thistlewood Farms posted this lovely table with a herringbone paint stick top. For me, It was love at first sight and I knew that if I ever found the right piece, I was, without a doubt, giving it the same type of makeover.
Best. Decision. Ever.
Here’s how I turned that sad table into a smashing beauty.
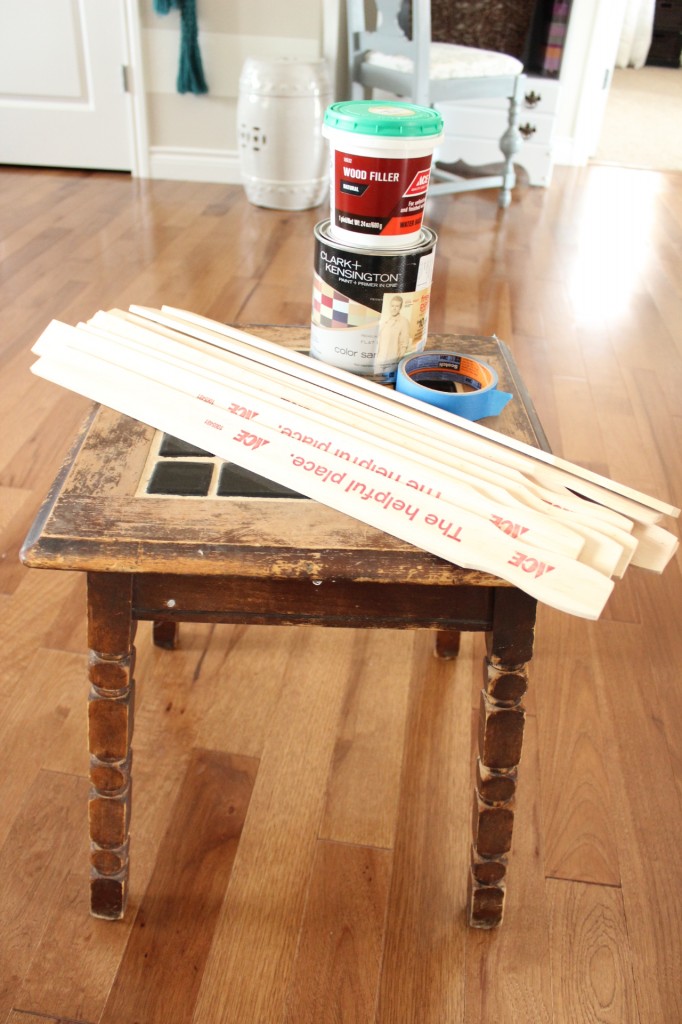
The weekend that I decided to tackle this project, our local Ace Hardware was offering a free quart of paint. I took full advantage of it and had them mix Ashwood by Benjamin Moore. It’s such a soft color. It speaks to me. I’m already itching to use it somewhere else too.
Since I’m also BFF’s with the paint department (I’m not kidding, they know they’re in business when I walk in…), I asked if I could have several 5 gallon paint stirrer sticks. They’re much thicker and longer than the regular gallon sticks, making them the perfect choice for this project.
Honestly, I felt a little guilty asking my BFF for like 20 stirrer sticks, so I offered to pay for them. They looked at me like I was crazy and handed over about 20 of them and probably 15 regular stir sticks. I am now selling them… kidding! I’ll find something else to make with them!
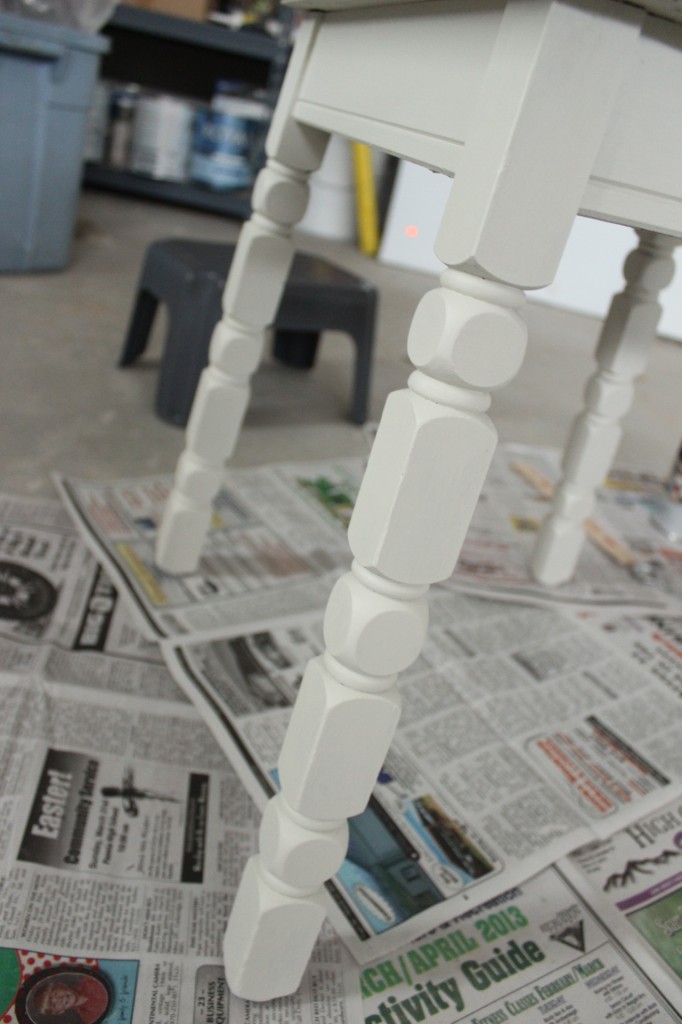
Because this table had such lovely legs, I didn’t want to have excess paint build up in all the curves, so I mainly dry brushed the entire thing. Meaning, I hardly had any paint on the brush as I painted. I had to do several coats, but since each coat was very light I was able to minimize the brush strokes and paint build up.
It turned out awesome!

Such an improvement!
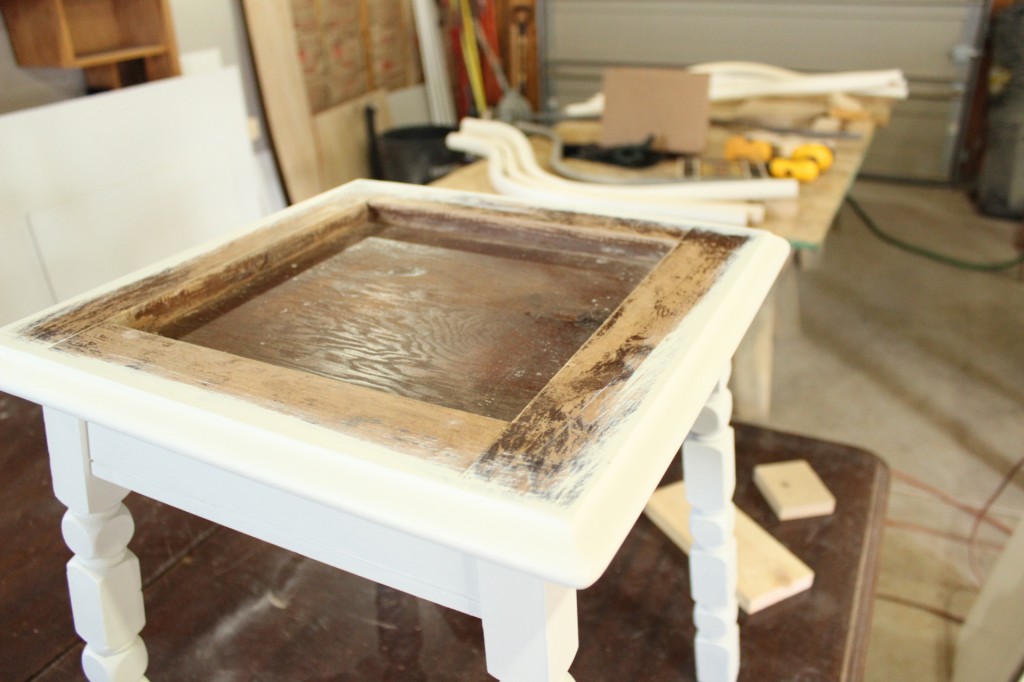
Once the paint dried, I removed the original tile top and we added a piece of wood to make the top flush once more.
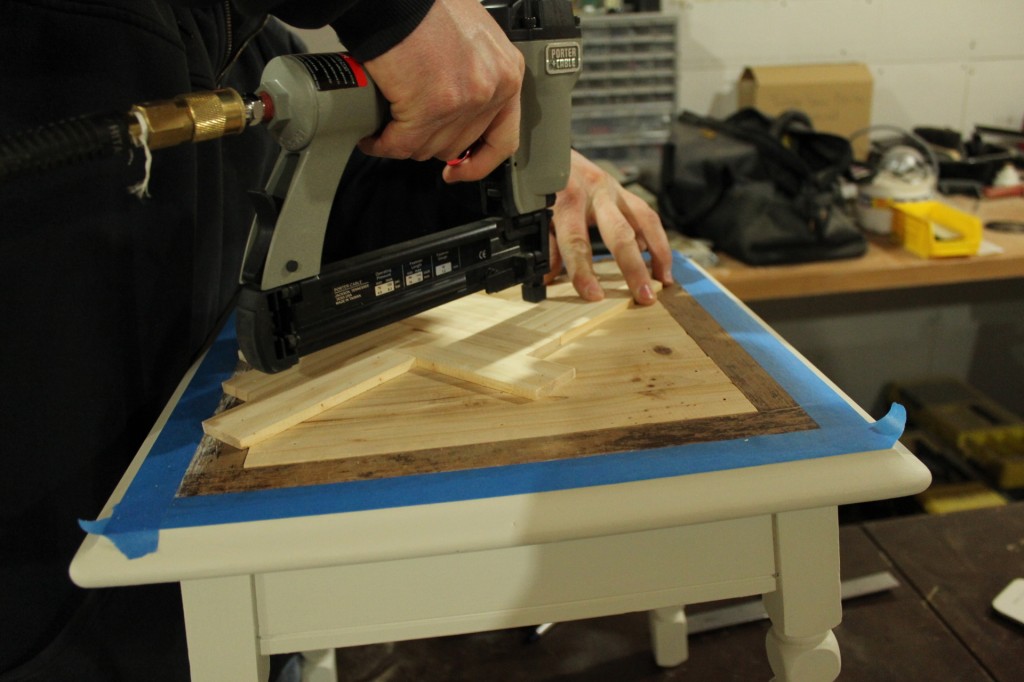
With the new top in place we cut all our stirrer sticks into 5 inch pieces.
I taped off about an inch around the top of the table as a guide and way to keep the pattern balanced… then we started laying them out in a harringbone pattern.
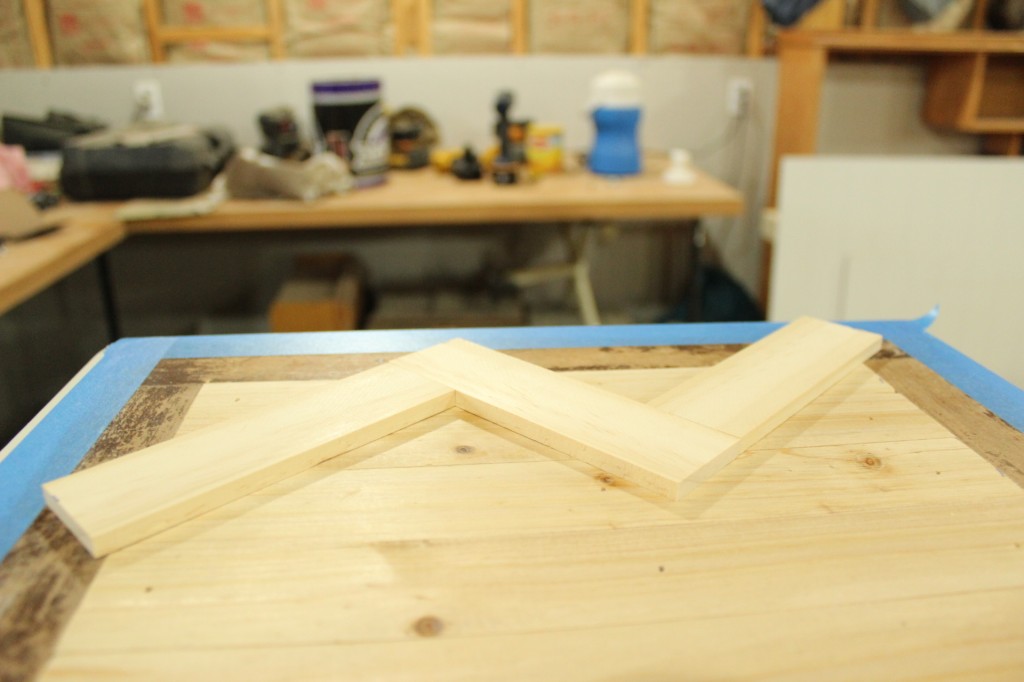
Once they were even and level, we kept repeating the pattern.

Then we used our nail gun to secure them in place. We could have used wood glue, but I lack the patience that it demands. When I want a project done, it should have been completed yesterday. Watching wood glue dry doesn’t fit into my time frame.
We kept adding the pattern, trying to get all whole pieces secured in place first.

With all of the whole pieces nailed down, we started on the pieces that would need to be cut.

We kept adding and cutting…
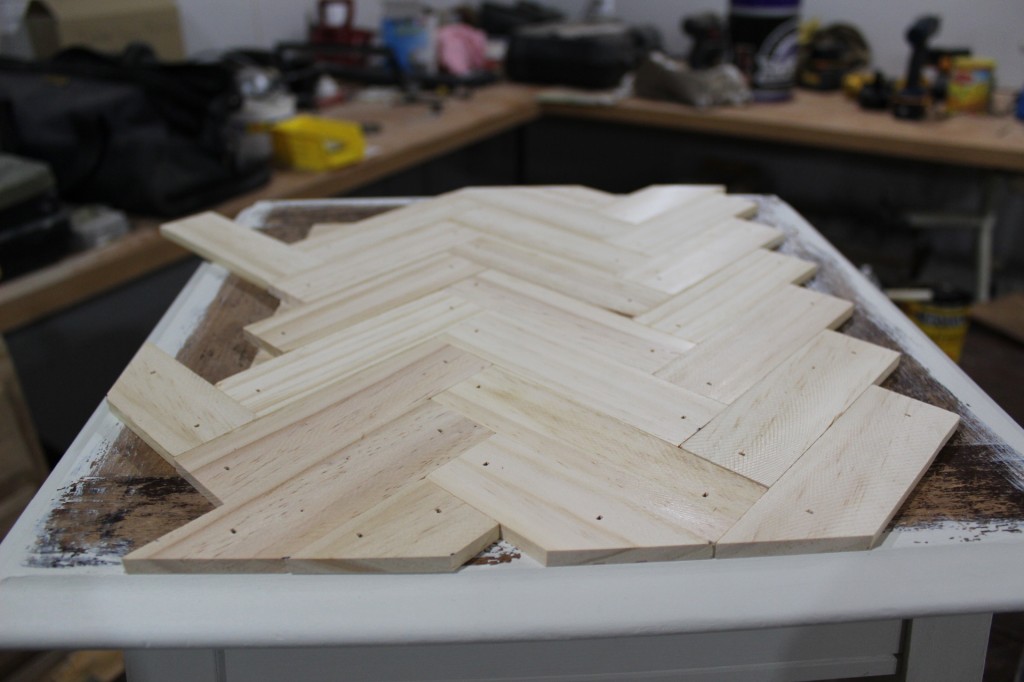
Adding and cutting…

Until we were left with this:

We were short about 2 paint sticks… seriously!
The next morning I headed back to Ace and was given more paint sticks by said BFF.
We kept up the theme from the night before: adding and cutting.
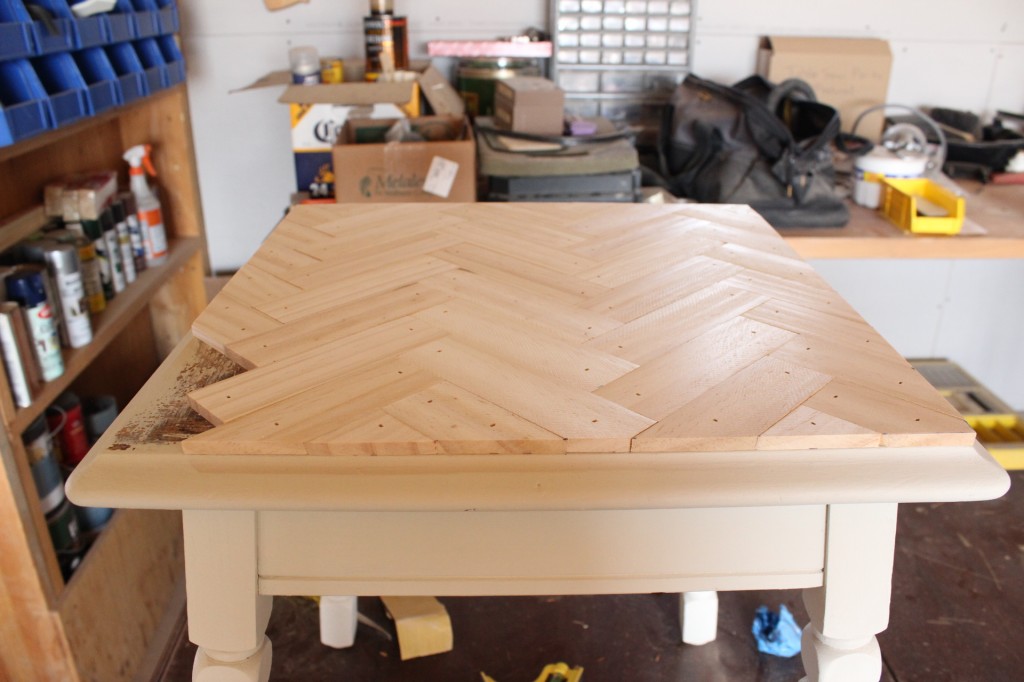
Finally, we had all the pieces in place, leaving us with one beautiful top!

Before I moved onto the next step, I grabbed an end piece of the paint stick and rubbed on a couple choices of stain. I was seriously loving the natural look.

While I tried to make my mind up, I started filling all the nail holes and minor gaps with stainable wood filler.
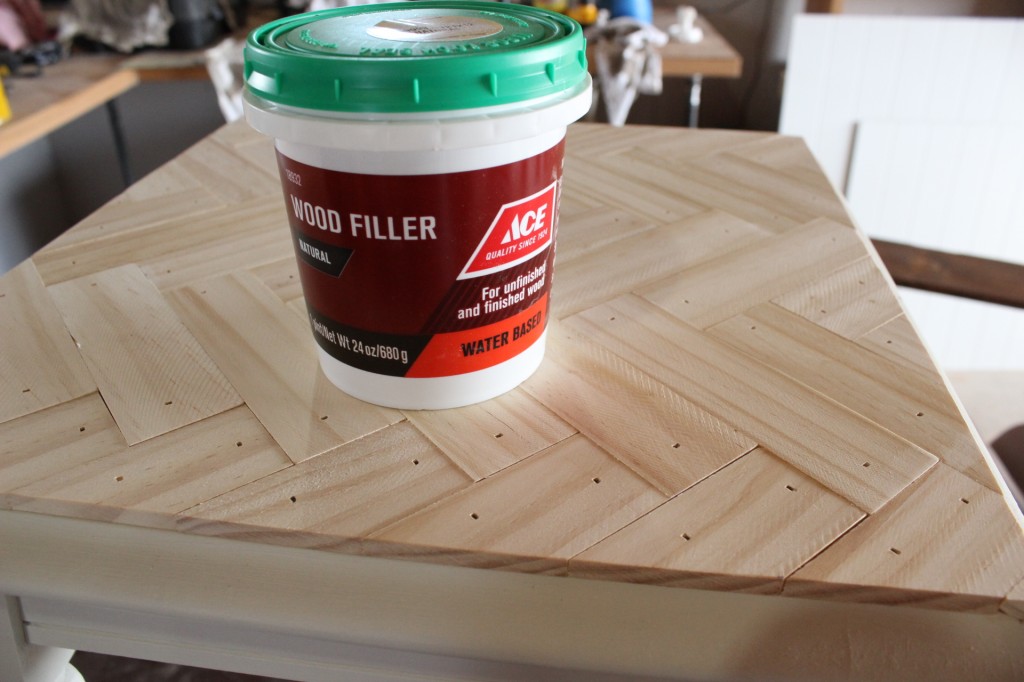
Easy, peasy! Just like patching holes with putty.
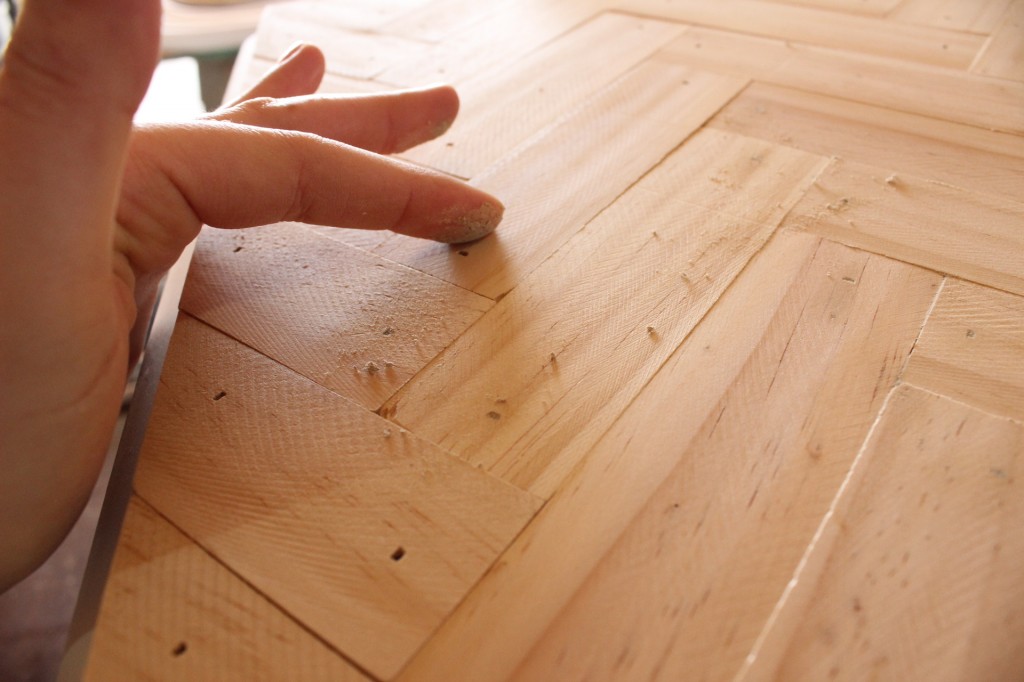
I waited for it to dry, then sanded it smooth. I also sanded all the sides making them as flush as possible.
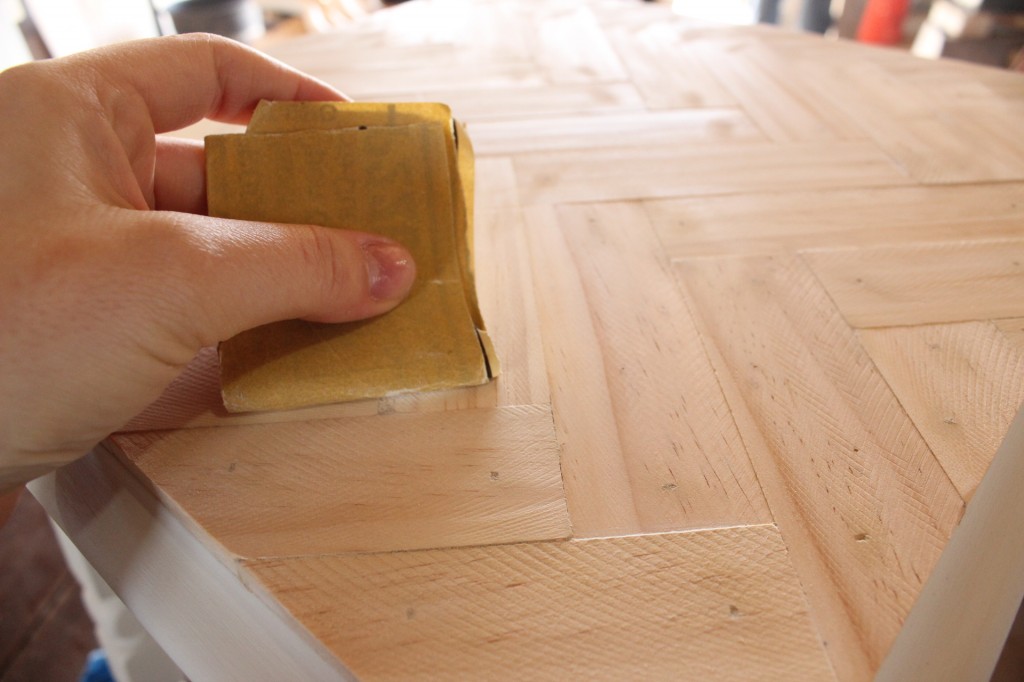
I gave it a good wipe down and then used cheesecloth to remove any extra dust.

To prepare for staining, I taped off all the edges with painters tape.

I decided on using Early American by Minwax, but the Golden Pecan was my second choice.

I started wiping on the stain, keeping in mind how quickly these paint sticks absorb stain.
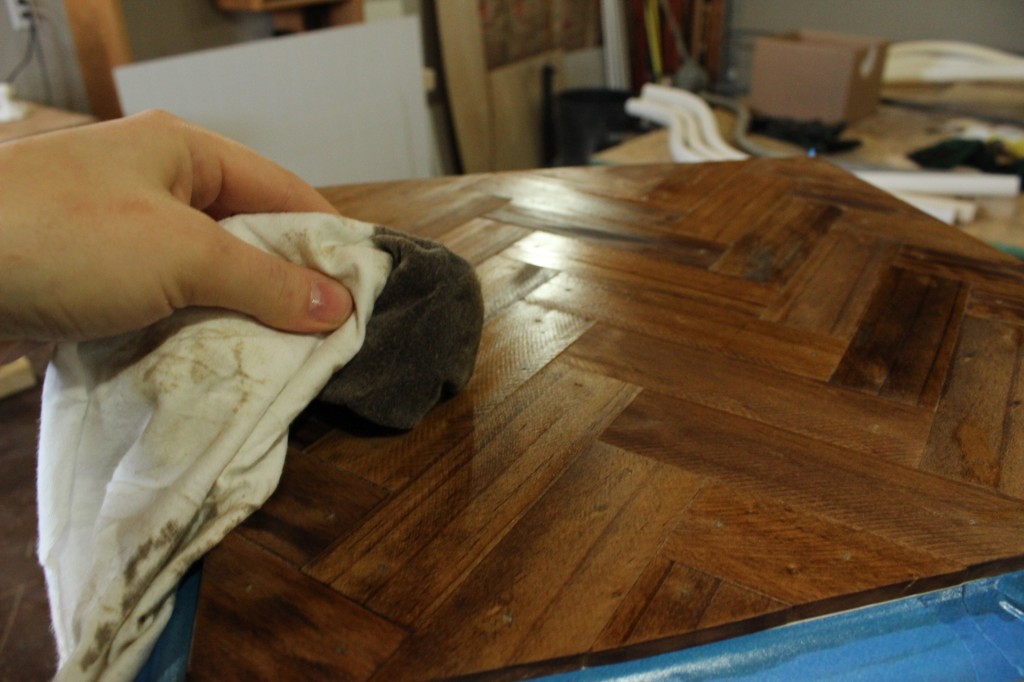
A couple of light coats later, I had this!

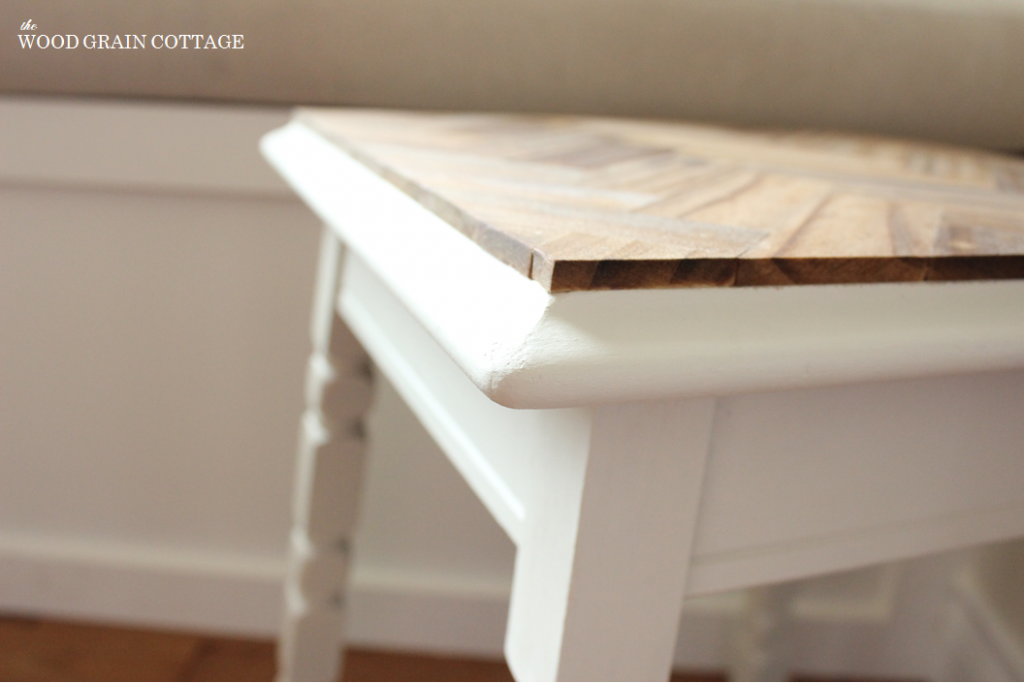
Once the stain dried, I gave it two heavy coats of satin clear finish. I’m still debating on going back and using a gloss.

I let it dry, then brought it inside.
I am beyond thrilled with how it turned out. It’s basically my favorite new thing.
And did I mention that it was an entirely FREE project? Yep. Free!

Goodness!

Such a perfect pattern on top…
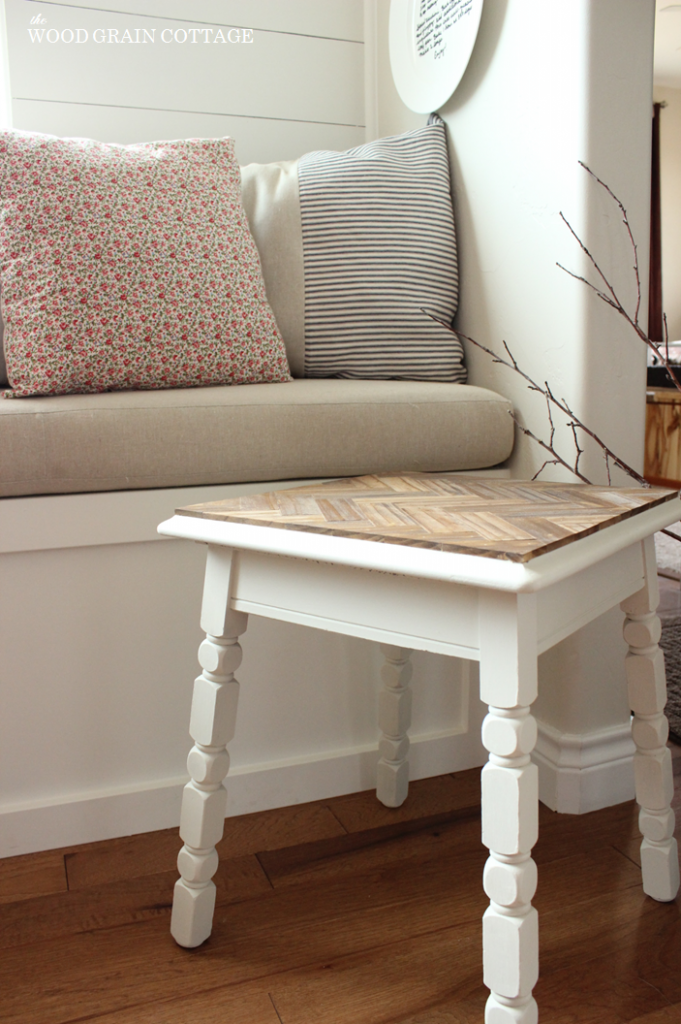
Paired with some seriously lovely legs….
Makes for a fabulous makeover!
Honestly, I still can’t believe that it was completely free. My head is spinning. Every time I walk by it, I feel like I’m looking at an expensive piece of furniture.

Such a rewarding project! And the power of paint is unbelievably amazing…
I’m off to admire my new side table and possibly find another piece of furniture to make another one……..
🙂
Your revamped side table is beautiful, I love white furniture so this is perfect for “spring”. It’s beautiful, you both did a great job with this! I am sure your grandma knew you would be able to create something beautiful with it and you did! I started laughing in front of my computer when I read this “could have used wood glue …. but I lack the patience it demands 🙂 ” ha!ha! I thought that was funny; I feel the same way!
Thank you Ingrid! It turned out better than I ever hoped! 🙂 I’m glad I’m not the only one who lacks patience… wood glue is the worst! 😉
-Shayna
I absolutely love what you did to that side table. Kudos to you for a great makeover. I’ll take 2 for my bedroom.
Thank you so much Johanna! I’m glad you like it! It’s an addicting makeover- I want another one too! 🙂
-Shayna
This table is absolutely GORGEOUS! I saw that same tutorial from Thistlewood Farms and have been looking for something to try it out on….You guys nailed it!!! Great job! 🙂
Thank you April! I am completely in love! My heart goes “pitter patter” every time I see it! 🙂 You should definitely try it!
-Shayna
LOVE IT!!! what a beautiful table! I would love to do this on a coffee table.
Pinning it. 🙂
Have a blessed day!
Traci
THANK YOU Traci! I’m so happy you like it! 🙂 And thank you for the pin!
All my best to you!
-Shayna
Shayna,
It is BEAUTIFUL!!!!! You did such an amazing job! I love the colors and the way it turned out is absolute PERFECTION!!!!
Thank you so much for sharing!
blessings,
karianne
Awe, THANK YOU so much KariAnne! I am completely in love! 🙂
Big smiles (& hugs) to you!
-Shayna
What a transformation! Love it!
Thank you Kris! I’m so glad you love it! Me too! 🙂
-Shayna
Wow! What an awesome transformation! I love the herringbone pattern. Great job!
THANK YOU Amanda! I’m glad you like it! 🙂
-Shayna
I’ve seen a lot of DIY blogs and I’ve read a lot. But.. your craftiness with DIY together is outstanding. I love your projects.
AUTUMN! THANK YOU! Such a lovely comment that makes my heart sing! So happy to have you as a reader! I’m glad you enjoyed the makeover too. 🙂
Big hugs!
-Shayna
I love your table! I just finished up this very same table, but with a different look. I went natural with a checkerboard top. I took the pictures last night and will be blogging on it next week sometime.
Thank you Felicia! I’m glad you like it. I bet your table looks terrific too. The checkerboard top sounds fabulous! 🙂
-Shayna
It’s beautiful! I’m visiting from the POP party. I’m pinning it too.
Thank you Callie! I’m so glad you’re visiting! Thanks for the pin too! 🙂
-Shayna
This is great! I guess I need to keep an eye out for a table in need!
Thank you Consie! I hope you find one too! 🙂
-Shayna
Wow! I LOVE the herringbone design!
Jenna @ Rain on a Tin Roof
THANK YOU Jenna! I’m loving the herringbone too! 🙂
-Shayna
That is just amazing!! I love it. Wish I had a helper like you do, lol!
I’m visiting from DIY Showoff. I hope you can stop by my blog and leave a comment and Link Up!
~ Megin of VMG206
http://www.vmg206.blogspot.com
Thank you Megin! I have an excellent helper- he’s a keeper! 🙂 Off to check out your blog… 🙂
-Shayna
Beautiful redo, Shayna! Love it!
THANK YOU Chelsea! I”m so glad you love it! 🙂
-Shayna
I love how this turned out! Now I have to keep my eye out for a free/cheap table to make over! 🙂
Thank you Emily! I hope you find one too! 🙂
-Shayna
Thank you very much for posting this. It’s a great makeover, and you explain the technique very well. Very inspiring!
I linked it up in my blob.
Thank you Lucia! I’m so glad you like it! 🙂
-Shayna
I love your style, I adore working on solid wood furniture, yet they are difficult to come by at decent price. I have found walnut one recently, which was an old telephone table with nice bottom shelf. I have upholstered the shelf with piece of faux black leather, and the whole table has been sanded down (which revealed amazing wear & tear marks). For the top I have decided to go with the native american theme, and sketched the Bull Skull silhouette, which I have later filled with black oil based paint. What do you think:
http://www.ebay.co.uk/itm/300918974706?ssPageName=STRK:MESELX:IT&_trksid=p3984.m1555.l2649
THANK YOU so much Maggie! I agree- solid wood pieces are fabulous to work with, but a little difficult to find at a reasonable price…
You have done an AMAZING job on your telephone table. It’s Perfect with a capital P! 🙂
Thanks for sharing!
-Shayna
You and I stumbled across the same blog — When I Saw the paint stick table at thistlewood farms I wanted to do the exact same thing. I’m working on mine now!! Yours turned out BEAUTIFULLY! I was going to stain my whole thing, but you are swaying me to the painting side!
Hi Jessica! I’m so happy you love my paint stick table top! Great minds think alike, right? 🙂
Oh…. I’m still lovin’ the two toned look of it too!
-Shayna
Amazing!!! How long/wide were these paint sticks?
Thank you so much, Liz! The paint sticks are the “5 gallon” stir sticks. 🙂