
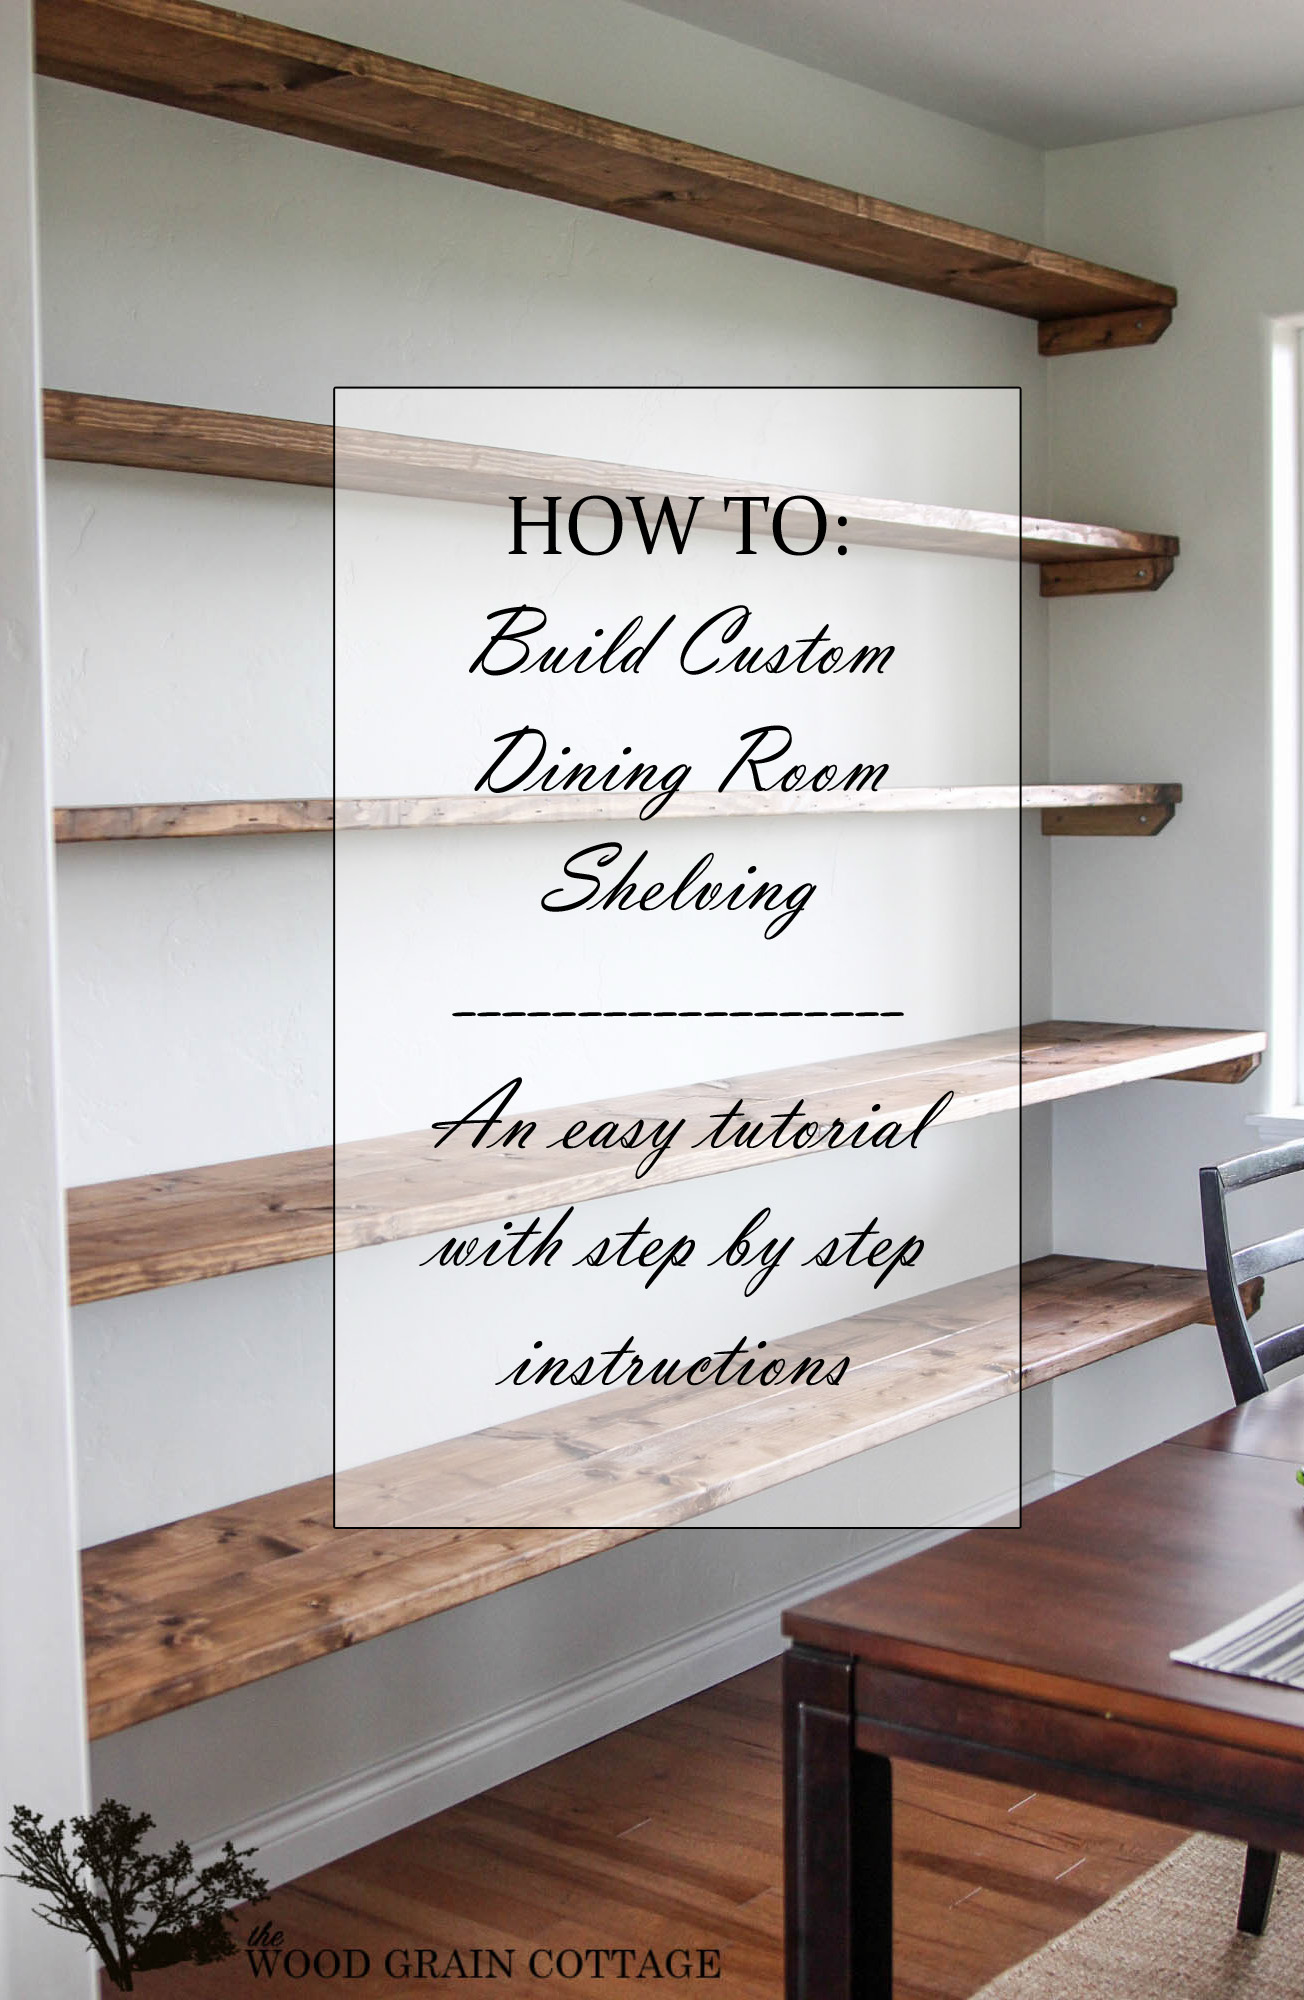
DIY Dining Room Open Shelving
Transform your home with our tutorial for our DIY Dining Room Open Shelving! Customize the size to fit your space!
Over year ago I wrote a post about how I wanted to add a big wall of shelving to our dining room. And for over a year, I’ve been patiently waiting for it to happen. That sentence itself is ironic, because even though I like to think that I’m a patient person, in many cases I’m not. Especially when I know what I want to have done, can mentally see it finished, and walk by it everyday knowing it needs done. It. Eats. At. Me.
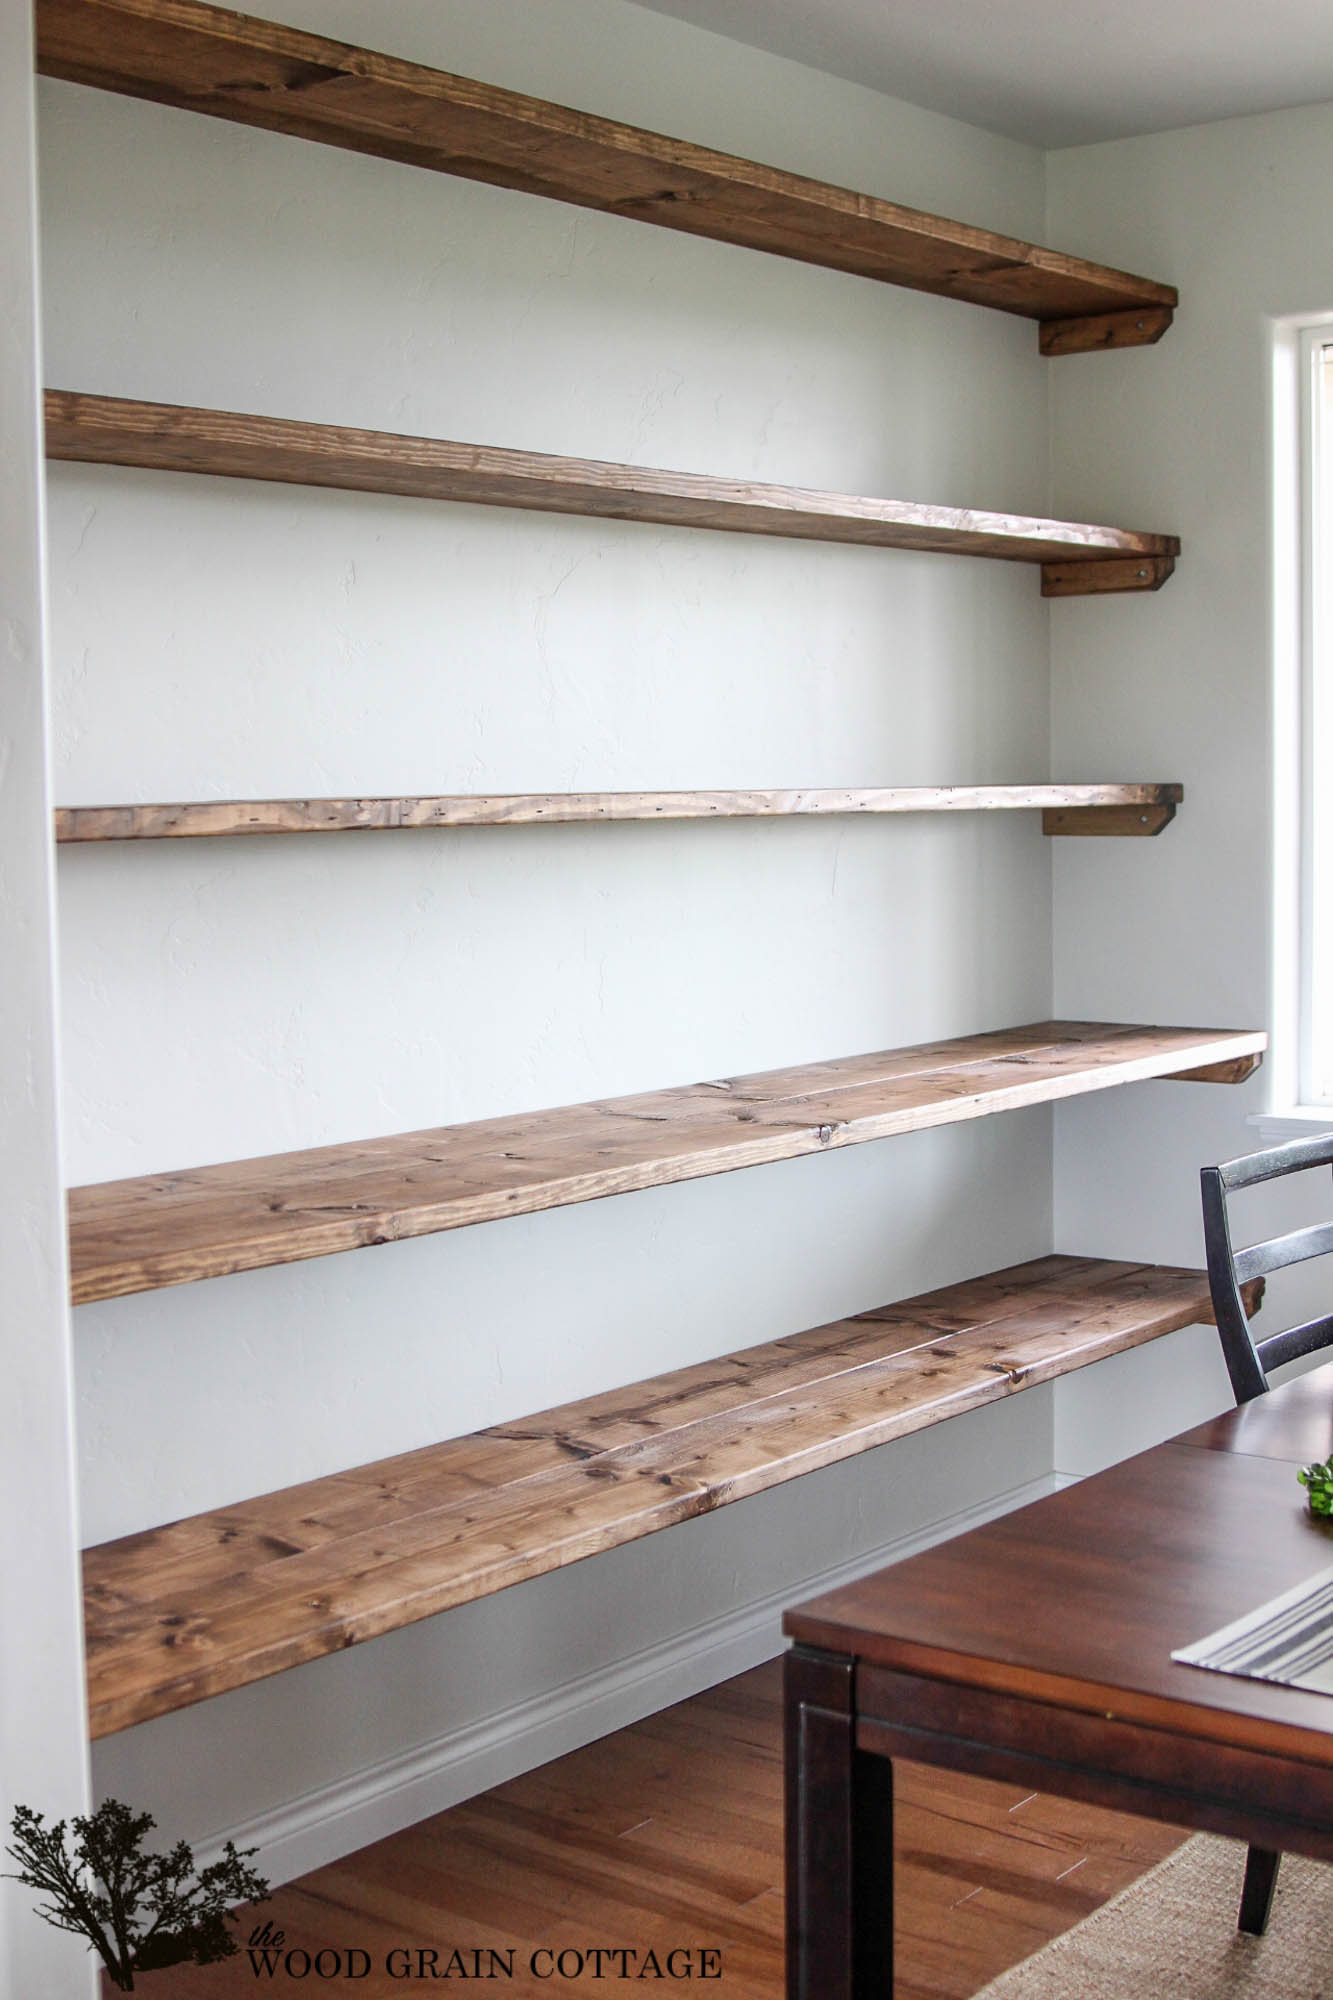
That’s why last weekend was such a success. On a split decision, I decided to paint the dining room. And before the paint was even dry, literally, I had managed to succeed at sweet talking Anthony into DIY’ing some custom dining room open shelving. He was all for it, I was all for it, so we dropped everything and ran to Home Depot for the supplies. Here’s what they look like built, stained and installed….
How To Build DIY Dining Room Open Shelving:

Affiliate links are provided below. Full disclosure here.
Supplies:
- 3- 2″ x 12″ x 10′ Boards
- 4- 2″ x 10″ x 10′ Boards
- 2- 2″ x 3″ x 8′ Boards
- Toggle Screws (Each holds up to 85 lbs!) Those are similar to what we used.
- 2 1/2″ Torx Deck Screws
- Chop Saw
- Screw Driver/ Drill
- Countersink
- Torpedo Level
- Measuring Tape
- Sandpaper, medium grit
- Minwax Early American Stain
- Minwax Dark Finishing Wax
Step One: Measure Wall
First, Anthony started measuring the wall to determine where exactly we wanted to place the shelves…

Step Two: Cut & Install Shelving Supports
Then, we headed off to Home Depot and bought the lumber we needed to make the shelves.
We bought 2″ x 3″ boards for the shelving supports on the side of each wall, and Anthony made a few angle cuts to give them a little bit of dimension…

Then, he placed them on the wall, made sure they were level and screwed them into the wall with massive drywall/cabinet screws, each one of those screw holds over 100 pounds!

Once he had the screws in place, he removed them. I know, odd, but we wanted to have the exact location for each side support, then pre-drill/ countersink the holes to avoid any splintering/ wood splitting when we actually installed them after they were stained, finished and ready to go. I really didn’t want to be staining in the house, so this step was simply a precaution to avoid the wood chipping/ splintering from the screws…
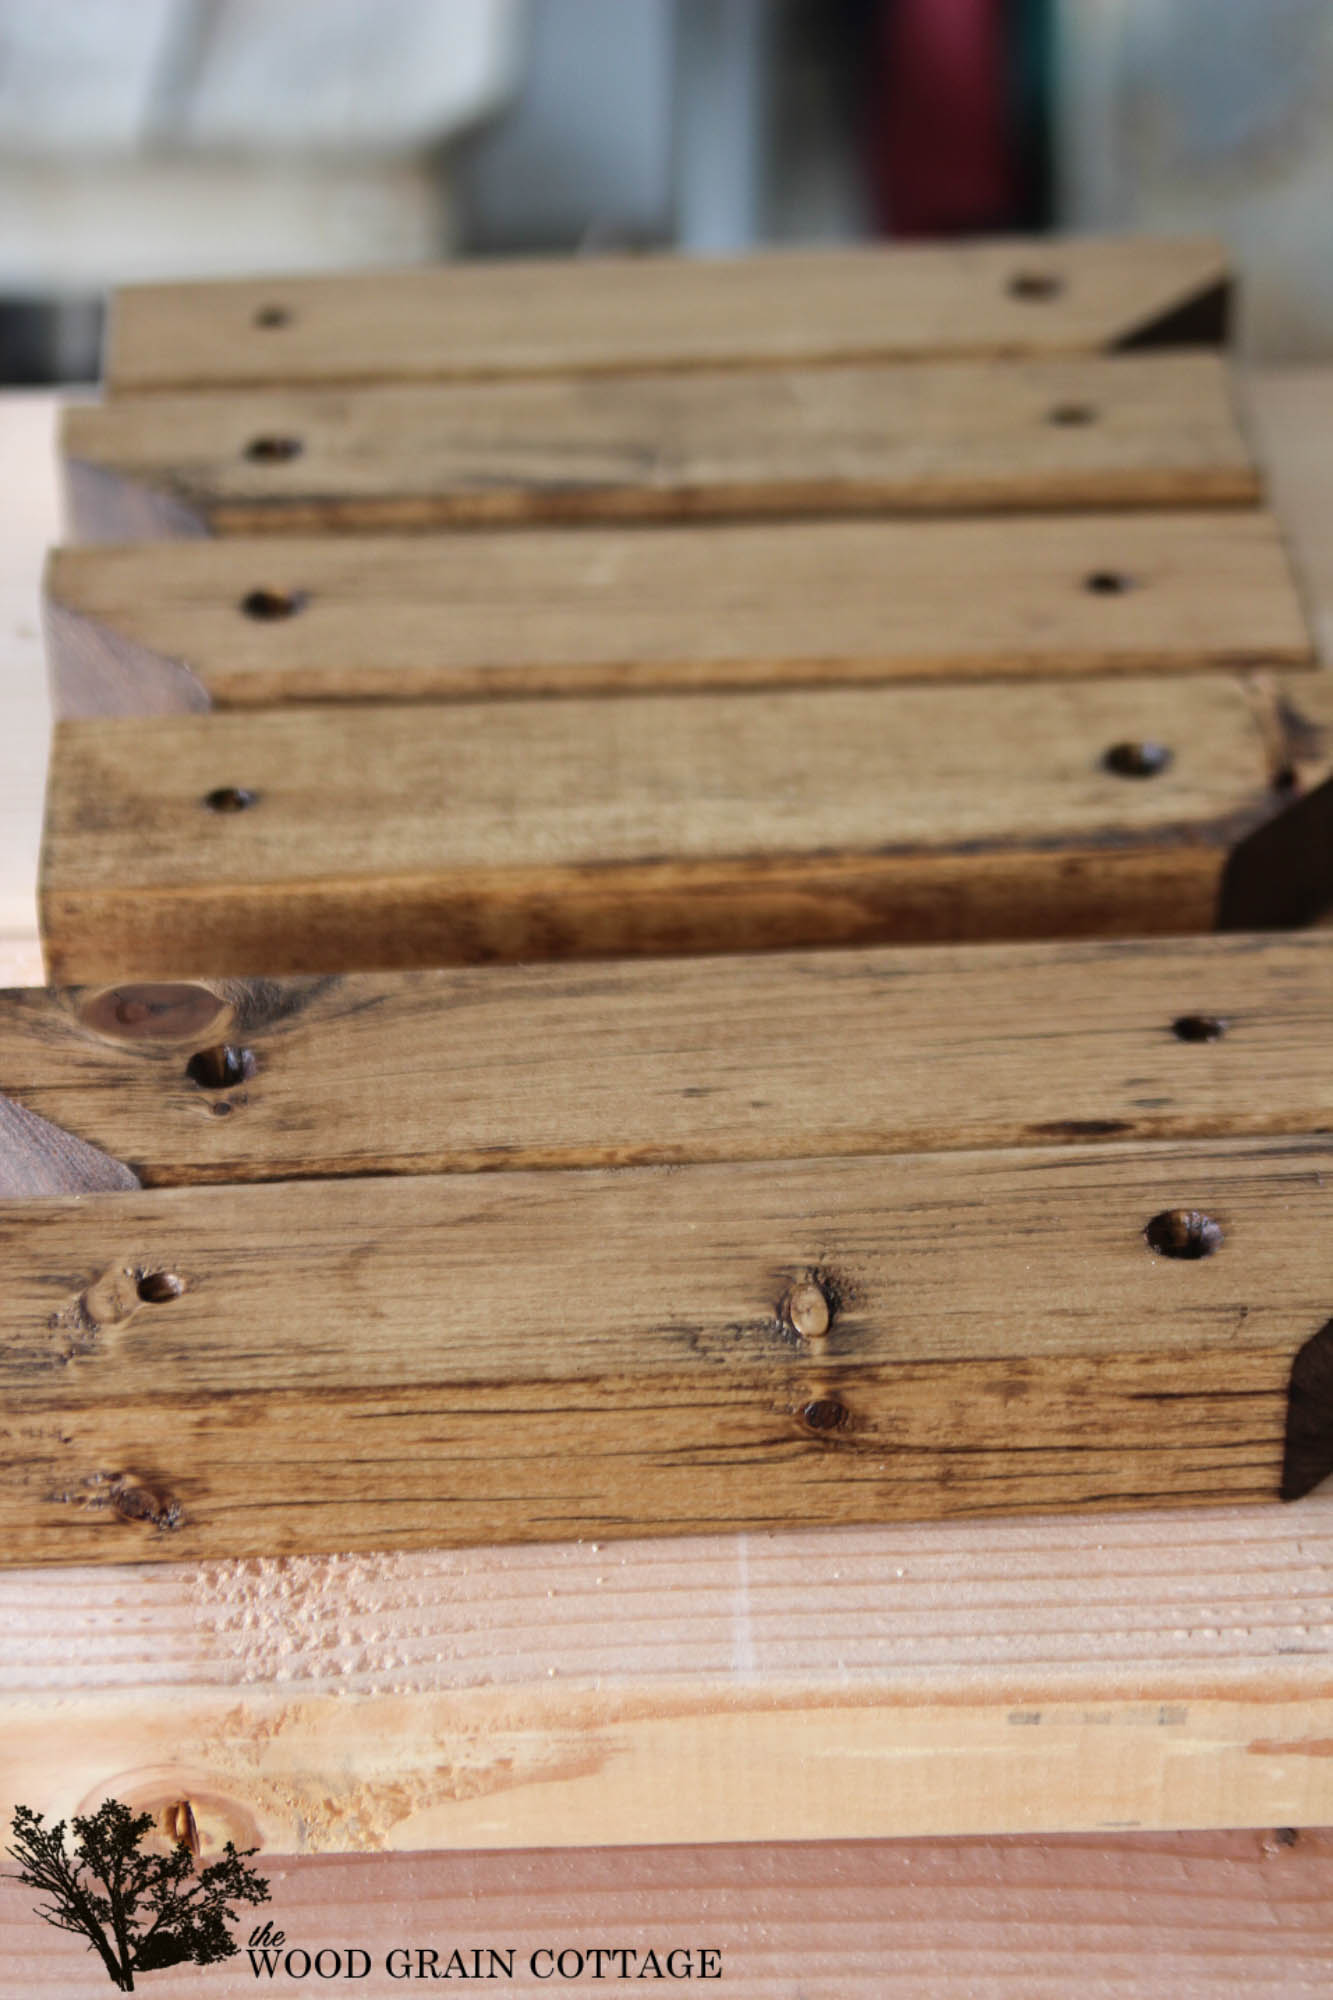
Anthony pre-drilled and countersunk his holes…


Step Three: Stain Shelving Supports
Once he had the holes done, I started staining them with Early American by Minwax…

Here’s what they looked like before we installed them… The smaller hole is for the cabinet screw going directly into a wall stud, the bigger hole is for the drywall anchors that would be going into just sheet rock…
Step Four: Install Shelving Supports
Then, we installed them on the wall. We made sure they were level…

Then used the cabinet screws and drywall anchors to secure them to the wall…


Step Five: Cut Shelving Boards To Size
Once they were installed, we started custom fitting the 2″ x 12″ x 10 ft boards to each section of shelving.
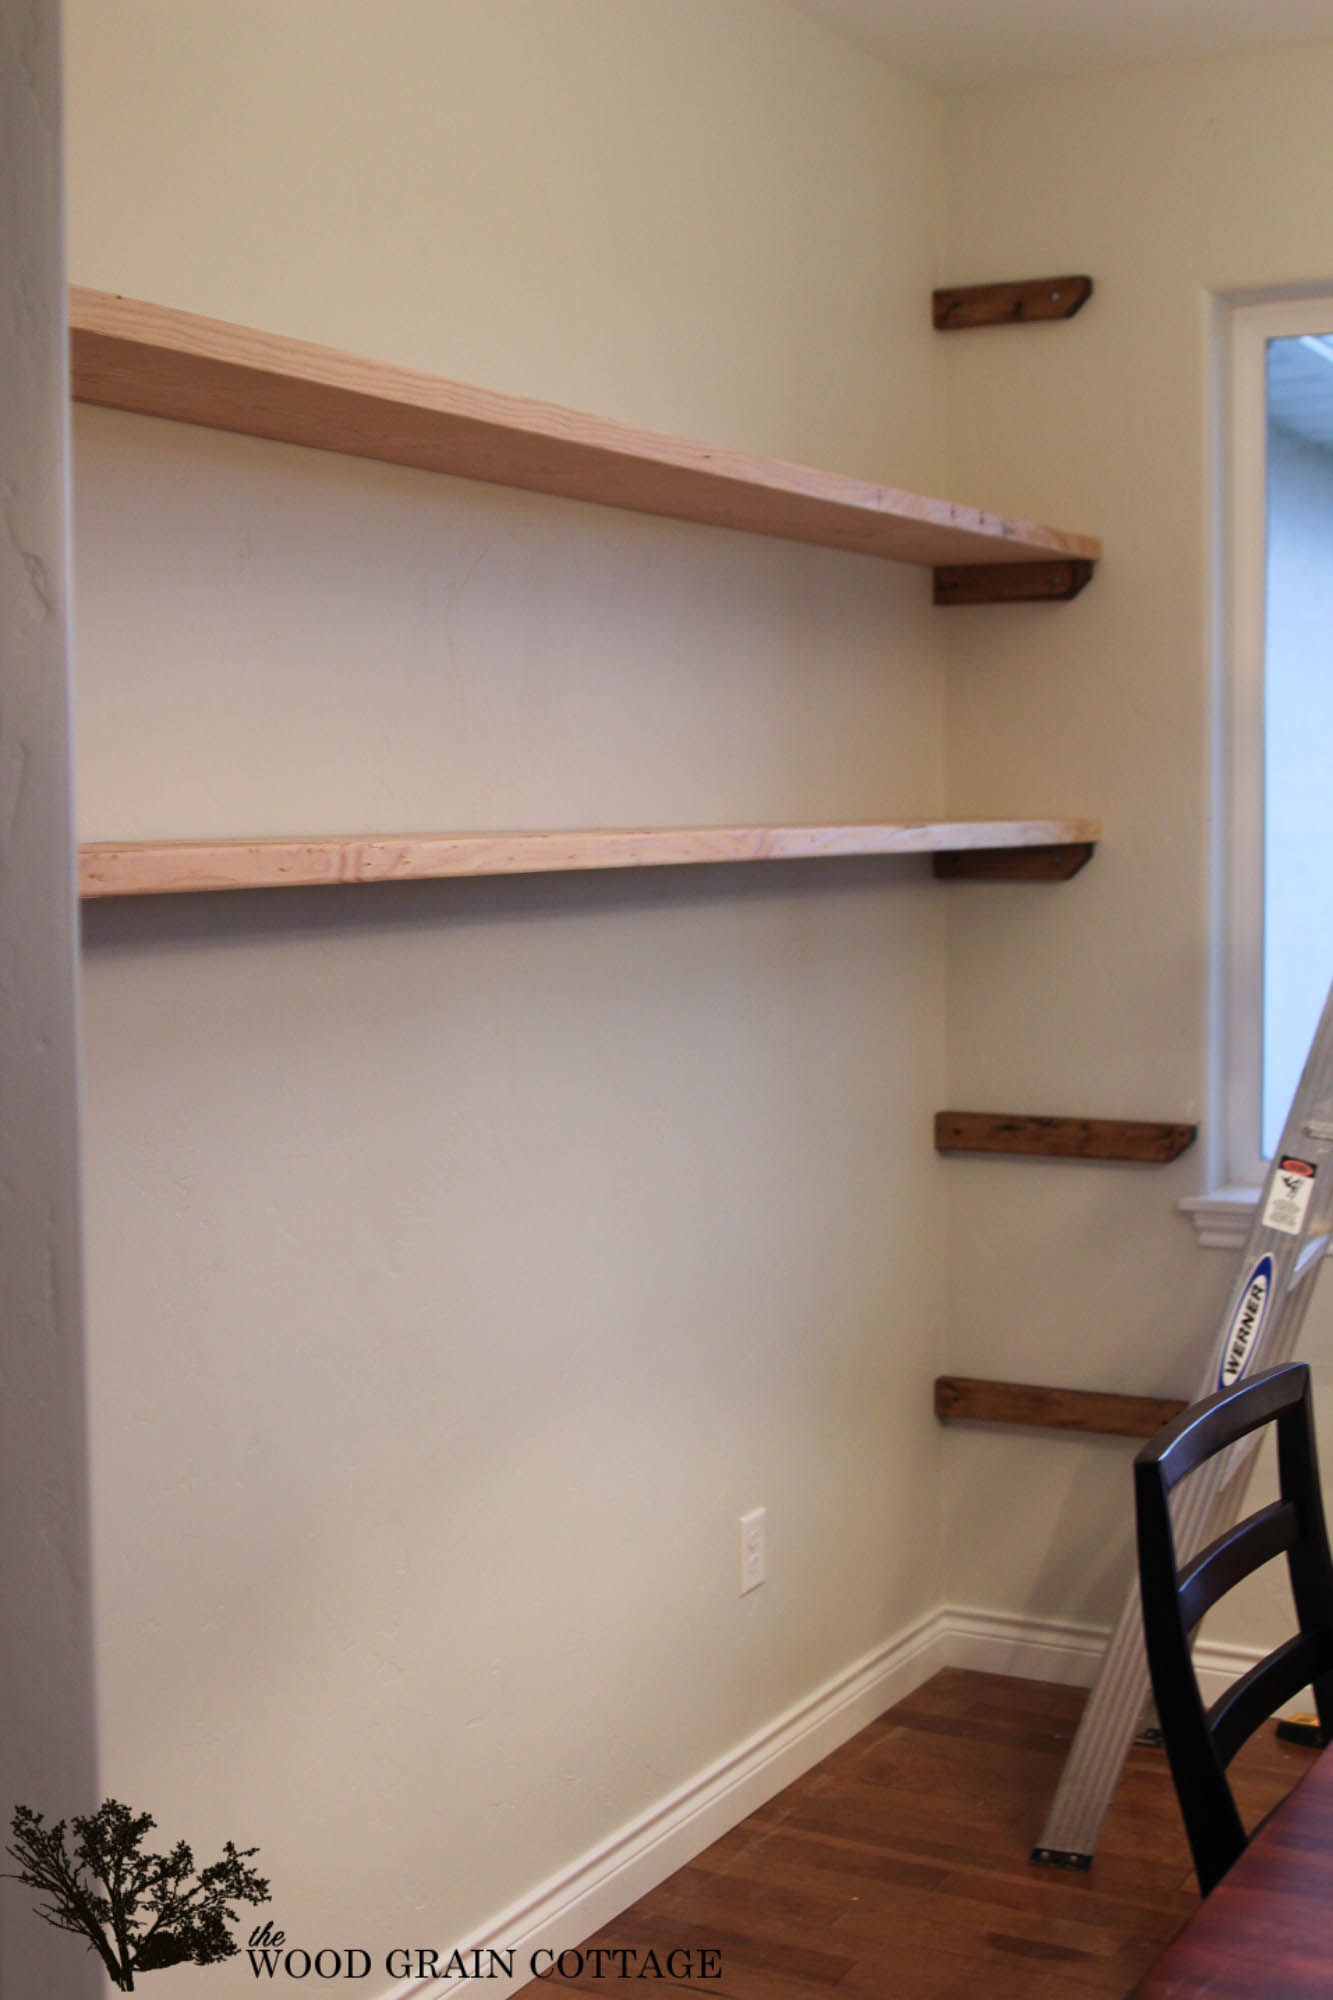
We measured the distance between the walls, then trimmed the actual shelving boards to fit each section…

And because I wanted the lower two shelves to be deeper than the top shelves, we made the side brackets the same depth as the shelves. The two bottom shelves are 18″ deep, and the top are 11″ deep.
For the top three shelves, we used 2″ x 12″ x 10 ft boards, and for the bottom two shelves, we used 2″ x 10″ x 10 ft boards. To make the bottom shelves even deeper than the top 12″, we used TWO 2″ x 10″ boards and placed them right next to each other. Even though we used two 10″ wide boards, the total depth ended up being 18″ because pre-cut lumber is always a bit smaller than it really says. 😀
Step Six: Stain Shelving Boards & Install
After we had each board cut to size, I started staining each them with the same stain, Early American by Minwax. I then used the Dark Finishing Wax from Minwax to finish them.
Then, we brought the shelves back in and Anthony attached them with 2 1/2″ deck screws into the side supports.

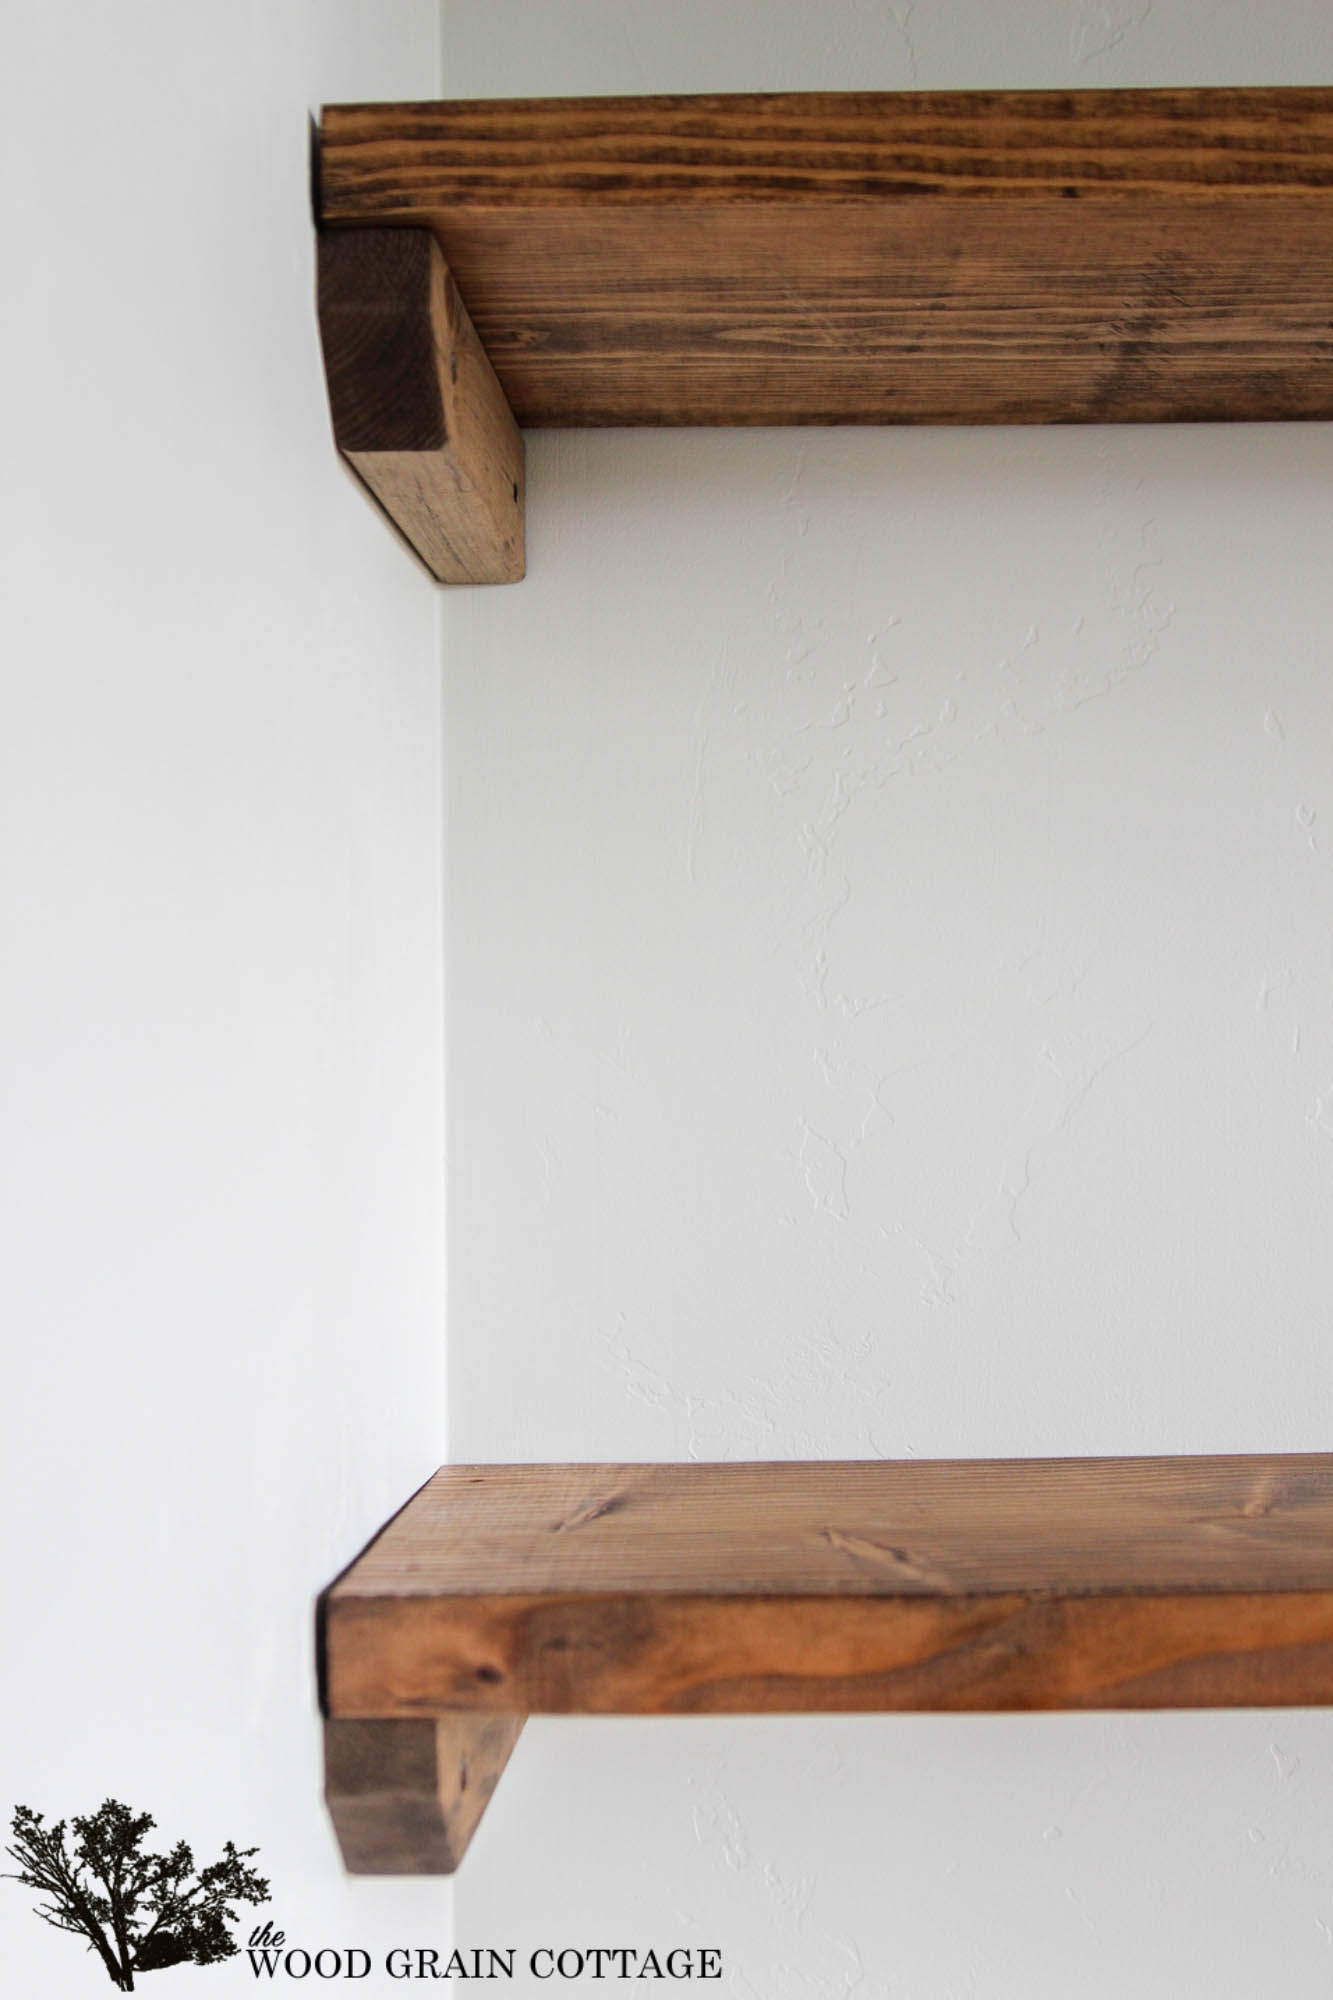
Step Seven: Enjoy!
Once all the shelves were screwed into place, they were ready to use!
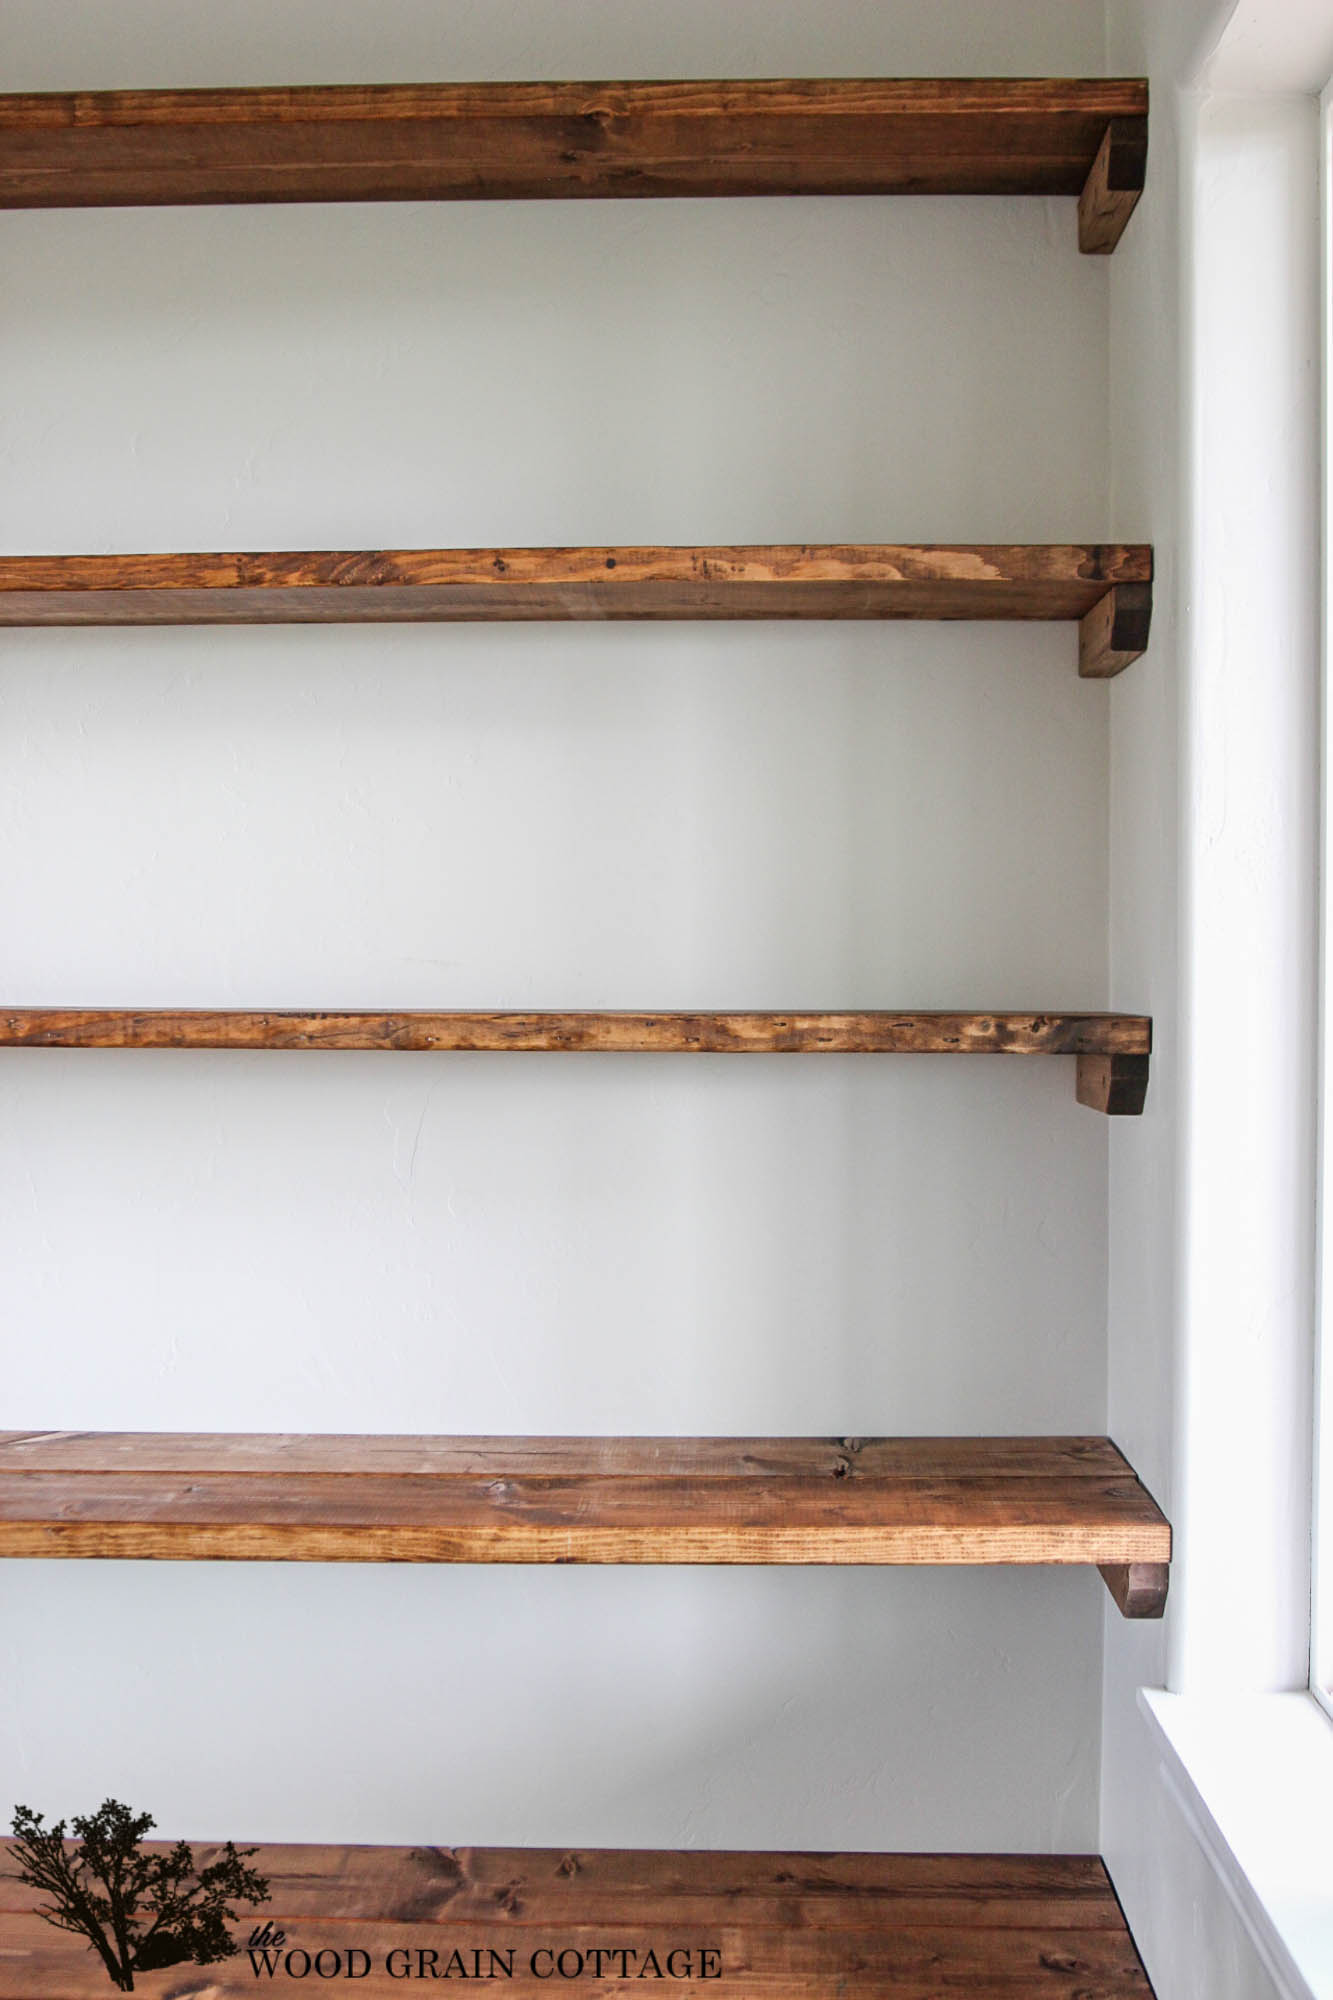
You can see the bottom two shelves are definitely deeper, which I love!

They’ve completely changed the entire dining room and I love it… they add so much storage and area to display my pretties, which I’ll be sharing next week…
Now, for some details:
- We have 9 foot ceilings.
- Here’s the distance between each shelf:
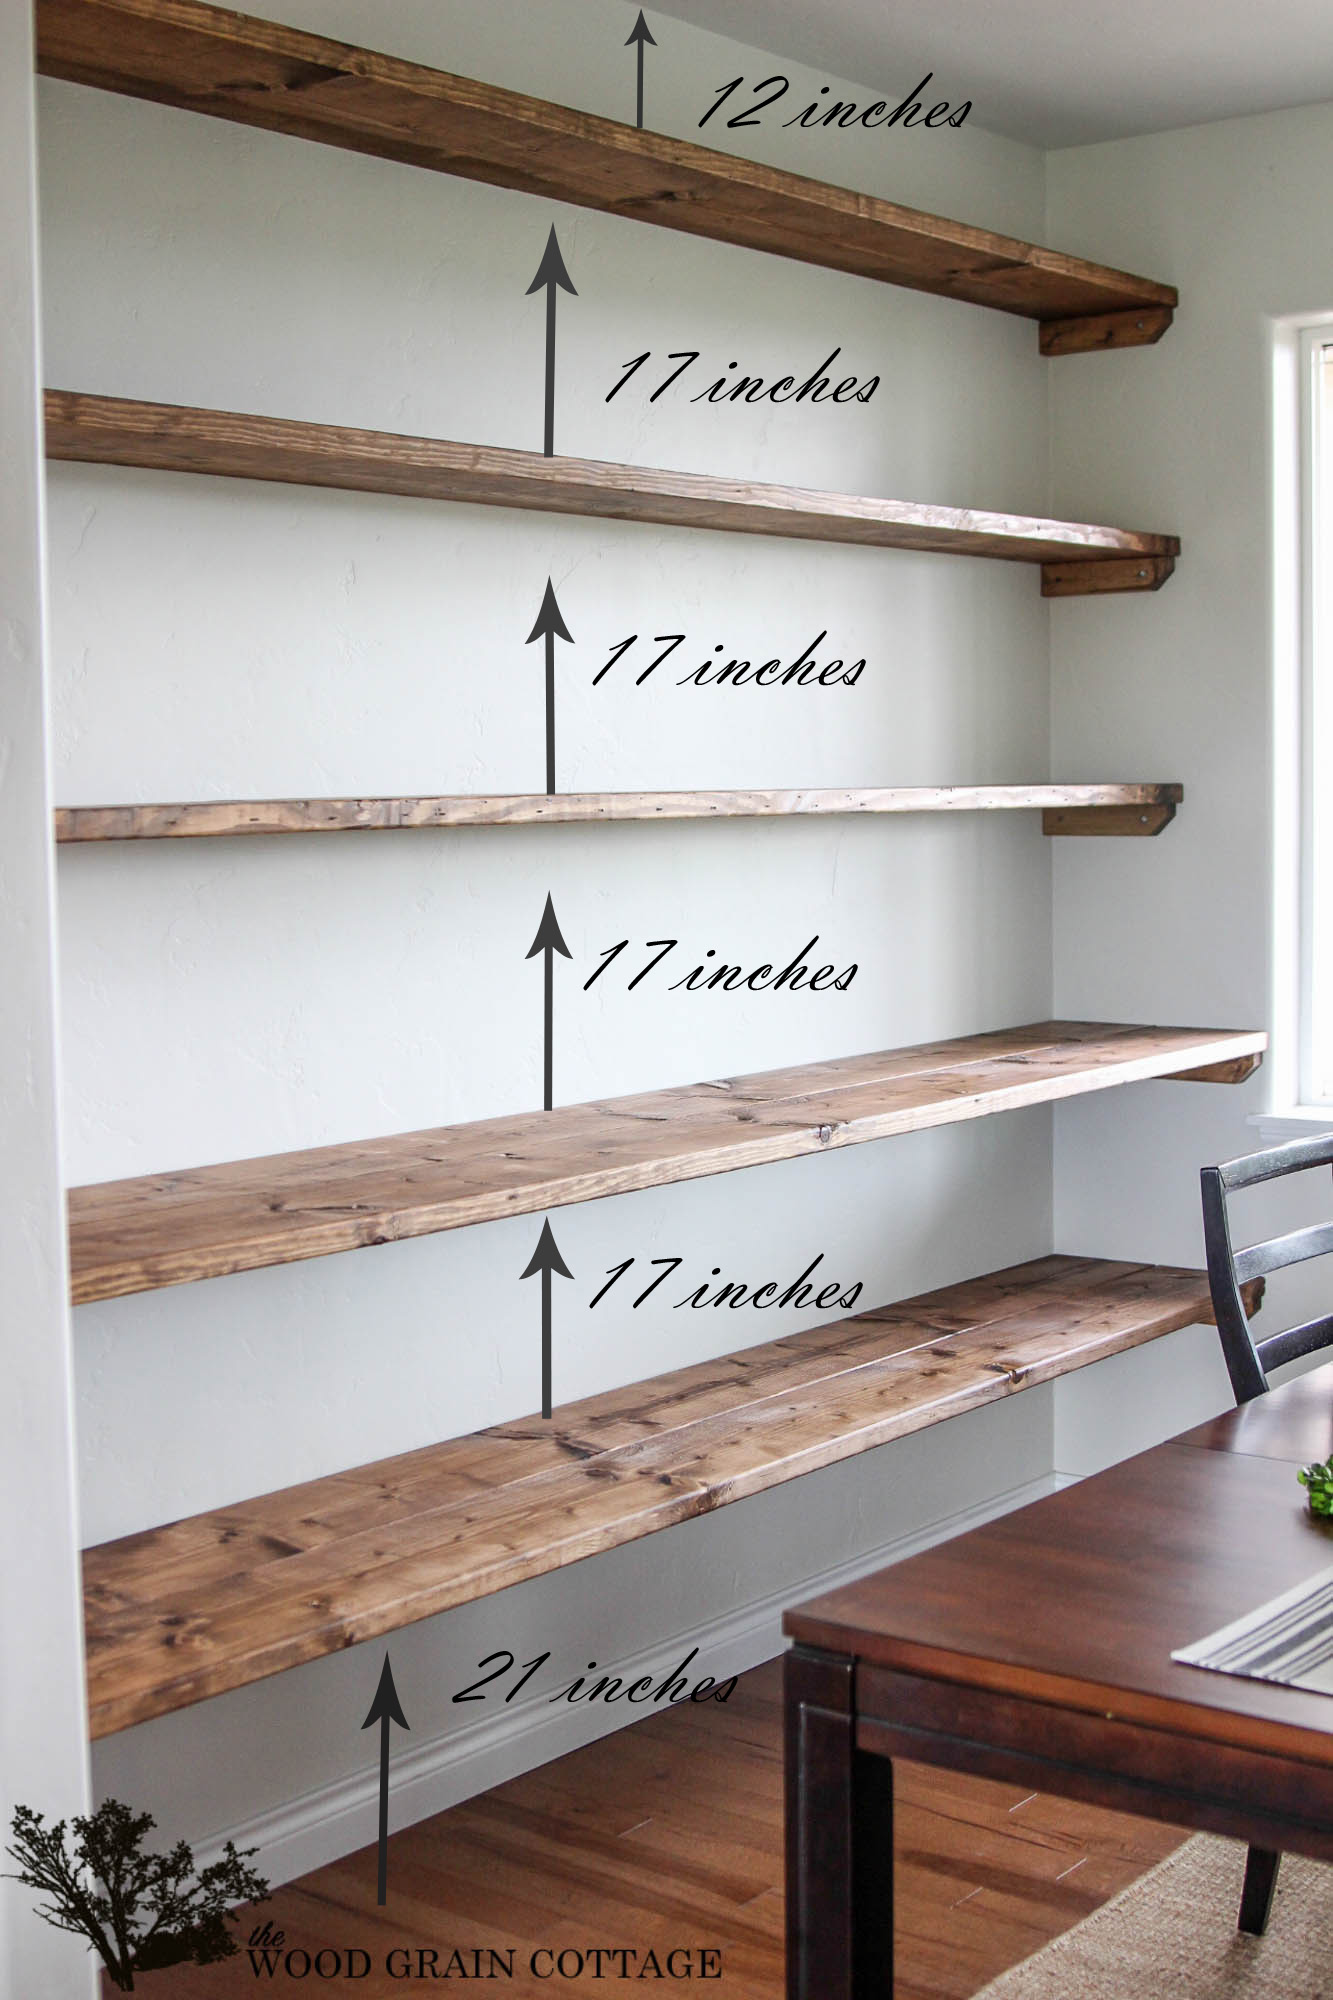
- We started with the bottom shelf and worked our way up. Because we have electrical outlets that run on the back and side of the wall, the bottom shelf has a 21″ distance from the floor. The shelf starts right above the outlet.
- The furthest the shelves stick out from the wall is 18″, which is the same depth as our previous buffet!
- No wall is perfectly straight.
- Yes, the house faintly smelled like stain for a few days, but the weather was great and we had every window wide open for extra ventilation! 😀
- For the cost breakdown, we spent about $145.00!! That includes lumber, screws, a new countersink, and stain! Boom!
- Just in case you missed that, $145 for an entire wall of beautiful shelving… Double boom!
UPDATED TO ADD:
We have had absolutely zero issue with sagging boards in the middle of the shelves. It’s been over a year since we installed them, and they still look just as great as the day they went up!
I can’t wait to show you what they look like now, all filled up and styled… DIY Dining Room Open Shelving for the WIN!
P.S. If you like shelving/ bookcases as much as I do, be sure to check out my pinterest board. It’s all about it!
This is a fablulous idea. I love it and wow, you really do have a ton of storage and the one 18″ shelf looks like it is just the perfect height to be a buffet too if need be. I love this idea.
So you.
Gorgeous!!
I hate you.
But I love you.
Just jelly 😉
They are awesome.
High five Anthony from me – xo Shan
Don’t you just love it when a project that you want to do is also a bargain?!!! It makes it so much more rewarding. I love it and thank you for sharing. Have a fun and happy birthday too.
The shelves look great. The Hubs built some like them, but routed out a groove so that I could put plates and picture frames on them w/o worrying about them sliding off.
I can’t wait to see how they will look w/accessories.
love it and can not waitto see more.
Love, love the shelves. They look fabulous. Your white dish collection is going to look great on those shelves. What an awesome birthday gift from such a wonderful husband. Enjoy your birthday weekend 🙂
Can I have Anthony for a couple weeks…Boom 😉
love them!
Looks gorgeous! 2 questions- 1- are you worried about the middle of the shelves sagging since the boards are so long with no center support? Probably not a concern with dishes up there but just curious if you have son estimate of how much weight these should hold? Also- what type of wood is it? Maybe that makes the difference. Okay I lied- 3rd question- do you spend a lot of time sanding? You stain so much stuff which I love and want to do too, but is find I end up spending so much time sanding that I can’t accomplish much. Do you have a tip on where you buy wood to avoid this? Thanks! Another gorgeous project!
Hi Lacey! Great questions! 😀
1- We are a tiny bit worried about the two lower shelves sagging in the middle. They are stout boards, but with them spanning across 10′, there’s always the possibility. If we notice a problem, we’re going to secure the two boards together underneath, or attach a board along the back.
2- I’m not sure exactly how much weight they will hold, but they definitely hold enough for dishes, decor items, etc. We used really log cabinet screws to be extra sure the wood wouldn’t fall off the wall.
3- We bought the wood at Home Depot. It’s Douglas Fir.
4- For the wood prep, the boards were mostly smooth, so I only sanded the areas where it was a bit rough. For that, I used our electric sander and 220 grit sandpaper. After I sand the wood, I wipe it off a few times, then stain.
I hope that helps! Let me know if you have any other questions. 😀
Hello i would like to do something similar in my husbands office. Could you tell me what kind of wood you bought? Im looking at Oak or pine but not sure which one will give me that rustic look like you have.
We used the standard wood from Home Depot. I believe it’s Douglas Fir. Hope that helps!
I think Lacey is right. I notice that this post is about 4 years old now. These will probably have bowed over time (all of them, not just the ones on the bottom). I wouldn’t span more than 4 feet without some additional support. Fastening the wider bottom pieces together is a step in the right direction, but won’t prevent them from bowing on its own. It will just ensure they bow along with each other. Adding a flat piece anchored to the back wall similar to the ones you used on the sides and screwing the shelves into these supports should keep everything where you want it, and you’ll probably notice the shelves feel significantly more rigid when you place anything with a little heft toward the middle. Just screw in the supports at every stud along the way and this will be rock solid.
Have you added any extra support since you created this post? If so, what did you do?
They look fabulous! I can’t wait to see how you style them! I’ve had to do my fair share of sweet talking the hubby on several projects lately too. I think I owe him several guys’ nights out now. Aren’t DIY-embracing hubbies the best though? Anthony did a great job.
I’d love to see what it looks like full and how you organized everything I love this idea but am debating on if I want to do floating stained shelves (early American is my FAV ever) or putting cabinets on the bottom then shelves 🙂 your look SO good
LOVE, LOVE, LOVE this project!! And I love how you pulled the lower two shelves out further, such a good idea!!
Thanks for sharing! I am definitely going to be making these this weekend 😉
This looks so amazing and it looks ridiculously easy for a DIY challenged person!! I can’t wait to do this in our place!! Thank you so much for sharing <333
I meant to say a diy challenged person like me*** lol
My husband did these for me in a sitting room and I love them. I would love to send you a pic.
If you put a lot of weight on those boards they will bow, I would put some support in the middle, very nice otherwise.
Hello! Got here from Pinterest. Love your shelves!
I was wondering 2 things.
1) in the subsequent months, have the boards sagged? and
2) did you screw the boards from the top, down into the support pieces?
I ask, because if it does sag and they’re not screwed in, it’ll eventually pull off the side supports. That’s a very long span for anything of weight. Ask me how I know…
And, a very plain, perhaps also wood & stained bracket in the middle would solve all that worry. My worry, that is! 🙂
Hi Christine! Glad you found me and welcome! 🙂
Yes, we did the screw the boards into the side supports that we built and secured to the wall. No, the boards have not started to sag even one tiny little bit. They haven’t changed since we installed them in August. 🙂
I hope that helps. 🙂
Nice. I love their thickness. Gotta build some myself. Odd. I built my kitchen cabinets, but I’ve been intimidated by shelves. I should get a grip and get on it!
Thanks for getting back to me!
Merry Christmas!
Just a thought; I’ve been working with wood for a while and it has been my experience that it tends to sag when not properly supported. I would suggest the same type of support that you have on the sides across the back/wall of each shelf and a center support under each shelf that has two boards. They look amazing though for sure! The early American stain is one of my all time favorites.
These look great! Having made many shelves I would brace a small angled 2×3, 45’s on both ends 8″-12″ long in the center, Or angle a few Long screws up from underneath into a stud in the middle Another great trick is to seal the ends or end grain with wood conditioner (shellac) before the stain this will stop them from getting to dark. Then after the stain you could put shellac as a top coat this will seal the stain smell and give a nice finish
Hi
Would love to see pictures of the shelves with items actually stored on them. I like them but I’m not sure how to display items attractively.
Here you go! 🙂
https://www.thewoodgraincottage.com/2014/08/11/styled-dining-room-shelving/
Quick question for you – did you seal the boards after staining? We’re about to stain some shelves and I’d like to skip the poly step if I can. Curious about what you did and how their faring. Thanks!
Hi there! We did not seal the boards after staining them. I used dark wax. Our shelves are still beautiful! Love them! 🙂
I just saw this, and I love what you have done. I do have a question for you. For the upper side support pieces: are both ends of the support piece anchored into studs? If not, how do you work around this? Thanks in advance!
I have this concern as well. The end closest, right up to the wall would drill into a stud, but not the outer part for the second drill/screw. This is a major concern. A screw is only as strong as the wall it’s drilled into.
Thanks for the comment, Jenn. We have had absolutely ZERO issues with our shelving. It looks exactly like the day we installed it. The side boards are screwed into our studs, and we used heavy duty screws… each one holds 100 pounds. The shelves aren’t going anywhere… and I’ve had them full to the brim with heavy dishes, etc. I don’t remember exactly what we used, but these are really close: http://www.homedepot.com/p/E-Z-Ancor-Toggle-Lock-100-Pan-Head-Self-Drilling-Heavy-Duty-Drywall-Anchors-with-Screws-25-Pack-25320/100007784
I hope that helps.
Please show the shelves decorated! 🙂
Are you sure that the top boards are 2×10 and the bottom boards that are doubled are 2×12? To me the picture looks like the 2x12s are p top and the 2x10s are the ones that are doubled up. In any case I like the way these look and am making them in my wifes home office today. THANKS
o man so pretty and so much storage area, I love it… right exotic looking and I love the woodgrain showing through..
What size wood did you use for the bottom shelf?It says two 2×12, but not sure how that equaled 18. Thanks! I am planning on doing this project this weekend.
Thank you!!!!! I could envision my own project in my head but needed more details to execute it. Now I’m on my way. Your shelves are beautiful!
This looks so beautiful! We are wanting to do a similar project in our play room and went to Home Depot and can not find a 2″ x 10″ x 10 foot board. The thickest that they claimed they carried was 1″. The only 2″ boards they had were framing boards. They seemed very rough and splintery to us. Did you special order these or get them somewhere other than Home Depot? Any suggestions you have would be great! Thank you so much!
Thank you so much, Ashley! We use the lumber in the framing section. They work perfect. You may need to do a bit of sanding if the boards are rough, but it’s worth it! 🙂
My hubbs built these for me about 4 years ago for my vast book collection. I’ve since pared down & moved the books into another room, but I’m flummoxed on how to decorate the shelves. Help!
I love this idea! I want to do something similar for my office nook. I’m wondering with this long span if you notice your shelves sagging in the middle at all.
I would like to put art supplies on my shelves but I’m not sure if the boards would sag over time from the weight.
Thanks!
Shannon
Thank you so much, Shannon! I can honestly say that the shelves have held up great! No sagging or warping! We love them! 🙂
Hey!
Gorgeous! Planning on stealing this idea, but perhaps adding wainscoting/bead board to the wall first. Your thoughts?
Confused on the bottom two shelves… you say 12″ which would make it 24″ but then you say it’s only 18″
Please explain!
Thanks again for this beautiful idea!!!!
Also, what is your spacing recommendation for an 8ft ceiling. I see you have 9ft. I’m thinking I might only have four shelves.
Thanks!
Thank you Shannon! Thanks for catching my typo. The two bottom shelves are actually 10″ wide boards. Together, they equal 18″. Also I think bead board would be lovely behind the shelves! 🙂
I love the shelves. My husband and I built these this past weekend. We did find that we needed to add some support under them. Our walls are 12 feet wide so the extra two feet made a difference. We simply added a furring strip along the wall and anchored them into the studs. The shelf just rests on that.
We love the extra room and the light and airy feeling that it creates. We had really struggled with the lack of cabinet space but this is such a better option! I love seeing cookbooks and photos and flowers mixed in with my pretty platters and dishes.
Thank you so much for the inspiration.
As an experienced woodworker I have 4 quick comments:
1. Very nice wall fixture.
2. Two 2×10’s side by side would be over 18 inches. How do you get 18″ width out of two 2×12’s?
3. Ten feet of 2×10 is a long span. Have you since had to add support between the end walls?
4. Suggestion: Next time you need to countersink screws, try making the countersink before you drill; it makes neater holes.
Thanks for your comment, George. We have had absolutely zero issue with the wood sagging in the middle across the span of our two walls! Also, I made a mistake when I wrote down the size of the boards. The two bottom boards are 10″ wide boards. Together, they equal 18″ deep, which is to be expected since the lumber is always a bit smaller than advertised. Also, The top boards are 12″ wide.
In the width of your span could there be a problem with a shelf sagging in the middle? Those are pretty thick boards, so hopefully there will be no problem. The whole project sure looks great!
Thanks Lee! We have honestly had zero sagging on the boards. They looks just as good as the day we installed them… over a year ago now! 🙂
Very nice! I’m planning something similar in my pantry. I would have liked to have seen a picture with the shelves with your stuff on them.
Ive always adored these and thoroughly read this post twice now. Im thinking about copying the look! I just love it!!!
I just love these shelves and have talked my husband into making them for me. For 8 foot ceilings, do you recommend eliminating the top shelf or sticking with 5 shelves but taking a couple of inches from the space between each shelf equally to compensate? Thanks!
Thank you so much, Elizabeth! I think you could do either or. If eliminating a shelf gives you more room to easily store/ display your items, I would go that route. Either way, they’ll look fantastic! I hope that helps! 🙂
I would love to know what the screws you used look like. I am trying to follow your footsteps on a smaller scale and I don’t have studs to screw into. What type of anchors did you use?
We used screws very similar to this: http://www.homedepot.com/p/E-Z-Ancor-Toggle-Lock-100-Pan-Head-Self-Drilling-Heavy-Duty-Drywall-Anchors-with-Screws-25-Pack-25320/100007784?AID=11210757&PID=6158653&SID=ikh5ecqu0a00z44d001rw&cm_mmc=CJ-_-6158653-_-11210757&cj=true
Did you cut the ends of your boards square or did you measure the angles of your not square walls and cut each board at the angle?
Hi Rachel! We cut the boards square, and did not scribe them to the wall. Luckily, our walls were pretty straight, there are only slight gaps. I hope that helps! 🙂
I love how the stain turned out on the wood! What type of wood did you use? I have a poplar beam in my kitchen that I’d love to stain but I’ve heard that stain doesn’t take well to poplar. Any thoughts?
Thank you so much! I *think* this wood was pine, but I’m not 100% sure about it. If I were in your situation, I would test stain a tiny spot on your beam. If you don’t like it, sand it off… no harm done. 🙂
I was wondering where you got those metal milk crates. They look awesome and are exactly what I am looking for
Thank you so much! These are from our family farm, but I have seen them at antique malls and estate sales. I hope that helps! 🙂
I wouldn’t recommend anyone doing this. It won’t hold up to any significant weight and they will sag. The only question is of when. I want a pic of the shelves holding food for a party. How did they hold up??
Thank you for your concerns, Laura. However, our shelves have held up beautifully and they don’t sag in the middle. I often fill them full with heavy dishes (that are very important to me) and we haven’t had any issues. I wouldn’t worry about using them as a buffet for food either. Hope that helps!
Hi,
With that length, is the board bowed down in the middle when you put some load? I’m planning to use it as book shelving.
Thank you
I have filled the shelves with heavy dishes and haven’t had any issues with the boards bowing. If you’re worried about it, you could probably use a L bracket for extra support. They shouldn’t be overly noticeable.
OK — hubby here.
My wife showed me the post and said “I want.”
o, after reading, I had to write. I must disclose I can spell, but this tablet has a way of inputting each letter so slow, even my hen pecking speed is too fast to keep up and i may have major spell issues… After an hour +, here’s my reply:
You all are driving me nuts with your “have the shelves sagged ‘yet’ ” malarchy…
This is a no-brainer — who can deny gravity over time?? <> So —
If you dare — just go ahead and ask ANY woman about gravity — and they will inform you of the reality of the physics of gravity over the variable called time…?!!
After several months of debate over the built ins surounding our gas fireplace insert, in particular: to float or not to float the shelves, we came across your post\ pin..
As above, gravity WILL win.,. Eventually – I Guarantee that!
So your choice to proactively address the situation are:
a. Flip the shelving board every now and again – iis nice if the shelves are to be used for seasonal decoration (and especially more so when your wife is a Gemini, like mine) where the contents are regularly shifted or otherwise changed…
b. If you plan (or are choosing an installed decorative edge banding like we are) you’ll want to make certain it’s symmetrical or otherwise maintains an acceptable look when flipping the shelving board… If that is a concern.
With greater length shelving you always have the “easy” option of placing a decorative trim mold, such as, but not limited to a colonial style window stop or larger (2-1/2″ windown trim) or other full length support parallel at the wall side under the shelf for the required additional support —
BUT that creates other issues:
a. It takes away from the perception of a “cleanliness” that say a similar, much more time and cost intensive floating shelves look would otherwise provide;
b. If your shelves are similar to ours, where they are not rectangular (from top view ours are triangular to accomodate a pocket door on the left side of the shelf) and as such, flipping is not an option.
AND so then,
you must again revisit your consideration of what the intent\ purpose of the shelf is.
To be robust against sagging, you must answer the question of “How much weight is to be placed <> edge of the shelf?”, as that will also tweek the outside of the shelf with the gravitational pull (that reportedly is yet to happen with the originator here)..
Alternatively, there are other options here that should preserve the ” clean” look of bracket less shelving:
1. (Using Cabinet style stainless steel screws and/ or predrilling to use small head screws):
Toenail the (pre-combined into one) boards to the wall at the studs. (Note – you will loose the ability to flip the shelving boards later and\ or have work to cover the toenail screw hole and any damage caused by the remove\ replace of said toenail screw).
2. Pre-Drill through the depth of the shelf to provide opening access to countersink a #8 or #10 wood screw into the width of the shelving board(s) so as to grab the later half or third of the width of the board, securing the shelf at each stud location(s) and then cap the holes with wood filler or wood plugs and spot-finish the prefinished shelf boards with the final finish sealant coat, as required.
I’d love to be able to get back here to post a photo(s) of our situation(s) and challenges we have had to face in our built-in design build as they have been at (Each and Every turn of our project) and way above and beyond belief…
We are also incorporating built in cabinet bases, one side of fireplace has a tilt up desk top so as to cover e computer it will house and have a office work station in our living room because, well, everything is short on space here in our rambler (ranch) style home.
We also have a Real granite faced fireplace surround with Real stone heart and floating mantl.
, oh yeah, Of Course, don’t forget a gypsum top over fireplace to hold a 60″ Flat panel TV.,. That we had to hide all wires to to…
And we incorporated recessed lighting in the ceiling above with Remote Controlled LED warm color (2700 Kelvin) dimmable lights that will link to our hub for IOT home upgrades
— and Of Course —
the ceiling and (former) walls were Plaster!! where (of course!!) We have vermiculite insulation above, ALL covered with a wood sub floor and rug for storage in the gable above the living room..
To frost this cake here — instead of making inset wall shelves on the adjacent, load bearing wall, we decided to carve out an opening and install a pocket door (so we could later change the entry from garage to kitchen for a later planned kitchen remodel and still have access to the staircase to the basement), where ((of course)) the 100amp sub-panel feed had the to then and by this time also and, likewise be extended and re-routed…
Ya feel any pain here yet??
I hope this helps with the questions of a “potential” gravitational issue here… after all, its not nearly as painful (or abrupt), yet is sure as “It CAN’T HAPPEN ANY OTHERWAY!” ?
Best regards,
I remain,
Ck
IN LOVE!!!
Question…
What’s the demensions of your room. Sorry if you answered this already.
Our dining room is 10′ wide x 11′ deep. 🙂
Me gusta mucho voy a intentarlo pero necesito la traducción en español, puede ser ☺️☺️
Love the way your shelves turned out! And thanks for taking the time to photograph and post about them, clearly you’ve inspired a lot of us to follow in your footsteps!
I’m working on a set now for my office and had a few questions. Did you have any issues with warping on your boards? I’ve purchased 10 douglas fir framing boards from Home Depot, which seems to be what you did as well, for my shelves and picked the straightest ones I could find but they still aren’t totally level. I’m a little nervous to use them as-is, but I’m not sure it’s worth the huge amount of effort it would take to take all the warp out, especially if your boards were similar and your project wasn’t negatively affected. I’m hoping your boards were similar, not terribly warped but definitely not 100% level, so that I can rest assured it can still turn out ok. Thanks in advance for any tips!
So sorry for my delay in getting back to you! I hope your project turned out great! The boards we bought were not 100% straight (are any of them really?), but they also weren’t terribly warped. We picked the straightest boards we could find… We haven’t had any problems with them, like any, so I’d say this project has been a good one! Hope that helps!
Hey Shayna! Love the blog! Those shelves look so nice. How do you keep them from getting dusty?
Thank you for posting this. It was incredibly helpful in a home project, and yours turned out beautifully.
If the boards do sag, just turn them over, crown up.
When did you apply the dark wax? How did you apply?
Thanks much!
I applied the dark wax after I stained the shelves. Because there were so many shelves, I probably used about 1/2 can. I hope that helps! 🙂
I have had this pinned to my board for years and on Sunday I finally did it! Apparently all I needed was a quarantine to tell me not to leave my house to get things done. They look AMAZING. I was even able to do them all by myself! (Having the lumber delivered doesn’t count) Thank you!!
I just came across this post, thank you Pinterest. Can you tell me what kind/type of boards you used? I want something similar to this on a smaller scale and a total newbie. What kind of wood boards did you use? It’s beautiful!
Thank you! I’m so glad you’ve found inspiration for your own project! We didn’t use any special type of wood, just what’s found in the lumber section at Home Depot. I believe it was Douglas Fir. I hope that helps! 🙂
Could you please share how you styled these!? I just bought a house with the exact same shelving in the dining room and I’m at a loss for how to make it look good.
Super helpful! Looks absolutely beautiful