
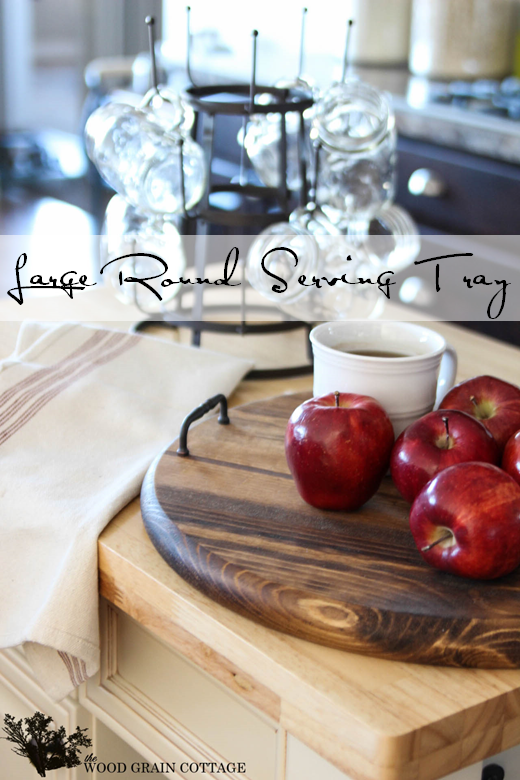
DIY Large Round Serving Tray
This DIY Large Round Serving Tray is such an affordable, easy project that can be used in so many ways! It’s also a great beginner project!
Hi there! Today is the first Thursday of the month, so that means it’s $30 Thursday!
In case you’re new here, April from House by Hoff, Jen from Migonis Home and I team up to bring you simple and affordable ideas that you can recreate for $30 or less! We have so much fun coming up with ideas…
To start off the new year, I decided to make a DIY large round serving tray…
This was such an easy and affordable project!
I started by buying a large 18″ round board and two metal pulls from Lowes (here are some similar ones!)…

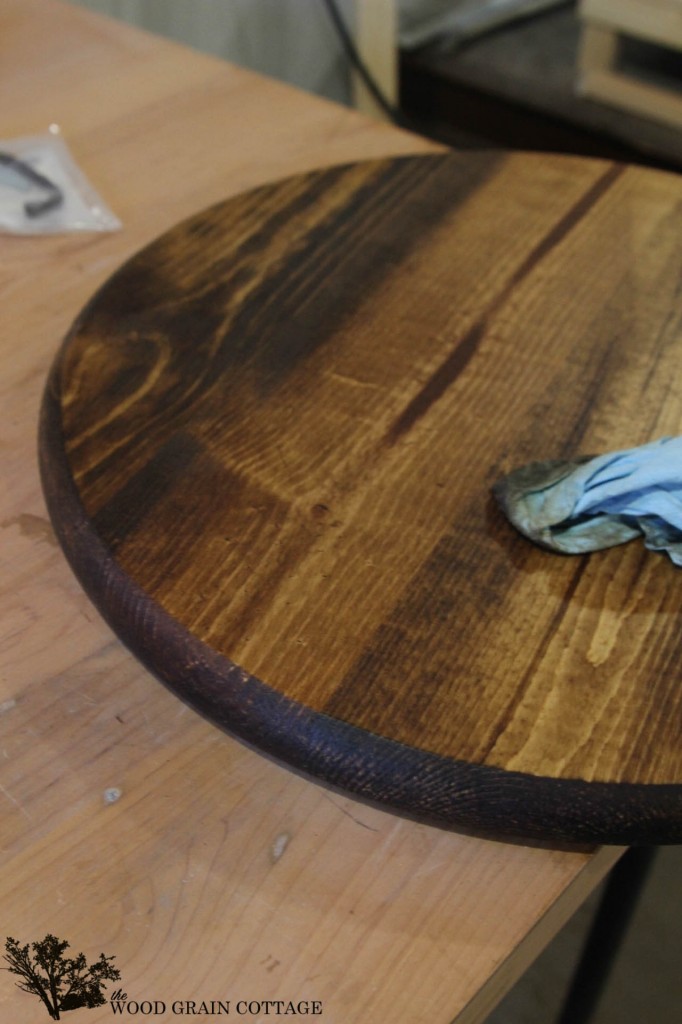
The wood was ready to go, so I stained it with Provincial by Minwax…

Once the stain dried, I applied a few coats of dark wax…
Once that had dried, we drilled the holes for the handles…

Then attached them….

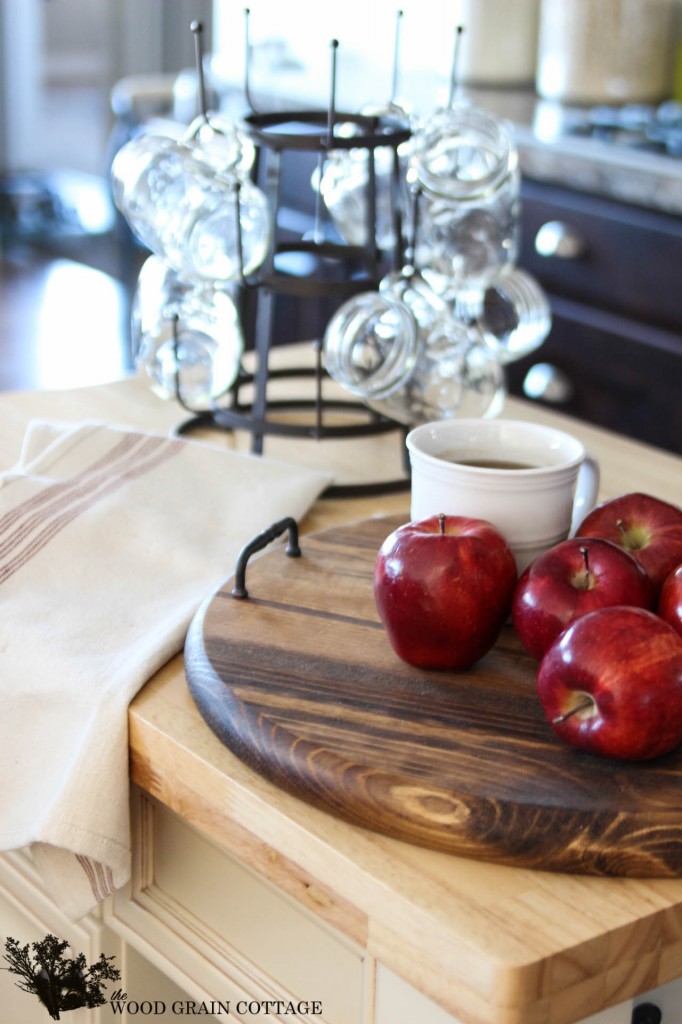
I told you it was easy! But just because it was easy doesn’t mean that it doesn’t look great… This tray is absolutely beautiful!

I love, love, love the variations in the wood…
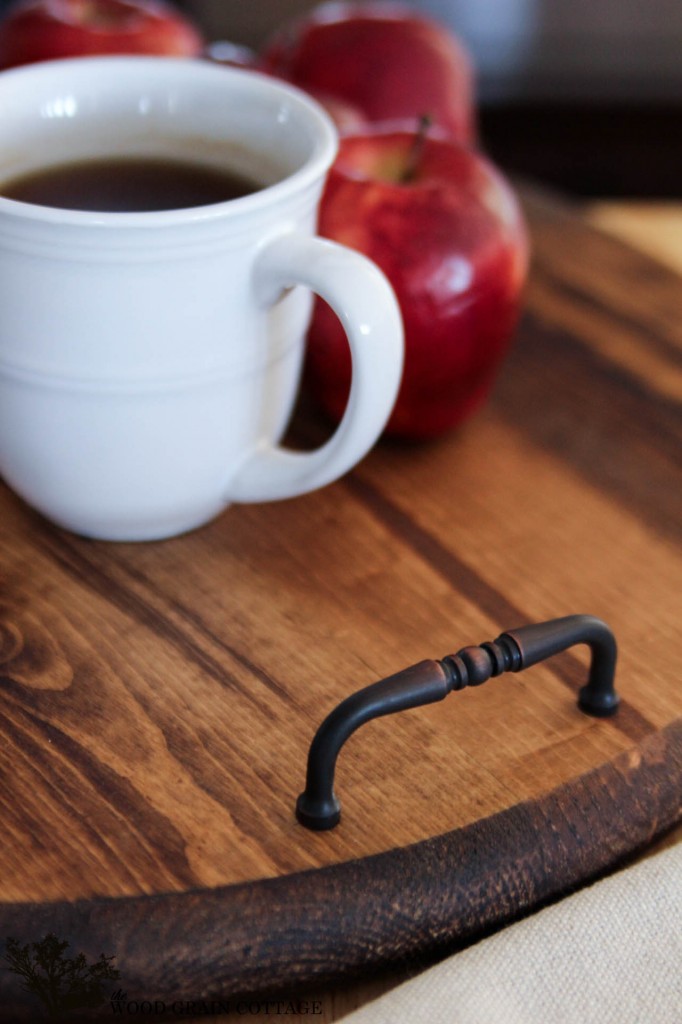
And the simplicity of the handles…
And the size!!
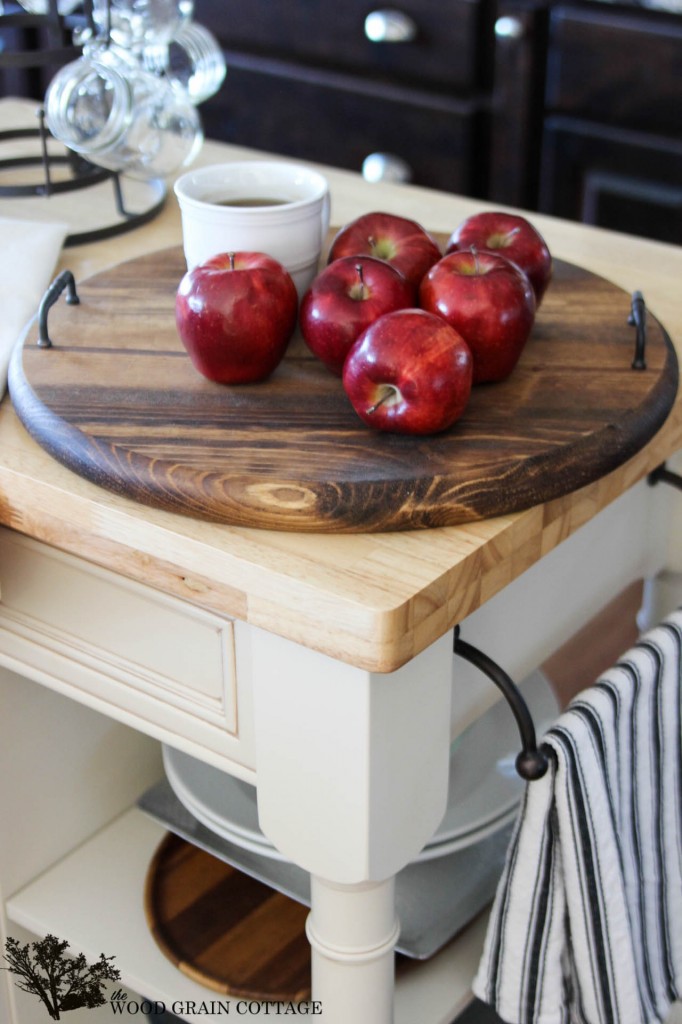
It’s also really thick and substantial, which gives me another reason to love it!

The handles are pretty fabulous too!

And I love that they stick up enough to be noticed…
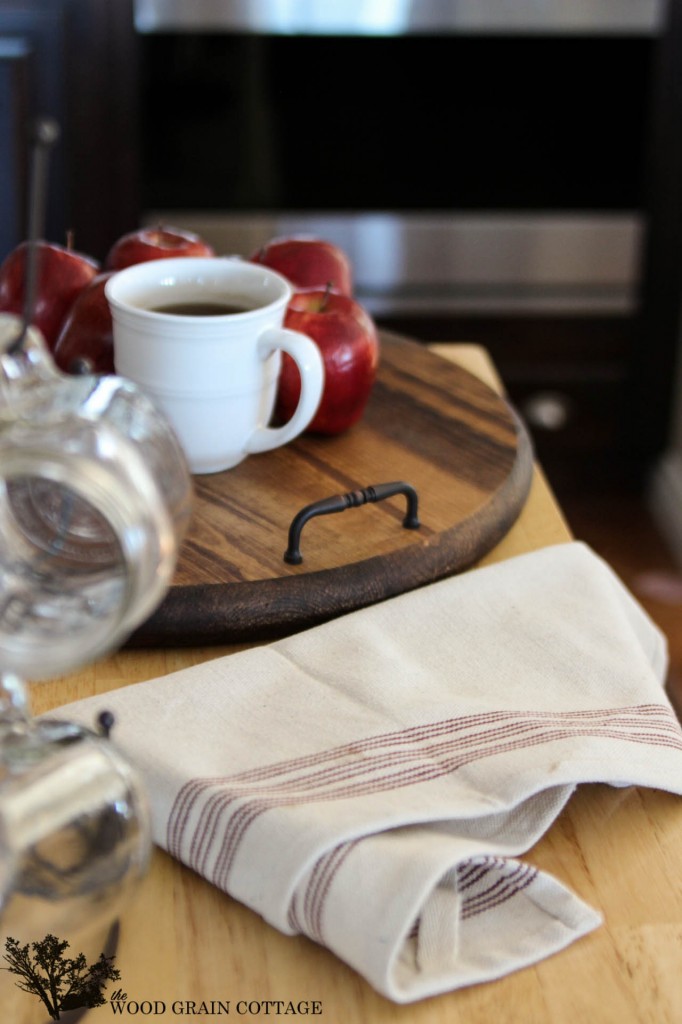
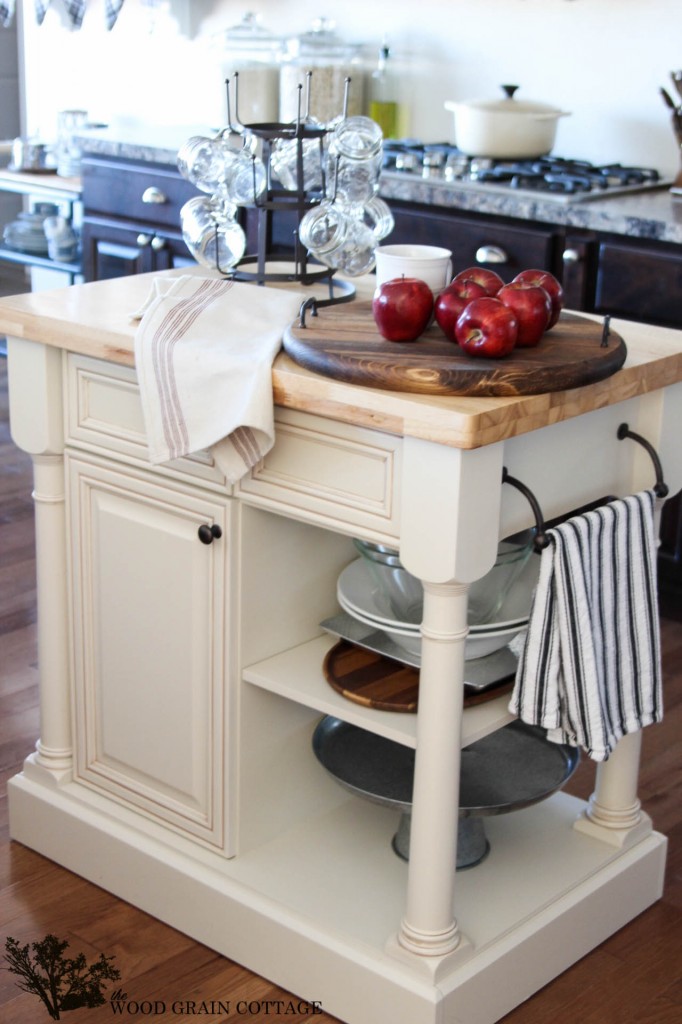
It’s going to be such a versatile piece, and I can’t help but love the way it looks with apples…

It’s just yummy!
Simple and beautiful, just my style!

Here’s what April and Jen came up with…
April made this lovely winter photo display, I just love how it looks!

And Jen created something completely fabulous with clearance Christmas ornaments…

And just in case you want a few more ideas, check out our $30 Thursday pinterest board. We’ve got a ton of fun & easy projects that can be made on a budget!

Love it! I bet Mr. Wood-gran loves it too! lol
THANK YOU so much, Diane! You’re exactly right, Mr. Wood Grain definitely loves it! 😀
-Shayna
Shayna I love this project!! The wood looks beautiful, you can use this anywhere too, very cool 🙂
xo, Tanya
THANK YOU so much, Tanya! I love it too! And you’re exactly right, it can be used anywhere! 😀
-Shayna
So the handles are attached by screws from the bottom of the wood?
Hi Mary! Yes, we attached the screws from the bottom! 😀
Hope that helps!
-Shayna
I love this!!! might have to try to make my own (: I already have three serving trays so hubby might question the need and I will just show him to here (;
THANK YOU so much, Brittany! I have quite the collection of serving trays, but is there really ever a limit? Send your hubby my way and I’ll do my best to convince him! 😀
Happy weekend!
-Shayna
I love love love this idea too! Perfect for serving or arranging things on. Thanks for the inspiration!
Awe, Yvonne! THANK YOU so very much! 😀
Happy Weekend!
-Shayna
Great idea and it’s beautiful!
xo
Pat
THANK YOU so much, Pat! 😀
-Shayna
Very cute!! I also like your cup rack where did you get it?
THANK YOU so much, Michelle! 😀
I bought the metal drying rack at Cost Plus World Market! I looove it!
-Shayna
So pretty and practical! It really does look like it’s straight out of a PB catalog!
THANK YOU so very much, April! 😀
Happy weekend!
-Shayna
What a super idea!
THANK YOU so much, Kara! 😀
-Shayna
I love it very much too Shayna! 🙂 it’s pretty and you can use it anywhere around the house and because it’s wood; with a natural color; you can display it every season 🙂
& wish you a beautiful, happy new year 2014 !!! 🙂
THANK YOU so much, Ingrid! I agree, it’s so versatile and it will look great with everything! 😀
Happy New Year!
-Shayna
Very nice! I’ve seen those wood rounds at Lowe’s before and wondered what I could do with one! Thanks for the inspiration!
Tania
THANK YOU so much, Tania! I’m so glad you’re inspired! Now you must make one! 😀
-Shayna
What a great idea. This would make a great house warming gift,hostess gift or even a shower gift paired with some vintage glasses. Love it. Pinned it. Now I just need to make it. Thanks for the inspiration.
THANK YOU so much, Michelle! I’m so happy you’re going to make your own! And I totally agree, it would make a perfect gift! 😀
Happy weekend!
-Shayna
Where can I buy the black bar you are using for a towel bar on your center counter?
Like your ideas!
THANK YOU so much! The black towel bar came on our kitchen island, which we bought at Home Depot. 😀
I hope that helps!
-Shayna
Shayna: Are your trees in the buckets fresh? Growing trees?
Tell me more! Details, please
Hi there! Yes, our little trees in the buckets are baby growing trees. Since we just built our home, we don’t have a ton of landscaping! I thought it would be fun for us to buy a few of these trees every Christmas, then plant them in the spring. We could sure use the wind break! 😀
In the mean time, they’re getting a bunch of extra attention! 😀
Happy Weekend!
-Shayna
Hi,
Visiting here from Savvy Southern Style. Love your kitchen and that tray is great!
THANK YOU so much, Penny! I’m so happy you stopped by! Welcome to The WGC! 😀
-Shayna
Love it, & YOU!!! Lol;) You’re such a creative momma, Shayna!!! Beautifully done…blessings & <3 M
THANK YOU, M! Sending BIG smiles your way! 😀
-Shayna
Love this! You’ve got fabulous style! XO
Christy! THANK YOU so very much! 😀
-Shayna
I love this and will be making one of my own. Thinking about glueing a lazy susan to the bottom for my breakfast table. Do you think that would work?
THANK YOU so much, Carolyn! Yes, I think gluing a lazy susan would be perfect on the bottom of it! Love your idea! 😀
-Shayna
Hi Shauna,
I love your house and all your ideas. Where did you get your kitchen island?
Jill
THANK YOU so much, Jill! We found our kitchen island at Home Depot. They have similar islands on their website.
I hope that helps! 😀
-Shayna
Thank you. It’ll check it out. We just built a new home also. Lots of fun. Thanks again. I will be watching.
So I went to Lowes site and looked up the price for the board and the cheapest one was $94. I typed on the words that were on the board in your pic . what did you post for yours?
Hi Jenn! Oh goodness, $94 for that board?! Wow! No, I spent $12 on mine. I bought mine in the store.
I hope that helps! 😀
Shayna
New follower to your site…you have wonderful taste and great ideas…looking forward to following along. That plank wall in your dining room has me thinkin!! Now,,,just to bounce an idea off the hubby!
THANK YOU so very much, Dawna! I’m so happy you found me! Welcome to The WGC! 😀
-Shayna
Hi Shayna-
I’m going to make this for my husband for Valentine’s Day,
He works from home and has this small cutting board that he piles his breakfast on every morning.
(3 eggs, 3 pieces of toast and jelly) can not fit that on a 8×5″ cutting board…
This is perfect for him.
Thanks for sharing-
Have a wonderful day.
Rose
OH, Rose! This will be such a perfect gift for valentines day! And it’s the perfect size for his breakfast too! Enjoy! 😀
Happy weekend!
-Shayna
I pinned this the first day you posted this project and just got around to making two of these! Such a great project! I see Christmas gifts coming! Thanks for the inspiration.
This is beautiful! I want to make it with an initial in the middle. Not sure how to do it though. Any ideas?
Thank you so much! I would probably trace on the initial you’d like to add, then hand paint it! Hope that helps! 😀
haha…my question was for the purpose of serving food on it. I decided to use a leafing paint and seal it with wax finish as suggested. However, can this be washed without compromising the wood or finish?
This is beautiful and I bought my round wooden board today. I too, was wondering about the wax. Dark wax you said, but what type? I will need to buy it.
Thank you,
Karen
What a great idea! Im heading out to lows right now! Your instructions say dark wax…and specific brand you used? Also, I got one of those cup racks at World Market a few weeks ago and only considered putting mugs on it. I have to say it looks much better with glasses 🙂 Are those Mason jars with handles you have? Where did you find them? Again, I love this serving tray! Bleassings ~Christy
Hi, very lovely. I was curious to see the underside of the tray. Did you use flat head screws? I’m guessing you left the screws showing?
Thank you! Yes, the screws are recessed into the back of the tray. If the tray were flipped over, you’d see the screws on each side of the tray. I hope that helps.
Hi, what size handles did you use?
Hi, Love this.. what size handles did you use?
I love this!! Its absolutely beautiful. I did have a question you said you used 2 coats of dark wax? Why not a poly? How long did it take for the wax to dry??
Thank you! The wax dries as soon as you buff it onto the wood, and adding multiple layers will only darken, or lighten the wax depending on the combination of wax colors you use. You could easily apply a couple coats of poly instead if you intend to use it consistently with water. I like wax and the finish it gives the stained wood, but it’s up to you. 🙂
Did you use a food safe stain ?
The stain I used was not food safe. If you want to use this tray for food, you can either use a food safe stain, or make sure you use something like parchment paper or a plate.